Attaching & removing 3 point implements

   / Attaching & removing 3 point implements #22  
When you arrive at the point to insert a Draw Pin into each clevis, or push the Lower Links over an "open" Draw Pin, lube the Draw Pins with graphite. There is both "wet" graphite spray and "dry" graphite spray. You want "wet". Not only is graphite a good lube which does not attract dust but it will also furbish the Draw Pins, removing dirt and polishing them.

Graphite is very slightly hydroscopic. In high humidity Florida, Draw Pins sometimes develop a thin "haze" of oxidation, which can be wiped off with a thumb it is so slight. The Draw Pins remains lubed, extremely smooth and easy to insert.
 
   / Attaching & removing 3 point implements #23  
I use a combination of assist aids. One is Pat's Premium 3-Point Quick Change Hitch available at Tractor supply and other places like Northern Tool, etc.

I adjust sway stabilizers so the swing in only as far as they should and I use a bungee cord to keep them there, back up to the pins, lift 3PH, click we're on.

On some attachments I have made a special pallet to put under the attachment. I can use a pallet jack to roll the attachment into position on the shop floor, raise the 3PH onto the pins, click, we're on.


.
When you arrive at the point to insert a Draw Pin into each clevis, or push the Lower Links over an "open" Draw Pin, lube the Draw Pins with graphite. There is both "wet" graphite spray and "dry" graphite spray. You want "wet". Not only is graphite a good lube which does not attract dust but it will also furbish the Draw Pins, removing dirt and polishing them.

Graphite is very slightly hydroscopic. In high humidity Florida, Draw Pins sometimes develop a thin "haze" of oxidation, which can be wiped off with a thumb it is so slight. The Draw Pins remains lubed, extremely smooth and easy to insert.
 
   / Attaching & removing 3 point implements #24  
I use an attachment that stays with the tractor its called a quick hitch it has to u shaped brackets at bottom that have spring loaded latches and then for the top link it comes with a hook or can use a link can hookup to box blade and never get off tractor and the same for disconnect I pay 100 dollars for mine tractor supply has them for about 230 dollars for cat 1
 
   / Attaching & removing 3 point implements
  • Thread Starter
#25  
Re: Attaching & removing 3 point implements UPDATE

UPDATE:

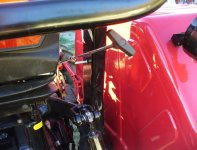
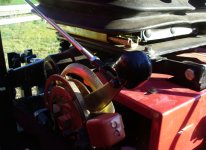
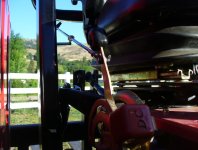
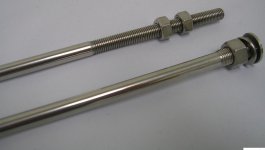
After installing a prototype control mechanism and using it for awhile, I decided to fabricate a more robust system using a T handle, brake yoke and a chrome plated 32 Ford radiator support rod. I no longer have to struggle to get implements lined up. Obviously one has to be careful when moving/adjusting the 3 point while standing near the equipment while the tractor is running, but this works for me.

Here are a few pics of the final install including closeups of some of the parts used.

3 point rear control final version 2.jpg3 point rear control final version 4.jpg3 point rear control final version 3.jpg3 point rear control final version 1.jpg

3 point rear control part yoke.jpg3 point rear control part T handle.jpg3 point rear control part 32 ford radiator support rod.jpg
3 point rear control part tubing clamp.jpg

Next project: Installing hooks and a receiver on the loader bucket and a hydraulic top link for the 3 point.
 
Last edited:
   / Attaching & removing 3 point implements #26  
Re: Attaching & removing 3 point implements UPDATE

UPDATE:

After installing a prototype control mechanism and using it for awhile, I decided to fabricate a more robust system using a T handle, brake yoke and a chrome plated 32 Ford radiator support rod. I no longer have to struggle to get implements lined up. Obviously one has to be careful when moving/adjusting the 3 point while standing near the equipment while the tractor is running, but this works for me.

Here are a few pics of the final install including closeups of some of the parts used.

View attachment 382066View attachment 382068View attachment 382067View attachment 382065

View attachment 382071View attachment 382070View attachment 382069
View attachment 382072

Next project: Installing hooks and a receiver on the loader bucket.

excellent craftsmanship ya got going through for ya!

my toes, and more so what is between the toes and my ankle *arghs*
 
   / Attaching & removing 3 point implements
  • Thread Starter
#27  
Thanks. Yep, ya gotta watch the toes and fingers. Hydraulics are unforgiving for those whose attention lapses even for a moment.
 
   / Attaching & removing 3 point implements #29  
UPDATE: After installing a prototype control mechanism and using it for awhile, I decided to fabricate a more robust system using a T handle, brake yoke and a chrome plated 32 Ford radiator support rod. I no longer have to struggle to get implements lined up. Obviously one has to be careful when moving/adjusting the 3 point while standing near the equipment while the tractor is running, but this works for me. Here are a few pics of the final install including closeups of some of the parts used. <img src="http://www.tractorbynet.com/forums/files/customization/382066-attaching-removing-3-point-implements-3-point-rear-control-final"/><img src="http://www.tractorbynet.com/forums/files/customization/382068-attaching-removing-3-point-implements-3-point-rear-control-final"/><img src="http://www.tractorbynet.com/forums/files/customization/382067-attaching-removing-3-point-implements-3-point-rear-control-final"/><img src="http://www.tractorbynet.com/forums/files/customization/382065-attaching-removing-3-point-implements-3-point-rear-control-final"/> <img src="http://www.tractorbynet.com/forums/files/customization/382071-attaching-removing-3-point-implements-3-point-rear-control-part"/><img src="http://www.tractorbynet.com/forums/files/customization/382070-attaching-removing-3-point-implements-3-point-rear-control-part"/><img src="http://www.tractorbynet.com/forums/files/customization/382069-attaching-removing-3-point-implements-3-point-rear-control-part"/> <img src="http://www.tractorbynet.com/forums/files/customization/382072-attaching-removing-3-point-implements-3-point-rear-control-part"/> Next project: Installing hooks and a receiver on the loader bucket and a hydraulic top link for the 3 point.

Nice job,Retired LE! Unfortunately our "working prototypes " on the farm in the old days seldom made it to the refined finished look of yours. Good work.

Terry
 
   / Attaching & removing 3 point implements
  • Thread Starter
#30  
Nice job,Retired LE! Unfortunately our "working prototypes " on the farm in the old days seldom made it to the refined finished look of yours. Good work.

Terry

Thanks for the kudos. I know what you mean about putting on the finishing touches. Most times, it was too much of a hassle to go in and redo everything. I think the reason I did it this time around was because I already had the parts laying around and they were calling to me to install them... or something...
 

Tractor & Equipment Auctions

Utility Trailer (A46683)
Utility Trailer...
New Holland 450 Sickle Bar Mower (A47809)
New Holland 450...
2005 BENSON DUMP TRAILER (A43005)
2005 BENSON DUMP...
PCC CONNECTIONS (A47001)
PCC CONNECTIONS...
KMC 3 P.T. 6 Row Peanut Inverter (A46443)
KMC 3 P.T. 6 Row...
1.5in Galvinized Pipe (A47809)
1.5in Galvinized...
 
Top