Chipper Chinese Chipper Review

   / Chinese Chipper Review #171  
No problem dnu...you're not butting in. Welcome to the board!

You need to check your tractor specs in the manual for the PTO lift capacity. The Model 6 chipper weighs in at 880 lbs. I have a Kubota L3600 which weighs 2965 lbs without the FEL and will lift 2870 lbs at the 3 point hitch. I can tell you now that my tractor sure feels it when I pick it up. I have plenty of lift capacity but that tractor just squats on it's tires!!

Check your specs and let us know.

Good luck!
 
   / Chinese Chipper Review #172  
Thanks for the reply.

The manual shows models L3010 through L4610 all having a lower end link maximum lift capacity of 2870 lbs. Same as yours. So the question becomes an issue of terrain and intended usage. I have 60 acres on the summit of a mountain in the Arkansas Ozarks. The steepest slope I might need to move it on is about 20% (a gravelled driveway). Would moving the chipper around be an issue?

I could haul the brush to the chipper or I could get the 4" chipper (if I could locate one) which might be easier to move. The 4" chipper would probably work OK as I won't be chipping anything larger than 2". Everthing else is firewood or kindling. But it might not have as big a chute and thus maybe not as good for brush.

All things equal, I'd rather go with the 6" chipper. Any thoughts, anyone?
 
   / Chinese Chipper Review #173  
Your tractor should handle it fine. My tractor "grunts" when I lift it but it doesn't really have any problem moving it around. I take it everywhere on the property. It somewhat defeats the purpose to haul the brush to it!

I have very hilly property as well. Just make sure you are pointed stright up or down when travelling. I wouldn't feel comfortable getting sideways on a hill with that on my back. Also make sure your sway bars are tight so there is no sway from right to left. Giving it a running start is a bad idea!
 
   / Chinese Chipper Review #174  
diyguy, when i try to click on your article about changing the knives i get a message saying "locked" is there something i can do to see it?

thanks,
doug
 
   / Chinese Chipper Review #175  
I clicked on it today and it worked. You can try to access the website directly at the CTOA website. .
Mark
 
   / Chinese Chipper Review #176  
Well, all....

I drove down to Cheasapeake, VA to pick up my 6" Jimna chipper today. Left at 5am and got back about 2:30pm. I decided to take the minivan with a trailer, as it would be a whole bunch more comfortable that my 10 year old F150 4x4. It rained cats and dogs the entire way there and back.

Anyway....

I bought the chipper from Emerybuilt for about $1500. He had one in stock because someone ordered without a deposit (he took their word that $ were on the way) and was never received. So, I lucked out getting one within a couple weeks of deciding to buy.

Emerybuilt has a real location and a pretty complete machine shop. They were busy putting an FEL on a 35hp tractor when I got there. Gary's son helps with the business and does the internet stuff. He retyped/reworked the chipper's owner's manual (correcting the bad English translation), printed it, and bound it in a nice cover. The parts explosion is just a photocopy of the one that came from China. That was an unexpected bonus.

After I got back, I printed out Mark/DIYguy's manuals from the CTOA site. Tomorrow, using these photo manuals and the one I got with the chipper, I hope to put the thing together and test it. I stll need to get a PTO overriding clutch first, though, so I don't mess up my New Holland's PTO brake. I'll post whatever happens.

The metal crate has a lot of metal with it. Any suggestions with what to do with it? Like, maybe I can build an implement with JB weld or something.... /forums/images/graemlins/grin.gif

Bis morgen!

Mark
 
   / Chinese Chipper Review #177  
</font><font color="blue" class="small">( The metal crate has a lot of metal with it. Any suggestions with what to do with it? Like, maybe I can build an implement with JB weld or something.... /forums/images/graemlins/grin.gif)</font>

Congrats Mark! Good luck with your new chipper. As far as the crate goes I took four or five crates from Gary that were laying in the shop partially cut up. It can be very handy stuff to have around (It's free!) but beware how you use it. It is very cheap steel and does not have near the strength of real steel. If you keep that in mind you will find many uses for it, especially if you weld.
 
   / Chinese Chipper Review
  • Thread Starter
#178  
I had a few issues last week with my web hosting service. It should be all set now. Let me know if any of the chipper links don't work.
 
   / Chinese Chipper Review #179  
All right - here we go...

Got the chipper put together yesterday. Thanks to Mark/DIYguy's online manuals, I got it put together properly. I think it would have taken be twice or thrice the 6 hours of assembly/setup/service time had I not had this resource. Here are my contributions to the knowledge base.

Assembly Notes:
-You need both metric (10mm, 13mm, 17mm) and SAE (1/2", 5/8", 3/4") wrenches and sockets.
-Your grease gun needs a flexible hose to get at the fittings, as access angles to the fittings is limited.
-To assemble and attach the base, the main unit needs to be lifted - I used the FEL and a chain hooked onto the top of the flywheel housing. This is one heavy piece of metal.
-For those who want to preassemble the cube-shaped base (made up of 4 pieces of steel), the front and back sides sit inside of the side pieces.
-I was missing 3 grease fittings and one set of nut/bolt. Further, most of the grease fittings are brass and one sheared off.
-A handful of chips found in the flywheel housing when the inspection plates were removed was evidence that it had been tested at the factory before it was shipped.

Feed Mechanism Notes:
I've been following the discussion about the feed roller driveshaft issues and decided to pull the assembly prior to any problems occuring and see if I could prevent them. I'm glad I did. Pictures are in the next 3 posts.

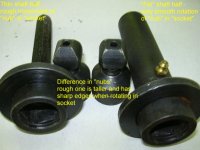
After removing the driveshaft, I bent each ball in its socket to its severest angle while pushing it in (to simulate spring tension) and rotated it through its full range of motion. The "fat" shaft was extremely smooth. The "thin" shaft was rough and "notchy" feeling. I concluded that the "notchy" motion was going the create an "in-and-out" chattering motion that would "jackhammer" against the retaining ring, eventually causing it to fail. I pried the retaining rings out using a screwdriver so I could compare the differences in the balls and sockets.

Both sockets were almost identical: each had a hemispherical bottom and were about the same depth. The "thin" one had several large chunks/shavings in the bottom corners that I pried/scraped out with a screwdriver.

The balls or "nubs" were strikingly different: the rough one was taller/longer and had 4 sharp edges where it was to contact the hemispherical portion of the socket. I ground the tip of the nub on a bench grinder to the same length as the good nub, but it was still kind of rough. I then smoothed the corners to mimic the corners on the good nub. Voila'! Smooth as silk.

After greasing them liberally but before installing the snaprings, I tested again and discovered each of the 4 possible positions of the nub in the sockets felt different with one position smoother than the other 3. I rotated the nub to the smoothest and snapped the rings back in.

I hope my little "re-engineering" helps keep my downtime to a minimum and helps those of you who have had problems.

Hookup and Usage Notes:
I only used it for about 15 minutes before I had to mow the grass, but - WOW!!!! This thing eats wood.
-It is loud (use hearing protection) and throws stuff back out (face and eye protection.)
-If you have a PTO brake (like I do on my New Holland), I would highly recommend an overriding PTO clutch ($54.50 at Tractor Supply Co). The flywheel has an incredible amount of momentum and has great potential to damage the tractor's PTO brake. At 1500rpm, it took over 30 seconds for it to stop.
-The top link has to be extended out very far (almost to the end of travel), so if you've shortened your, you may need another. I could probably shorten the PTO driveshaft, but it is very short to begin with.
-The feed-roller disengagement linkage and the feel-roller lift bar make contact when either is used to their end travel. Not really an operational problem, but will cause paint wear in the long run.

I guess that's it. I'll post more a I discover it it.

Mark
 
   / Chinese Chipper Review #180  
Here are the feed roller driveshaft parts (less the tension spring.)

Mark
 

Attachments

  • 422538-chippershafts.JPG
    422538-chippershafts.JPG
    91.1 KB · Views: 422
 

Tractor & Equipment Auctions

2019 INTERNATIONAL 4300 26FT NON CDL BOX TRUCK (A52576)
2019 INTERNATIONAL...
Deutz BF12L413F 19.1L V12 Turbo Diesel Generator (A51691)
Deutz BF12L413F...
2018 FREIGHTLINER CASCADIA TANDEM AXLE SLEEPER (A52577)
2018 FREIGHTLINER...
2010 Ford Edge SE SUV (A51694)
2010 Ford Edge SE...
2018 Freightliner Day Cab, Detroit Diesel, Auto (A52384)
2018 Freightliner...
2012 Caterpillar AT1055E Track Asphalt Paver (A51691)
2012 Caterpillar...
 
Top