Container Weld Shop build -

   / Container Weld Shop build - #171  
Now for a little humor since I didn't make it to work today, Trump wont win Trump wont win what a joke.................the liberal Hillary supporters just wont let it go, there was nowhere near the complaining from the anti obamanation side when he was president.
Trump can't WIN! - YouTube
 
   / Container Weld Shop build -
  • Thread Starter
#172  
I tend NOT to talk politics publicly anymore, too many "feelers" instead of "thinkers" - plus, my "sub-trailer trash" neighbors on one side keep me well "prepared" enough to handle anything I have any hope of surviving, including motion sensors, cameras, dogs (including 2 Dobermans that REALLY know the difference between "us" and "them") - you know the old saying; "don't pick on an OLD man - he knows it takes too long to heal, so he'll just KILL ya"...

Somewhat in order -

"either your staying up late or getting up early so what would be the time your time on your post?" - I do tend to stay up kinda late, but not THAT late - you're on East coast time, I'm on West, so if it's 3am on your time it's midnite on mine -
"Are you implying that maggie will be using some sort of cutters instead of drill bits?" - Yup, I have a chuck adapter for the mag drill to use twist drills but haven't used it yet - that'd take another mod to my drilling setup that hasn't happened yet, so any hole I can make with annular cutters gets drilled that way. Cleaner, faster, easier and does NOT WANDER, with or without a punch mark -

"the 6 holes on top was the easiest-ish and would've been if I new about Transfer Punches" - True, and $10 for that HF set I linked isn't too hard to swallow - if those won't work it gets more "spendy" fast -
Punch Sets | MSCDirect.com

"The vertical bottom plate wasn't traceable so that required precise-ish measuring and also required reaming a couple holes."
Maybe - depends on what you have available - They ALSO make things called "Transfer SCREW sets" -
Transfer Screw Sets | MSCDirect.com

If you follow that link, you'll see that you need a DIFFERENT set for EACH SCREW SIZE - more than a couple sizes needed and you REALLY start $pending :( Plus, most of those screw sets are too LONG to help you on your VERTICAL plate) - but there's ANOTHER way, if you have access to a metal lathe - I DON'T, but I have a small chuck that fits my mill - here's how -

First, you'd need as many EXTRA BOLTS for that vertical piece as there are holes (6, in this case) - you'd ALSO need at least 2 NUTS in that same thread (like 12mm x 1.25 pitch, or whatever yours are) - The goal is to end up with 6 short bolts, but with NO HEAD, just a POINT -

So you'd want to use short bolts (more accurate "transfer") - double nuts on the threads, JAM hard together - chuck the NUT in the lathe, turn the OTHER END (where the bolt head WAS) to a point - take the nuts off and repeat with the other 5 bolts.

Now you can screw those "short transfer screws" into the threads on the Kubota - kinda tricky, but you'd need to get ALL of 'em sticking out as close to even as you can -

Next tricky part is to figger a way to hold YOUR VERTICAL PLATE against the points of those screws WITHOUT THE PLATE SHIFTING, til you can tap the plate with a hammer over each "transfer screw" -

Another trick that can help with this - do just ONE punch, like bottom left hole - drill a pilot hole in the plate, not too big - then back THAT "transfer screw" out a bit so it's higher than the rest, the POINT of the screw will then fit into the pilot hole so it doesn't shift - REPEAT this on the TOP RIGHT hole - those two RAISED screw points will keep the plate aligned, so you can tap where the other screws are and mark the rest of the holes...

You'd probably STILL need to go slightly oversize on the holes when drilling, you know how hard it is to get things EXACT -

And yeah, I know it's already DONE - but tricks like these have a way of helping you out of the NEXT jam :thumbsup:

"and I can here you laughing to" - nope, I mostly only laugh WITH people, unless they piss me off :laughing: - otherwise I prefer to help find a SOLUTION (what can I say, age just makes me even MORE wunnerful :D )

"so cut apart, do it again, weld it back together on the tractor" - "but this time I tacked two diagonal braces from both ends so it wont fold in, then I rewelded the inside toe bracket, checking squareness as I was welding, then welded the outside top toe brackets. The only way to keep steel from moving is tack on temp braces."

Pretty much, although having all those "high dollar" weld clamps has helped me too - all these "roof frame modules" -
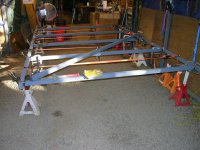
DSCN2325.JPG - came out near perfect - note the diagonal brace that's clamped at EVERY CROSS MEMBER - also, with no flat/level surface to fab on, I used one of these
Wixey Digital Angle Gauge with Flip-Out Display | Rockler Woodworking and Hardware
- set up the perimeter pieces on jack stands (with shims for "in-between notches" - Got it level all the way around, then tacked everything, alternating tacks so if one tack would pull left, the next one should pull RIGHT, etc - but the heavy clamps held as good as tacks on that diagonal...

Think that about covers it, guess I better get off my butt and "install some holes" - Oh, speaking of which - another thing I've learned in the last few years is to (if possible) weld EVERYTHING I can FIRST, THEN drill - specially if it's not a good idea to weld close to what I'm adding onto... Steve
 
   / Container Weld Shop build - #173  
I haven't had a chance to try this technique, but I'll pass it along so you can research and use it or not if you choose, I have read it mostly as a way to pattern gaskets, but I don't see why you couldn't use it to pattern bolt holes for brackets, too.

Put a piece of heavy paper, like from a paper grocery bag, over the surface, and lightly tap with a ball peen hammer wherever you suspect holes or edges you want to transfer might be...it will mush the paper fibers and leave a good enough mark to trace and cut out.
 
Last edited:
   / Container Weld Shop build -
  • Thread Starter
#174  
Yeah, I've used that quite a few times in years past - and IF the area in between all the holes in THIS situation is perfectly FLAT, it should work here too - but if it's NOT flat, that would change the straight line distance between holes due to the paper "following the terrain" -

Good suggestion tho, thanks for the reminder - I sometimes tend to be an "over-thinker" and forget the "KISS" method :rolleyes: ...Steve
 
   / Container Weld Shop build - #175  
("First, you'd need as many EXTRA BOLTS for that vertical piece as there are holes (6, in this case) - you'd ALSO need at least 2 NUTS in that same thread (like 12mm x 1.25 pitch, or whatever yours are) - The goal is to end up with 6 short bolts, but with NO HEAD, just a POINT - ")

I never would've thought of that, that would of work good. The 6>12x1.25 holes were about 1-1/4" deep so short transfer bolts would work and the idea of 1 small pilot hole to help hold the plate is a good idea to. I had a lathe 5 years ago so back then I could of made them, now if I had to do something like this again, I'd try to borrow or buy, buying 6 wouldn't be so bad but at $16.50+S&H if need a few dozen that could add up.

The old saying measure twice and cut once, well when I was measuring the 6 rear holes, I measured about ten times on each hole in three different directions, it was time consuming to say the least. So it's about 7:30pm here, must be 4:30pm your time and your still hard at it.
 
   / Container Weld Shop build -
  • Thread Starter
#176  
Yup, that's what my time WAS when you wrote this; it's just after 6 now, gettin' some supper - kinda ran into a snag on part of the drilling stuff, haven't quite thunk my way out of it yet but got a couple ideas, hopefully one of 'em will work. probly end up taking the 2 small milling vises off that xy table where I use the mag drill, and borrowing a few clamp pieces from the milling machine to clamp those welded up subassemblies to the XY, then I can vise grip the big hold-down bars to the subassembly and use them (already drilled) as a guide to match up the holes I'm drilling in those square tubes.

Once I figger THAT out, I can bolt those hold-downs onto the square tube with SHORT bolts long enough to goober some weld on the nuts, it's startin' to look like that "light at the end of the tunnel" is NOT attached to a locomotive :D

I'll grab a few more pics after, probly get 'em posted manana... Steve
 
   / Container Weld Shop build - #177  
Hobby welder here, what is that jar of jell used for? I have a small Lincoln 140 and tackle small projects so far, but on the occasion of fixing John Deere bucket on 855 welded the wire transfer on the out feed steel screw on cup. First time used side cutters to get wire to flow again, second time just tried to weld closer while feeding wire, got unstuck but end of steel cup looks terrible. So, I'm guessing that stuff keeps wire flowing? Is that a common problem or maybe a learning curve?
 
   / Container Weld Shop build - #178  
Other interests, I drive team and my co-driver and I deliver liquid argon to places like Electric-Boat in Groton and North Kingstown so we get to see glimpses of the new U boats under construction. So on the way home we were watching YouTube videos of the Columbia Class Submarines using robots for welding, but judging on the amount of people still employed by how full parking lots are.... absolutely no place to park never mind checking in with security to deliver. They probably still need the skill of men and women with welders for most of the assembly I'm thinking, or surmising.
Unbelievable skill and persise welding, very admirable.
 
   / Container Weld Shop build -
  • Thread Starter
#179  
Cabover, welcome to the party - First, that gel is an "anti-spatter" product, they're also available in a spray can, but from what I've read some of the spray versions are NOT very healthy to breathe, and I do ENOUGH of that already :rolleyes: - and yeah, that would decrease your welder's tendency to attract "goobers", and a $6 can would probably last you AND your kids' lifetime - the cans don't last as long and cost more, but they (supposedly) also reduce spatter on the welds.

I'm not gonna find out about THAT part because of the added health threat; at 72, I want ALL the remaining project time I can steal :D

I don't know much about Lincoln's welders, the ONLY time I've used one was the very first arc I struck - that was a SA200 that belonged to an ex-pipeline weldor friend, back in 1974 - so I googled Lincoln 140 welder and it looks like more than one version, at least one of which can do either MIG or flux core - If you're using flux core there's no gas to help cool the tip, so that would increase the spatter/sticking problems.

Your comment about the STEEL screw on cup caught my eye - if there's an optional COPPER version of that cup I would get one. Those BB's can still stick to copper, but it's a LOT less likely and often you can just grab 'em (the bb, not the tip) with a pair of pliers and snap 'em off - dipping the whole end of the torch in that gel (better when torch is hot) will minimize the sticking.

Your other comment, "Unbelievable skill and persise welding, very admirable." I'm guessing was for the U boat builders, since I know how much more I need to learn - if not, thanks :ashamed: - I've been stick welding on and off (more "off") since 1974, gas welding before that, but only picked up MIG about 5 years ago - if you wanna learn more about that, Jody at weldingtipsandtricks.com will help. If THAT guy can't weld something, it probably can't be done :thumbsup: -

HTH... Steve
 
   / Container Weld Shop build -
  • Thread Starter
#180  
Been awhile since I got much done, finally got back into it -

The holes that'll mount the "sliders" to the factory posts on the HF crane; showing ONE HOLE's worth of chips - DSCN3082.JPG -
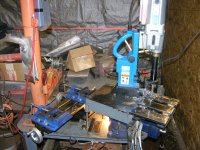
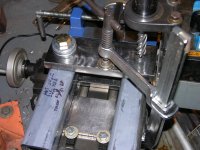
Overview of the "MDVT" showing the fixed vise and the XY table - DSCN3084.JPG -
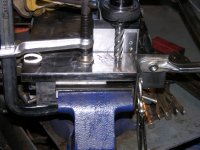
Getting stops set up to drill all 8 holes in the 3/4x3 holddown bars - DSCN3086.JPG -
Different view of same setup - DSCN3087.JPG -
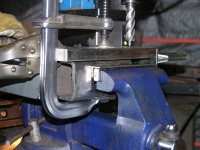
Holes drilled in one bar - 16-18 seconds each, ZERO cleanup other than blowing chips away with air - DSCN3088.JPG -
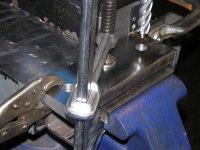
Using pre-drilled bars as a guide when drilling the square tube they'll bolt to, so things actually line up :thumbsup: - DSCN3091.JPG -
Since the holes in those square tubes are 7" apart and the XY table is mounted parallel to the mag drill's table, and since that XY table's lead screws are 10 TPI, the second hole in any of the tubes can be indexed by just cranking the index wheel 70 turns - DSCN3093.JPG -
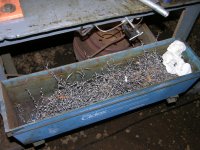
Chips from the operation so far (minus a few still on the ground) - DSCN3095.JPG -
And the easier way to pick chips out of gravel floors (doesn't work too well with aluminum :D) - DSCN3096.JPG -

More in a minute or two... Steve
 

Tractor & Equipment Auctions

ALL TITLED ITEMS HAVE A $35 TITLE FEE!!! (A50775)
ALL TITLED ITEMS...
2022 Mack MD Rollback Truck (A50323)
2022 Mack MD...
2019 CATERPILLAR D6N LGP CRAWLER DOZER (A51242)
2019 CATERPILLAR...
2018 VOLVO VNL64T670 TANDEM AXLE SLEEPER (A51219)
2018 VOLVO...
AMCO F42B-3626CS 13ft Pull-Behind Wheel Offset Harrow Tiller (A49461)
AMCO F42B-3626CS...
2017 Bad Boy Outlaw XP 61in Zero Turn Mower (A48082)
2017 Bad Boy...
 
Top