OP
You are using an out of date browser. It may not display this or other websites correctly.
You should upgrade or use an alternative browser.
You should upgrade or use an alternative browser.
Creating a Workshop & Home
- Thread starter EddieWalker
- Start date
- Views: 85848
More options
Who Replied?
/ Creating a Workshop & Home
#441
OP
EddieWalker
Epic Contributor
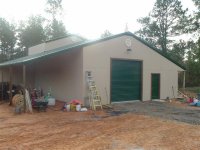
The workshop end also turned out better than I'd hoped for. Originally I ordered the roll up door in tan, but after getting home and telling Steph what color it was, whith the green roof, she told me I'd made a mistake and needed to fix it. I called my sales rep at Mueller and told him that I was in trouble for ordering the door in the wrong color. He said it wasn't a problem, and changed the order. Real nice and easy. That's why I use them. /forums/images/graemlins/smile.gif
If I'd used that tan door, it would have looked terrible. Good thing she's there to correct my mistakes.
Now I need to get on building some shelves in my outdoor storage space and my workbench inside so I can get organized.
Eddie
If I'd used that tan door, it would have looked terrible. Good thing she's there to correct my mistakes.
Now I need to get on building some shelves in my outdoor storage space and my workbench inside so I can get organized.
Eddie
Attachments
OP
EddieWalker
Epic Contributor
jinman
Rest in Peace
- Joined
- Feb 23, 2001
- Messages
- 21,059
- Location
- Texas - Wise County - Sunset
- Tractor
- NHTC45D, NH LB75B, Ford Jubilee
</font><font color="blue" class="small">( If I'd used that tan door, it would have looked terrible. )</font>
I agree with that! /forums/images/graemlins/tongue.gif It could have been very nearly the same color as the siding and would have been okay. If it had been brown you would probably have had to paint it to make it look right. It's much easier to get it right the first time.
I worried about my brown garage door on my house, but since all my doors are dark brown and the cedar siding is also brown, it looks just fine. In my case, I think green would have been the wrong color, but your green just fits perfectly.
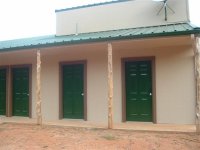
Tell your mom she did a nice job on the doors and the siding. Everything is really starting to have a finished look. Your front door has a really inviting look.
Are you going to plant grass around the house and in front of the bathrooms or put in pavers? The only problem I see is that traffic in and out of the bathrooms will track in a lot of dirt if you don't have something to prevent it, especially when it rains. I spread the pea gravel in front of my house just for that reason. As soon as I get my cabin moved, I'll put in grass and pavers (or native flat stone) to finish off that area.
I agree with that! /forums/images/graemlins/tongue.gif It could have been very nearly the same color as the siding and would have been okay. If it had been brown you would probably have had to paint it to make it look right. It's much easier to get it right the first time.
I worried about my brown garage door on my house, but since all my doors are dark brown and the cedar siding is also brown, it looks just fine. In my case, I think green would have been the wrong color, but your green just fits perfectly.
Tell your mom she did a nice job on the doors and the siding. Everything is really starting to have a finished look. Your front door has a really inviting look.
Are you going to plant grass around the house and in front of the bathrooms or put in pavers? The only problem I see is that traffic in and out of the bathrooms will track in a lot of dirt if you don't have something to prevent it, especially when it rains. I spread the pea gravel in front of my house just for that reason. As soon as I get my cabin moved, I'll put in grass and pavers (or native flat stone) to finish off that area.
OP
EddieWalker
Epic Contributor
Hi Jim,
Thanks for the nice words on the house. Putting color to a building isn't one of those things I have any tallent at. But when it comes out nice, then I'm a happy camper.
The guest bathrooms will have one built to ADA specs. It's the middle one next to the utility room.
The dirt will be built up, and there will be one parking space in fron to that side for handicaped parking only. The other parking will be further back, but since it's tent campers, I expect most to just walk.
The Parking space will be gravlel in this instance along with a gravel walk. The other buildings will be different when done due to their usage. Tent campers get a more rustic finish.
The rest of the dirt will have bermuda grass after I get it all shaped. The reason I'm not doing it now is my septic tank is in the middle of the parking area. It was the best place to put it without taking out any more trees than I had to. When I get my sewer lift station built and tie it into the sewer plant system, I'll take out the septic tank. It's not up to any code and totally designed for temporary usage.
Since I'm on over 10 acres and outside city limits, it's legal, but it would never pass an inspection if I had to have one.
Tell Kathy we all said hi,
Eddie
rox
Veteran Member
Eddie,
LOVE the green, looks like metal, roof. Taht turned out really nice. Also love the little peak, the way you joined up the timers on the porch, adds a nice touch. Place looks great.
I was jsut thinking a nice window box under that picture window to the right of the door might add a little something. Maybe paint it the same color as the roof or the front door.
Jsut an idol thought....
rox
Veteran Member
Steph was right about the garge door. Sure looks pretty.
OP
EddieWalker
Epic Contributor
Thanks Rox,
The window box idea sounds interesting. Might be a good winter project for Steph. She's been wanting to learn to work with wood.
Eddie
The window box idea sounds interesting. Might be a good winter project for Steph. She's been wanting to learn to work with wood.
Eddie
OP
EddieWalker
Epic Contributor
It rained the other day it's too muddy out to play in the dirt, so I did a little work on the workshop.
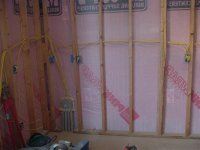
In this corner I'm putting my metal welding table with the vice. My air compressor will go under it and my welder will sit just to the left along the side wall. This is also the roll up door wall.
I like lots of outlets. Thanks to some advice on another thread, I put in a dedicated line to the air compressor. The welder has it's own outlet and that's been in for awhile now.
On the bottom left side of the wall you'll notice a gray box with four gray pipes leading into the ground. This is where I've brought power for outside demands. Namely my entrance, my street lights and a barn I'll build at a later date. The fourth line is there just in case something comes up.
I have a cover on the outside, under my overhang, to access the wires and pull them through the conduit.
Eddie
Attachments
OP
EddieWalker
Epic Contributor
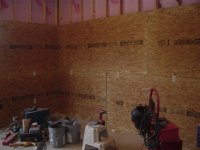
I put the top of the outlet boxes at 4 ft so it would be easy to cut them out. Then I used sheetrock screws to attach the OSB. Price for 7/16's OSB was $10.79 and who knows what it will be next week. Two weeks ago it was over $14 a sheet.
Eddie
Eddie
Attachments

OP
EddieWalker
Epic Contributor
The second row went up real fast and easy. Then it's all about putting in the outlets and covers. I guess I could have put up the third row, but having outlets seemed more important. Sometimes I get sidetracked. /forums/images/graemlins/grin.gif
Eddie
Eddie
Attachments
Nat
Platinum Member
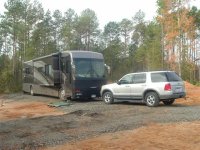
Eddie, Next thing on the list is some RV spaces, I'm getting ready, and I'm sure more are, for a vacation. Maybe you need to put in a few spaces, and then offer your freinds on TBN to come stay a week or so and help you out some. Really , it doesn't look like you need any help, seems like you do most everything by yourself. That't the way I was raised, and it has worked for me for a long time. Later, Nat
Bird
Rest in Peace
</font><font color="blue" class="small">( I like lots of outlets )</font>
Me, too. My little 21' x 25' shop has 15 duplex 120 volt outlets on the walls plus 3 in the ceiling and three 230 volt outlets. /forums/images/graemlins/laugh.gif And that's a good idea about locating them at the 4' height to make it easier to do the cutouts.
Me, too. My little 21' x 25' shop has 15 duplex 120 volt outlets on the walls plus 3 in the ceiling and three 230 volt outlets. /forums/images/graemlins/laugh.gif And that's a good idea about locating them at the 4' height to make it easier to do the cutouts.
Holzster
Gold Member
- Joined
- Sep 14, 2004
- Messages
- 268
- Location
- North Texas (40 Miles South of OK)
- Tractor
- Kubota L4330 HST
Eddie
Good thing you are buying the OSB this year & not last!! finally came down in price this last summer.
Good thing you are buying the OSB this year & not last!! finally came down in price this last summer.
jinman
Rest in Peace
- Joined
- Feb 23, 2001
- Messages
- 21,059
- Location
- Texas - Wise County - Sunset
- Tractor
- NHTC45D, NH LB75B, Ford Jubilee
</font><font color="blue" class="small">( Sometimes I get sidetracked. )</font>
Ha! The older you get the worse the sidetracked problem gets. I can't tell you how many projects I've started and gotten sidetracked on just in the last year. /forums/images/graemlins/laugh.gif
Nice job and planning on the outlets.... /forums/images/graemlins/cool.gif
Ha! The older you get the worse the sidetracked problem gets. I can't tell you how many projects I've started and gotten sidetracked on just in the last year. /forums/images/graemlins/laugh.gif
Nice job and planning on the outlets.... /forums/images/graemlins/cool.gif
MichMan
Member
Great work Eddie, been following all your projects. BTW, how did you handle the 2nd row OSB seam that dosen't lie over a stud, or is that some kind of camera angle illusion? Keep the updates coming!
OP
EddieWalker
Epic Contributor
Michman,
Your not supposed to notice that!!! /forums/images/graemlins/grin.gif
Just kidding. The OSB is stiff enough that I don't worry about ending it on the edge of a stud, but always have it end in a different location for strength. Each row will have a seem at a different location.
The first row ends with a piece cut to fit. I start the next row with that piece and don't worry about the edges hitting a stud. The third row will be done the same way.
When I put my shelves up, there will be several ledger boards going across the wall that will also stiffin things up and flatten out the slightly uneven edge on the ends.
Eddie
Tim_in_IA
Platinum Member
- Joined
- Feb 14, 2005
- Messages
- 840
- Location
- Eastern Iowa
- Tractor
- Kubota B7610HSD, Mahindra 6500 4WD, JD 440ic crawler, 2 560 farmalls.
Eddie,
You can also take a scrap piece of 1 or 2 x 4 and slide it down behind the osb and screw the two boards to it. That way they are locked together. I've seen and used this technique for drywall too as it keeps the number of seams to a minimum.
You can also take a scrap piece of 1 or 2 x 4 and slide it down behind the osb and screw the two boards to it. That way they are locked together. I've seen and used this technique for drywall too as it keeps the number of seams to a minimum.
toe nail a 2x4 between the studs and screw the board to that. if you put it flat side so that the 4" side is facing you, you have more area to hit when you want to hand something.
We do this all the time in offices we build. When we need backing for mounting some heavy equipment we have the contractors put blocking in the walls. Usually 2x10 put in flat side out so that we have some leaway
We do this all the time in offices we build. When we need backing for mounting some heavy equipment we have the contractors put blocking in the walls. Usually 2x10 put in flat side out so that we have some leaway
OP
EddieWalker
Epic Contributor
THanks for for taking the time to share your advice on the seams, but when the shelves are built, I think you'll see that it will take care of the seams.
I've got an idea on how to build the shelves that I've never done before, or actually seen before. Simple, open, and with minimal materials.
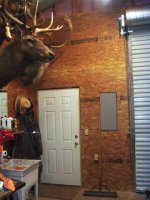
First I had to finish off the corners. This one is of the back door and main power box. Earlier threads it was mentioned that I need conduit to protect the wires that were exposed. Hopefully this looks a little safer.
Eddie
I've got an idea on how to build the shelves that I've never done before, or actually seen before. Simple, open, and with minimal materials.
First I had to finish off the corners. This one is of the back door and main power box. Earlier threads it was mentioned that I need conduit to protect the wires that were exposed. Hopefully this looks a little safer.
Eddie