Cub Cadet 6284 Tachometer

   / Cub Cadet 6284 Tachometer #1  

mark50

New member
Joined
Jul 11, 2011
Messages
10
Greetings All, I need a bit of help with a Cub Cadet 6284 Tachometer. I realize there is an old thread - http://www.tractorbynet.com/forums/c...d-working.html and my issue is just like the one described there. But, so far his post has not been answered.

As for my tachometer, it seems to work when turning over to start; but, when it starts, it goes back to "0". The failure happened yesterday after I greased the u-joint right behind the flywheel. I possible nocked a wire loose - albeit, I was not close to the tach or the connections to the motor? And, do not see anything unusual where I was working.

Anyway, any advice or troubleshooting suggestions would be appreciated.
 
   / Cub Cadet 6284 Tachometer #2  
Hey Mark,

I think that was my thread. I have not done any troubleshooting with it, other than I think it is has a magnetic pickup somewhere on the crank, I could be wrong.
I will try to look at mine next week as I will have some free time.
 
   / Cub Cadet 6284 Tachometer
  • Thread Starter
#3  
Scoops,

Thanks for getting back with me. I have spent some time riddling what is going on with mine and have a cub dealer that is working though their “trouble call” system with the cub cadet dealers service. Here is what I know:

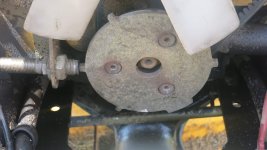
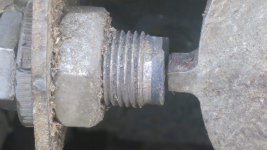
1. The 6284 tach sensor is located on the right side of the motor at the front and is right behind the radiator overflow reservoir. The sensor gets a signal from “high points” on a pickup plate which is held to to the crank pully with 3 countersunk hex screws.
2. My pickup plate became loose and actually rubbed the sensor until it wore through the epoxy tip and wore through the coil wire around the magnet which is in the middle of the sensor.
3. My sensor has two wires coming off of it. One of the wires is connected to two green wires.
4. The wire connected to the two green wires shorted against the frame and melted the connector and some of the wire going to the sensor.
5. The cub dealer said to check the sensor and it should have some resistance between the two wires. However my ohm meter reads infinite resistance (open circuit). So, according to the dealer it is bad.

I did not learn that the pickup plate was loose until the tachometer failed. And, it is a good thing that I tightened the plate because one of the hex screws had fallen out and the other two were very loose. This could have failed the radiator fan and cost some serious money to fix. The work doesn’t take long to do; but, the radiator does have to be removed to get to the plate. And, while it is more money than it is worth ($100) for the sensor, I believe having a cub dealer that will submit trouble calls to the dealer support group is worth the investment.

But, here lies the dilemma which is “have I fried or burned any of the wiring or components on the tractor besides the tach sensor?” Supposedly, these sensors rely on the Hall Effect and likely have a power supply to them as opposed to a pickup coil variable reluctance sensor (http://www.autoshop101.com/forms/h36.pdf) which does not require a power supply. Here is an article – http://www.motor.com/magazine/pdfs/092006_07.pdf that you might be interested in reading as well. One reason for saying that this is likely a Hall Effect sensor is that the wires on mine melted – indicating a 12V supply power (whether in the start or run position. However, there was not any fuse blown and I don’t have a schematic to track the wiring down. When I do trace one of the green wires down, it goes to what appears to be an oil sending unit (my owner’s manual shows a tube going to the unit as an “oil line”. I pulled the plug off this I do get 12 v coming into the unit via the other wire (orange) on the sending unit (I believe the switch was in the run position). So, it is possible that this unit has failed (but, again no schematic - ). It is most puzzling to me as to why there would be two green wires tying into the one wire on the sensor. I guess it is possible that one is fed from the “start” circuit and the other is fed from the “run” circuit.

When my sensor comes in, I will know if all is ok simply by hooking it up and giving it a try (registers RPM on start and run). Otherwise, if it is ok with you, I may ask you to check voltage for me on each of the green wires during start and run just to help me trouble shoot.

Let me know if I can help trouble shoot yours.

mark
 
   / Cub Cadet 6284 Tachometer #4  
great research Mark. I bet mine loosened up too, or melted to ground. Since I am already in fixing the front axle I might as well have a look at the area you pointed out.
Keep me updated when you get your new parts in.
 
   / Cub Cadet 6284 Tachometer
  • Thread Starter
#5  
Yea, leaky front axel seals are a common problem. Keep me posted on how that goes and what you have to do as I have to do the same thing soon. One is dripping pretty good.
 
   / Cub Cadet 6284 Tachometer
  • Thread Starter
#6  
Replaced the sensor and plug (as noted above, the original plug had melted when the wires shorted). The tachometer works as it is designed. I was not able to find any specific setup for the gap between the pickup plate and the sensor. So, I just set it at ~.010. For what it is worth, the tach wiring is polarity specific. In other words, if you switch the wiring (hook it up wrong) it will not work. :)
 
   / Cub Cadet 6284 Tachometer #7  
Great work mark. Since I have some free time tomorrow, I will investigate mine now that I know what
To look for.
 
   / Cub Cadet 6284 Tachometer #8  
Hey mark,

Finally got to mine. And sure enough the three Allen bolts were loose causing the plate to wear and cut into the sensor.

Is this the part # you ordered, 725-04212 ?
 

Attachments

  • image.jpg
    image.jpg
    495.4 KB · Views: 574
  • image.jpg
    image.jpg
    599.4 KB · Views: 468
Last edited:
   / Cub Cadet 6284 Tachometer
  • Thread Starter
#9  
That is the correct part number. Glad you figured your out before it caused real damage. Mine took the tip off all the fan blades before I figured it out. I put my pickup plate back together with locktite on the threads. Also, you can test your sensor by simply checking for continuity across the two wires coming into the sensor. If there is any resistance, it is good. If it is an open circuit, it is bad. For what it is worth, and that is about $110 for a new sensor, if you can solder, you can fix the one that you have. All that happened to mine is that it cut the copper wire wrapped around the magnet. If you spend a bit of time with a pick and get enough epoxy out so you can re-solder the wire together (assuming it is broken), you can fix your sensor. Then, just epoxy it back in place (with a non-conductive epoxy (don't use belzoma or other epoxy containing metal bits). If you decide to buy a new one, you might consider Central Equipment. The parts man (Tim Beasley) tbeasley@centralequipment.com was a real help in working through my loss of tachometer signal. He opened up a ticket with Cub to help me get it solved. Even though, I could have fixed my sensor, it was well worth the money spent to simply maintain that working relationship. I also bought tranny fluid from them - now, replacing that was a whole new troubleshooting opportunity. I am an engineer and it seems that the oil filters are on the intake to the pumps (bad design). Be that as it may, after replacing the filters and 26 qts of oil, the tractor got fluid circulating in short order and the drive and rear hydraulics worked fine. However, the steering and lift worked at about 50% capacity (both were jerky) at low RPM. At high RPM, the the steering and lift caused a loud screech/whistle. After troubleshooting and bleeding the system, I riddled this for a few more days and came to the conclusion that the filter must be leaking air. So, I climbed under the tractor again and tightened up the filter (way past what I would normally do). And, the system works again. I bought WIX filters and would advise to use the cub replacements as the seals are different between the two. Here is a good read on hydraulics - http://www.hydraulicsupermarket.com/download/hyd_problem_solving.pdf

Please keep me posed with your front seal replacement. I will be doing that soon. I would sure appreciate pictures as you posted here. If you would prefer to just email them to me, my email is mark@saracon.net. Take a look at these postings (they are almost the same and have answers worded a bit differently from the same guy) as it has some information about the front seal replacement - http://www.tractorbynet.com/forums/cub-cadet-tractors/283600-cub-6284-front-king-pin.html and Cub Cadet 7265 -- Cub Cadet -- Page 1
 
Last edited:
   / Cub Cadet 6284 Tachometer #10  
Mark,

I had no resistance between the wires on the sensor, I will order one tomorrow. I tried to even out the end and took too much off, and the copper wire came flowing out.. I checked the resistance beforehand though..

I am not doing the kingpin, only replacing the axle seal. Thankfully mine don't leak.
I would advise other guys to check their rpm plate for tightness though.. It's rather easy, just make sure engine is off and stick your hand up and try to wiggle the plate, if it wiggles, remove radiator and loctite and retightened 3 Allen bolts.
 
Last edited:

Tractor & Equipment Auctions

24ft Corral Panel (A47809)
24ft Corral Panel...
AGT MH12RX (A46443)
AGT MH12RX (A46443)
2005 BENSON DUMP TRAILER (A43005)
2005 BENSON DUMP...
2012 Volvo VNL 670 SLEEPER (A43005)
2012 Volvo VNL 670...
Utility Trailer (A45336)
Utility Trailer...
2015 CAM Dump Trailer w/Title (A47809)
2015 CAM Dump...
 
Top