DIY Leaf Vac

/ DIY Leaf Vac #1  

Cannon

New member
Joined
Apr 12, 2009
Messages
22
Location
Central VA
Notes on work in progress.
-6 Acres; central VA; heavy foliage = 30+hrs/yr for cleanup; when ignore/partial complete=eyesore & kills grass underneath (plus tannic acid in decomposing leaves); several times don't complete 'till Nov/Dec in 45 degree weather.

Historical Lackluster Results:
1) 6'x8' tarp filling & dragging most time consuming;
2) Two Stihl BP400's bungee corded on shoulders = mucho mph, but tiresome & leaves a permanent berm of leaves at edges of yard that either blow back into yard or after 6yrs became an eyesore;
3) sweeper fills up on 10' pass/wheels skid along leaf surface/caution on height or brushes tear up newly planted grass seedlings & still need to travel to a remote dump spot, once there piles become a problem-still have to dismount and consolidate piles or have 'mini-piles to navigate & remove anyways;
4) 10.5 hp Parker Hurricane wheeled leaf blower purchase, $$$, large engine=no "easy pull" to start & at 125 lbs, tiresome to maneuver, have to use in conj w/ husquvarna backpack blower.
5) Addn'l note: 2009-After 15+ yrs, used skid steer to move an ever-increasing leaf & yard debris mountain of branches, shop vac contents, etc...
6) Kerosene/Diesel & Match - rarely out of respect for nature (&neighbors)

Tractor Key Points
-Current 2009 Garden Tractor Purchase: GT2900; 54" deck w/ 28 hp hydrostatic transmission (hopefully final purchase of lifetime).
-Previous Tractors were Murray belt-driven 14.5 hp (07 yrs - outstanding!) & Murray belt-driven 17 hp (still own).
-Avoided continued purchasing of belt driven lawn tractor since felt were prone to suffer increased wear as well as lack of power to pull attachments.
 
Last edited:
/ DIY Leaf Vac
  • Thread Starter
#3  
Thanks J.J. I have scoured your posts on attachments and others-you are a vast resource of knowledge.

Defined Needs
-Pull Behind vs push by hand=punishment
-Speed/efficient collection
-Low initial cost
-Mobile dump=trailer system (transport out of sight)
-Low maintenance time & cost
-Non PTO Driven
-Non 3 pt hitch setup
-Chipper/Knives setup not a 'must-have

Research & Comparisons
Past Success Stories
-TBN home fabbed solutions
-TBN purchase experiences

Suppliers

AGRI-FAB
AGRIMETAL (blowers only no collection units)
BILLY GOAT
BLUEBIRD (pro-greens keeper equipment)
CYCLONE RAKE
DR VACUUM
EZ RAKE (no link...lebanon,indiana?)
EZ VAC (now bluebird intnl)
GIANT VAC
LAWN VAC (PECO)
PARKER HURRICANE (ARIENS BOUGHT IN OCT09)
PALADIN (makes sweepers not vacuums)
TORO (golf course vs residential use)
TRAC VAC (PALMOR)
TROY BILT (CHIPPER VAC)

Various Local Retailer Sites & Internet Sources of Supply (C'list especially)
 
Last edited:
/ DIY Leaf Vac #4  
If I were in your shoes - and I sorta am (4 or 5 acres of lawn, probably not as many trees) I'd be trying to find a used Giant Vac Trail Vac, as pictured below.

I have no personal experience with them myself, but have been looking at them for a long time and have always wanted one. I don't believe they are made any longer by Giant Vac (except for one similar model that is huge and meant to pulled behind a pickup truck) ..... but I believe several other professional turf care companies make similar units, Toro being one:

Toro Sweepers & Vacs

Most of the specialized turf equipment is probably going to be very pricey - so looking for something used would be the economical way to go. The other alternative is is copying the design and making one of your own, if you have the equipment and skills to do that.

The benefits of Giant-Vac Trail Vac type unit is:

1. Large capacity.

2. Can be used as sweeper with wide vac head or adapted to the discharge chute of mower deck.

3. They appear to be designed so that they will dump very, very easily. This is a really big deal - if you are doing large areas and have to dump the unit repeatedly. If your yard is so small that you only have to empty the unit once during each use it ain't as big a deal.

I have a large trailer-type Trac Vac (Palmor) - in terms of design it is absolute junk - the unit is not high enough off the ground to get sufficient dump angle to easily empty the load (particularly with grass, somewhat less with leaves) ..... and it requires alot of effort and digging with a rake and/or pitchfork to empty (something I had to do somewhere around 20 to 30 times the first time I mowed this year)

A TBN member, sandman2234, had a neighbor which has one of the Giant-Vac units for sale in Jacksonville, FL - might be worth a look. I believe the second picture below is that unit.
 

Attachments

  • giant-vac-3095.jpg
    giant-vac-3095.jpg
    10.6 KB · Views: 8,581
  • GiantVac1.jpg
    GiantVac1.jpg
    61.5 KB · Views: 6,553
/ DIY Leaf Vac #5  
Get yourself a Cyclone Rake. Awesome machine for mowing and vacuuming up leaves. You won't be sorry.
 
/ DIY Leaf Vac
  • Thread Starter
#6  
Purchased a parted out 460 Trac-Vac online to include:
-Impeller
-Blower Housing
-Deck Boot
Tot: $100

Parker Hurricane Leaf Blower w/11 hp B&S Engine. No luck-when removed the 'Parker blower housing, found the B&S is a 1" shaft while the Trac-Vac impeller is only 3/4".

10 year old Coleman Pressure Washer w/ 3 hp Engine. Again no luck- has a vertical vice horizontal shaft.

Went to Harbor Freight for their 6.5 hp Greyhound Engine for $129. Again no luck - the engine's muffler protrudes too far out the side where the blower housing and engine would marry up (3/4" shaft though).

Went to Tractor Supply for 'other parts, and found several B&S engines that have the full clearance needed/muffler positioned out of the way for the blower housing and engine to fasten together. Letdown though was price.

Next try will be Northern Tool for 5-8 hp engine prices.
 
Last edited:
/ DIY Leaf Vac #7  
Get yourself a Cyclone Rake. Awesome machine for mowing and vacuuming up leaves. You won't be sorry.

I second John's advice. My 79 YO mother in law takes care of her own yard with one & we borrow it when she's done. It's a bit of a chore to dump, but it gets you off the seat once in a while which actually is good for your posterior. Her place is shin deep by November. Nice unit, simple, reliable, easy to use. We use the composted leaves in our gardens - it's brown gold.
-Jim
 
/ DIY Leaf Vac
  • Thread Starter
#8  
Jim & John,

Appreciate your responses on a CR as a solution. Researched the site, grew up near by (Middlefield), and see 'you-all (as a yankee-I still can't get it right) are former neighbors! In fact had an opportunity to purchase a used CR for $900 here locally.

Am attempting to 'Keep it simple/'Make it fun with the kids and especially Low Cost for the wife. So with an existing trailer and Trac-Vac impeller & housing in hand, am attempting a DIY approach.

Again, appreciated and hope you can continue to provide guidance while I 'muddle through.
 
Last edited:
/ DIY Leaf Vac
  • Thread Starter
#9  
ENGINE & ADJUSTMENTS.

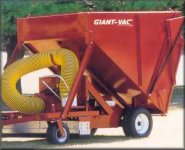
I've decided to go with the Greyhound 6.5 hp, 3/4" shaft 'Honda clone at Harbor Freight. With all the brick and mortar stores and internet options, the next closest in price was in excess of $179. The decision means I'll have to modify the muffler placement, since in its current position it'll impede on the recently purchased Trac-Vac blower housing, causing engine damage, or increase vibration that could ruin the impeller or engine shaft.

Please take a look at below for errors on my plan to modify the muffler placement when have a chance.


Muffler Modification/Repositioning

I'll need to move the muffler up and out of the way and want the results to: 1) not cause stress damage to the engine block by either coming in contact with the blower housing or engine; 2) being too heavy/bulky, or; 3) the assembly isn't supported properly. The pipe size will fit the existing mufflers' outer diameter versus inner so as not to interfere with performance or create excessive back pressure.

Required Tools
Drill and 1/4" bit
Center punch
Large file
Steel wool/Sand Paper
Pipe cutter (hacksaw)

Required Supplies
2 x 1/2" copper tubing (excess for trial & error)
High heat epoxy (ex. JB weld)
Pipe wrap / Fiberglass Tape (3 1/2' or wide enough to cover the seams in case my high heat epoxy doesn't hold up)


Preparing the copper piping
I'll cut the 2' of copper tubing to approximately 7" (I'll have three tries at). The initial choice of 7 is: 5 for length, and 1(x 2) for overlap. This will result in avoiding a second attempt or being unable to cut later if the intake and exhaust of the muffler are too long. I'm going to try to make sure this is the only time I'll need to cut the tubing. I'll find the correct height/clearance by lining up the muffler, once cut, with the 5" copper piping and place the piping in the middle. From there, I should be able to eye up the height I want. Again, I should want the muffler pipes to overlap the copper pipe by at least an inch after I've done so I'll add 2" for overlap.
After cutting the pipe, I'll make sure both ends are perfectly flat. I assume this will be important when setting up the epoxy later. If the pipe has a perfectly flat end, I can simply stand it up in epoxy and wait for it to cure. If the end is not flat, the pipe could lean to the side and perhaps not match up or keep proper clearance between the muffler and blower housing. To ensure a true end, I'll use a file to clean it up. If perfectly flat ends are not a major concern due to the existing muffler weight, the epoxy takes too long to set up, etc? I'll just lay propped up on its side or in a vise.

Preparing the Existing Muffler
I'll cut the manifold on the existing muffler past the bend in the elbow to provide the right clearance relationship between the muffler and blower housing. The mistake I want to avoid is to simply cut the muffler tube in half before continuing. This may result with difficulty in marrying up later of the intake-extended exhaust-muffler being far too long or the angle of the existing manifold bend being at the wrong angle. I figure the best way to create the correct angle/height is to place the piping in the middle. Once cut, I can eye up the angle and height. As a backup plan in case I fudge the angle, I want the copper pipe length to be able to be long enough to perhaps bend at least an inch after done (see above where I'm adding about two inches to the pipe length).

Testing the assembly (before epoxying)
I assume a good way to test that I don't create additional restriction is blow into it the pipe as hard as I can or use an air compressor. Then, hold my hand over each end of the assembly and try again. If I feel any more resistance with the end plugged by my hand than I did without, I'll need to redesign.

Epoxying it together
Epoxying the original manifold end. The first thing I'll do is epoxy the original manifold end to the pipe, then bolt on to engine and line up the blower housing's position. This'll be my last chance to make sure that the pieces are level, the muffler is low profile enough in relation to the engine, and to allow the muffler to sit properly prior to epoxying the copper pipe and manifold.
Epoxying the pipes. Since the epoxy can make up for mistakes, this does not have to be perfect, but the better I line this up now the less of a headache it will be later.
Epoxying the muffler end.
I'll slide the two sides together after lining up the pipe/manifold assembly to the muffler. If the muffler bottom falls flat onto the copper pipe, I should have it down pat. I'll pull the assembly apart again, make sure I'll double check that the pieces are level, and the muffler doesn't come in contact with the blower housing or engine.
I'll then ensure to have plenty of epoxy between the top of the copper pipe and bottom of muffler and press it together. As well with the first bond, I want to make sure that the fittings can't break loose and damage the engine or turn the muffler modification into a machinegun when running.
I'll make sure to liberally apply epoxy to the copper ends of the pipe to the top and bottom of the cut muffler assembly to ensure that its� air tight. After the epoxy has cured, I'll test the seal by plugging one end and blowing into the other as before.

Fit and Finish
I'm usually the only one who picks up on the little 'ditzels or mistakes I make along the way, but if there are any final steps I've missed-please advise.

The muffler may need extra support, which could be accomplished with cleverly placed bolts, hose clamps or pipe support straps. Once I see in operation, I'll think of where the forces are transferred and adapt as necessary.

I'll probably dress up the exhaust tube and add a margin of safety with a bright coat of high temp paint on the cover to avoid anyone coming in contact with.

I originally thought to purchase an aftermarket Honda clone muffler with the correct bends and clearance, but when I saw the prices; my budget can't afford a $100+ muffler on a $130 engine, plus I don't want a muffler that looks like it should belong on a small car.

Optional Ideas
1. One alternative I've thought of is to take the copper pipe, cut two 1 slit opposite each other on each end, then use hose clamps/u-shape muffler clamps on each end to pinch the three piece assembly together. Drawbacks could be lack of 100% seal (fiberglass tape); short lifespan since under vibration load from engine and working around yard, or; assembly comes in contact with engine or blower housing.

2. An additional alternative of perhaps using flexible steel braided hose (flexible exhaust pipe) to connect the cut apart existing muffler pieces to relocate. Drawbacks could be difficulty in fabricating a way to secure to the engine assembly; having hose available in correct diameter; and ensuring I can seal the braided ends in a permanent fashion.

3. Another alternative is using electrical conduit?
 
Last edited:
/ DIY Leaf Vac
  • Thread Starter
#10  
Last nite I purchased 6.5 hp Greyhound. Declined the extended warrantee. In parking lot disassembled the muffler and measured pipe = 1" outer dia / 7/8" inner dia

Went next door to Autozone to inquire on flex exhaust or other options. Smallest size they had in stock was 1 1/2" dia so no go. However did have high temp jbweld.

Traveled over to Homedepot & in plumbing aisle picked up 3/4" & 1" steel pipe ($1.76/ft) so as to 'marry up with either OD or ID measurements. As a a backup plan, purchased in electrical aisle 3/4" electrical conduit for 10' at $1.89 - would be rigid enough to support but as stated before, is galvanized = off gasses.


Had to reassemble the Parker Hurricane that afternoon (don't want too many unfinished projects sitting around).
 
Last edited:
/ DIY Leaf Vac #11  
Cannon,

Welding the muffler is much better option than copper and epoxy as I think the delta of expansion between the metals and epoxy then vibrations would last maybe a hour ... so welding is the best for muffler.

Next will be the connecting pipe from your impeller housing to the cart. The trac vac uses a fairly stout 6" flexible pipe (one radius) with a 45* connector to the dump box. You must be careful about this pipe because projectiles from the blower will dent the impeller housing and this pipe (i know i have a 580 Trac Vac)

Then you will need to make the dump box on top of the cart, and the Trac Vac has tapered sides from front to back to enable unloading easily so stuff falls out easily. Dont know your plans around building your box but I suspect thats next on your list..

You can build a plywood box with a hinged rear door but be sure you have some good material on the door as the projectiles from the blower will also create dents etc..

Good luck.
 
/ DIY Leaf Vac #12  
Then you will need to make the dump box on top of the cart, and the Trac Vac has tapered sides from front to back to enable unloading easily so stuff falls out easily.
Sorry, but I have to disagree on this one - stuff rarely comes out of my Trac Vac (a Model 880) easily ........ particularly if whatever it is (grass or leaves) is at all moist.

The unit itself sits so low to the ground that it is impossible to tilt it enough to achieve an adequate dump angle to easily empty.

I do agree with Carl regarding epoxying the modified exhaust system - you would be much better off having it welded.

Another alternative (to using the original muffler) would be cutting off the muffler (from the exhaust pipe and flange) and welding on a threaded female pipe fitting that would allow you to install a commonly available small engine muffler.
 
/ DIY Leaf Vac #13  
Gotta agree with others... I doubt the epoxy will withstand the heat of an exhaust system. Instead of taking the muffler off the engine and trying to make a new exhaust manifold/muffler, would it be possible for you to adapt to the outlet of the existing muffler to make it exhaust in a different direction (I'm thinking something like a metal downspout elbow)?

On the trailer, you could make the top hinge open as well as the back so that you could access the top of the leaf pile in the box. Fabricate a heavy strip of tarp or other material to lay in the bottom and up the back of the leaf box. The leaves blow in on top of it. To unload, you grab hold of the strip and pull it (and all the leaves) out the back of the box.
 
/ DIY Leaf Vac #14  
/ DIY Leaf Vac #15  
rsryan,

The 880 is 50 Cu Ft vs 30 CU Ft capacity of the 580 I have probably makes for a longer cart and more overhang on he rear wheels equating to a lower angle of dump. Also I dont usually vac wet leaves, but on occasion when I do it still comes out as a brick of leaves/waste.

I unlatch the cart and tilt it back quickly which loosens the load then drive away. When less than full it does not dump as well due to less compaction. Over all tho i have not experienced any dumping / unloading issues..
 
/ DIY Leaf Vac
  • Thread Starter
#16  
The HF Greyhound 6.5hp engine #66014/15 went on sale this week so will attempt to price match $99 vice what I paid 7 days earlier.

aczlan re: B&S muffler system http - thanx for expanding my knowledge.

Carl_NH re: capacities - am definitely extracting 880/850 knowledge of your model manual comparisons. I've two trailers to choose from (well, one cart & two trailers actually), but only one garden tractor.

I've picked up mods by reviewing a lot of parts diagrams from all manufacturers. And one feature I'll not be able to incorporate is a tilt back/emptying capability, mainly since the discharge from the blower housing will be permanently married to the trailer if at all possible to prevent flow reduction. Good feature for particular models, to be able to attach/detach the upper chute from the entire assembly, I just don't have the material thought out yet.
 
Last edited:
/ DIY Leaf Vac
  • Thread Starter
#18  
HF Greyhound 6.5hp Mod #66014/15
(Carl/John advice read morning after I performed mod)
Shows how I modified exhaust clearance problem. Would've liked a better outcome but the weld job was a 'friend of a friends and couldn't get back to in time - literally :05 min after the fact.

Result was at least the muffler assembly now clears both the top of the blower housing, and the parallel plane of the gas tank.

Cut original manifold (exhaust pipe), and welded a 7" length of steel pipe (1"od) from Home Depot at $1.76/ft.
(had HD cut at store).

Message - TractorByNet.com Photo Gallery
 
Last edited:
/ DIY Leaf Vac
  • Thread Starter
#19  
HF Greyhound 6.5hp Mod #66014/15
Shows mounting face

For general knowledge:
- Shaft is 3/4" dia x 2 1/4" length; 3/16" keyway; and a 5/16"-24 central thread.
- Bolt Pattern is 3-5/8"; 8.0-1.25mm thread.

The Trac-Vac blower housing will mate easier now that the exhaust has been modified, but will still need spacers to clear tank & modified exhaust.

Pic shows flat washers - will change to 1 pc collar type.


Message - TractorByNet.com Photo Gallery
 
/ DIY Leaf Vac
  • Thread Starter
#20  
Ugh, I ended up not having the same keystock sizes between the shaft and the Trac-Vac impeller & unfortunately didn't realize right away.

First reaction was 'wow, tight fit, guess I need a bigger hammer! Four blows later I realized my mistake.

No pic, but had to remove with a two arm 5 ton gear puller. Then replace the key with the appropriate size. Could've ground down the existing key that came with the engine, or ground out the keyway on the impeller but: 1) had extra hanging around; and 2) most importantly, I didn't want to cause any 'slop that would've been compounded/increased wearing from the amount of vibration that is going to occur already.

If needed, I could've purchased SAE or Metric 60pc keystock set at HF to marry-up properly at $8 or $9.99 each respectively.
 
Last edited:

Marketplace Items

Unused 2025 CFG Industrial QH12R Mini Excavator (A59228)
Unused 2025 CFG...
2025 JMR Single Cylinder Grapple Bucket Mini Skid Steer Attachment (A59228)
2025 JMR Single...
2002 International 9200i Truck (A61306)
2002 International...
2019 CATERPILLAR  XQ60 GENERATOR (A58214)
2019 CATERPILLAR...
207275 (A52708)
207275 (A52708)
2019 Jeep Grand Cherokee SUV (A59231)
2019 Jeep Grand...
 
Top