Dump Trailer - start to finish

/ Dump Trailer - start to finish #1  

GuglioLS

Veteran Member
Joined
Feb 13, 2005
Messages
1,155
Location
Edgewood, NM USA
Tractor
Jinma 354, 1953 Ford NAA Golden Jubilee, Komatsu Bulldozer
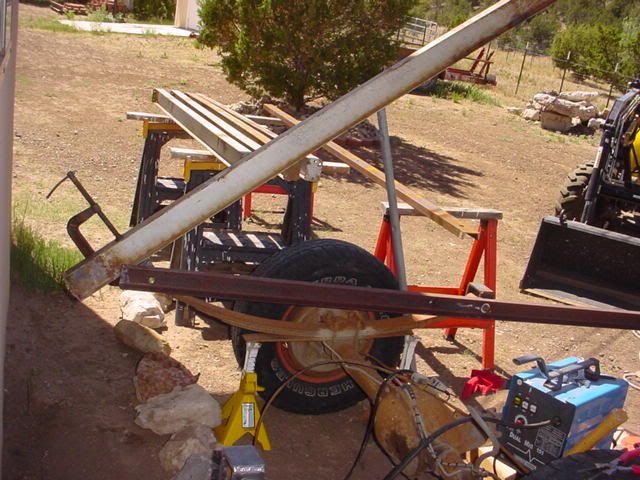
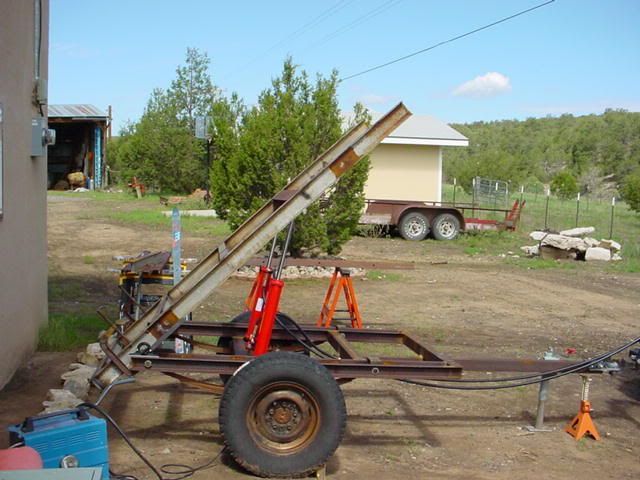
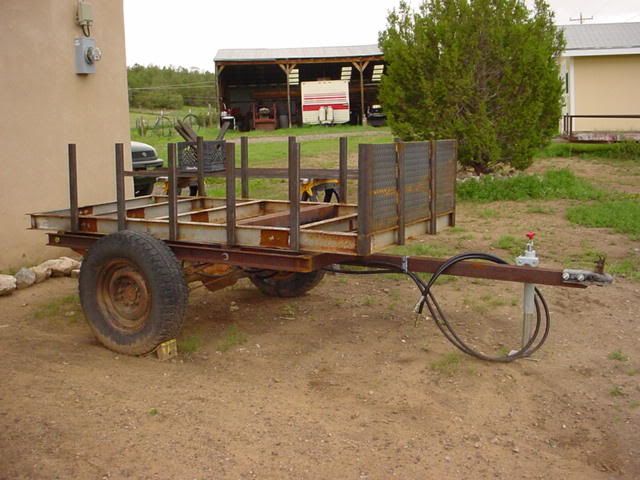
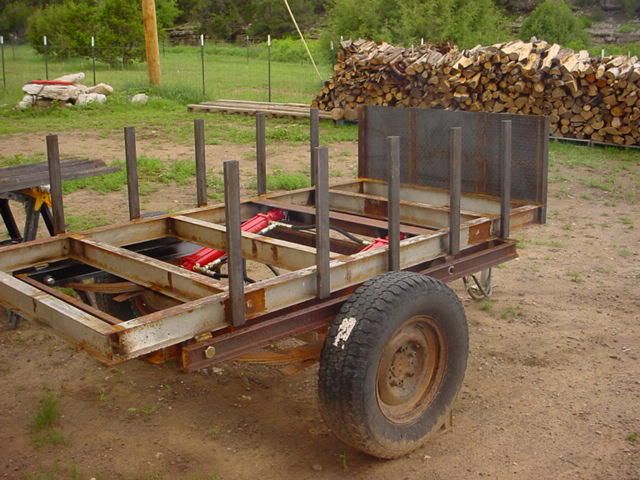
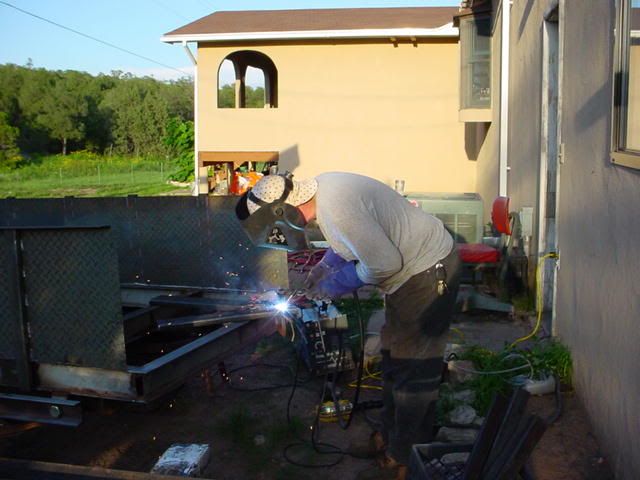
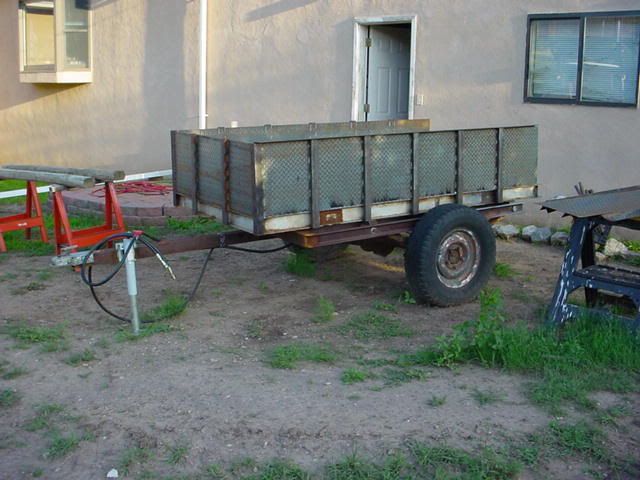
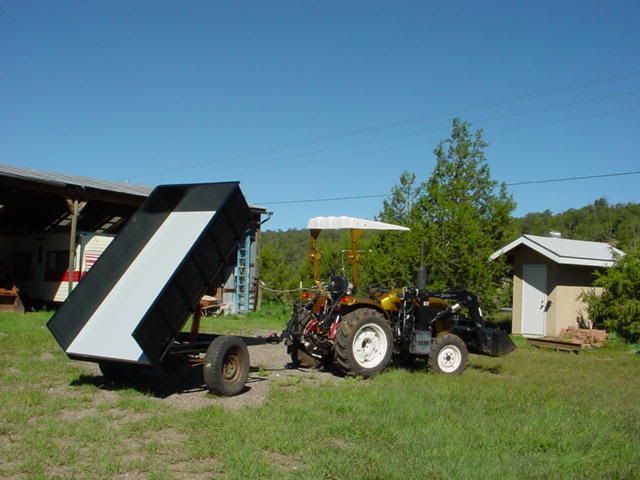
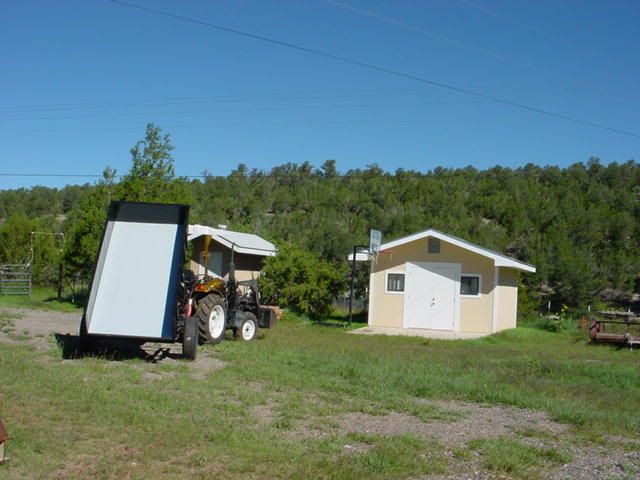
Here is a project I have been working on & off this summer.
I needed a dump trailer to move dirt, wood, wood chips, rocks etc from one place to another. I have made 3 trailers so far in my lifetime, but have never attempted to make a dump trailer.
I have a fairly good "inventory" of scrap metal thats been collecting over the years. The scrap pile has grown to the point where I have enough material to start construction on something useful.
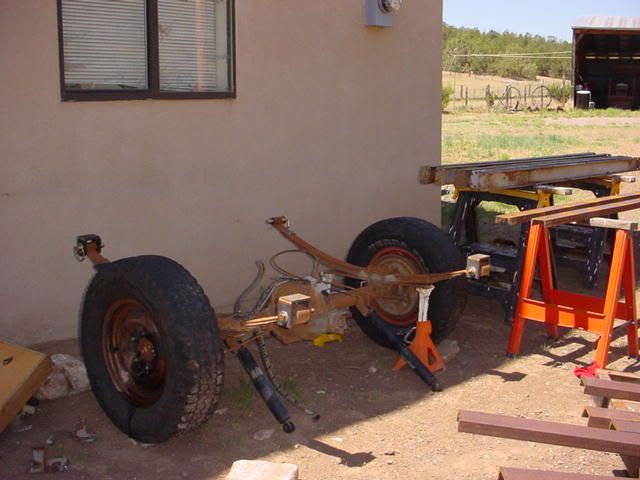
Last year I was exploring the woods near where we live on my ATV and came upon an abandon 1 ton van. I am sure it was stolen because it was pretty much striped and had been sitting there in the woods for quite some time. I took my tractor out to where the van was and used the FEL to flip it up on it's side. I removed the rear-end and hauled it back to the house where it sat for a while until I gathered up the courage & parts to make the dump trailer.
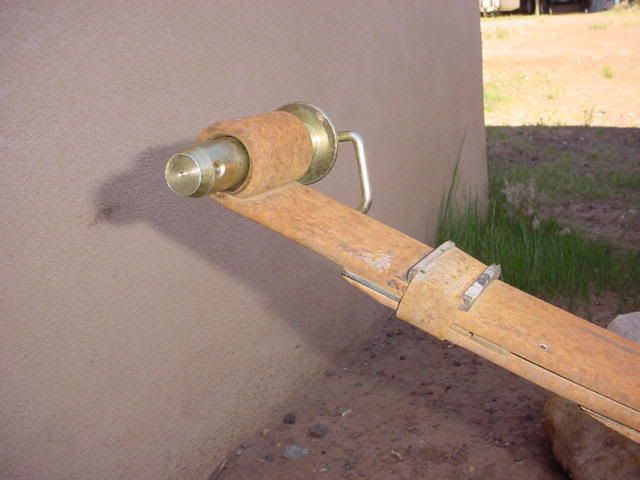
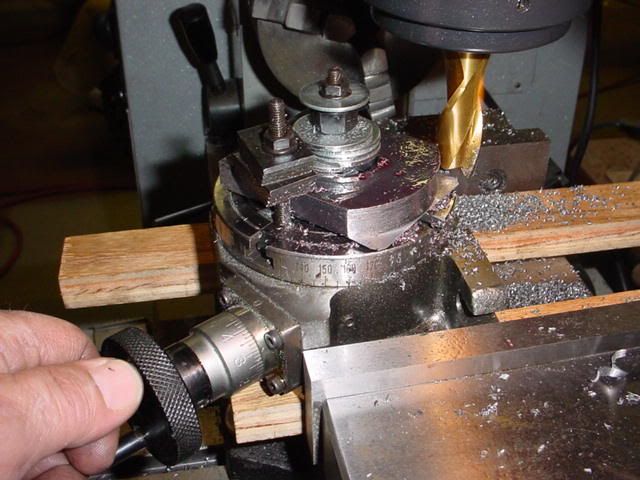
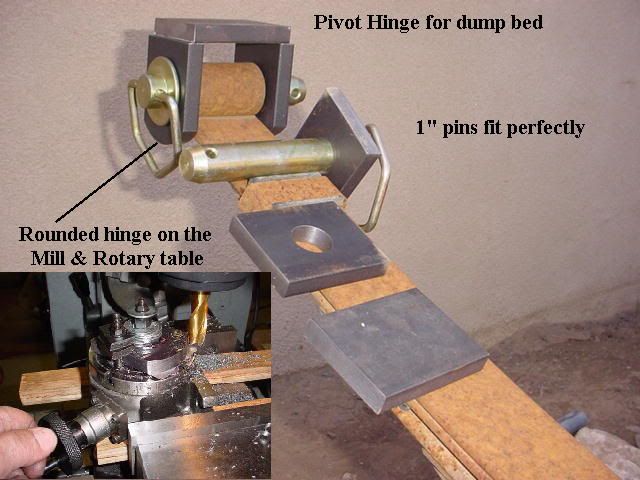
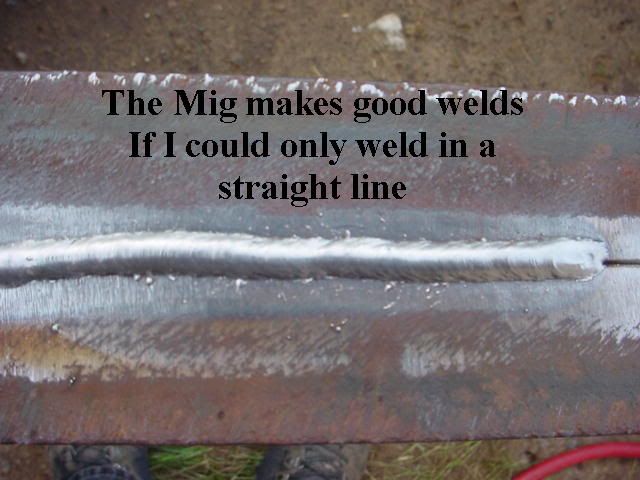
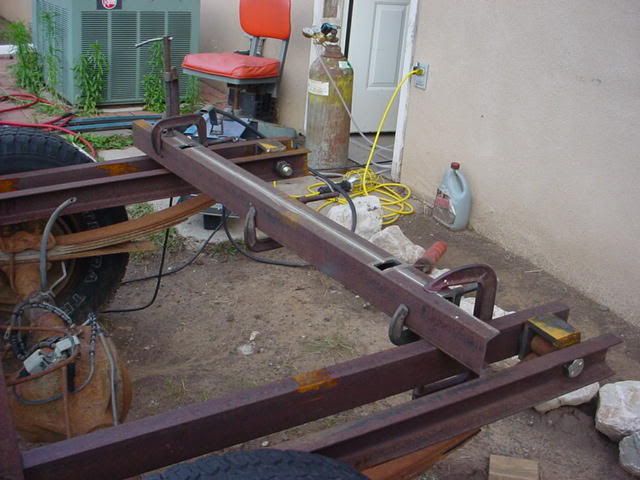
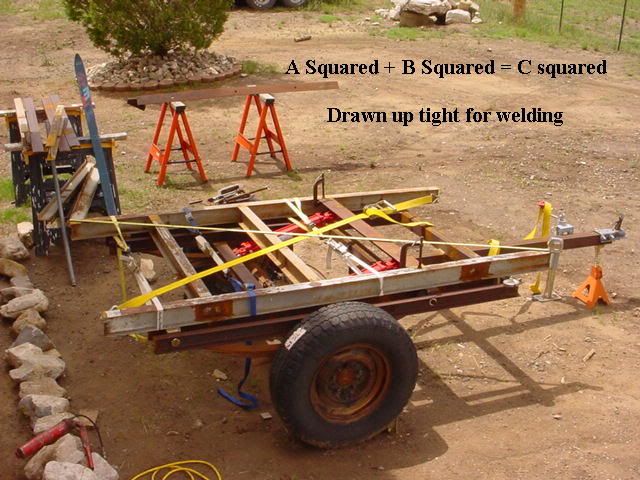
It took me a while but I finally started. I ran many ideas through what's left of my head until the light bulb finally went off.
Here is a picture of the rear end before I started.

>>>>>>All the images are thumbnails - click on them for full size.<<<<<<


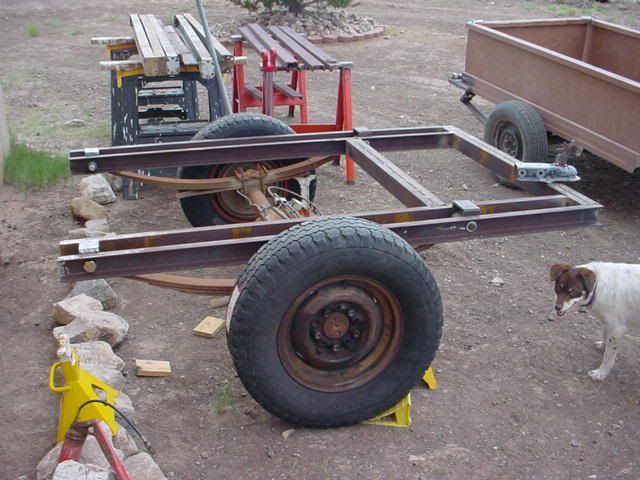
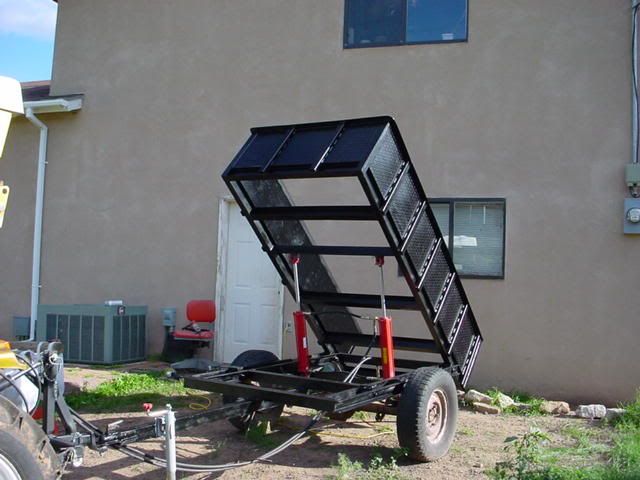
The rims you see were scavenged from a junk yard - a free junk yard out in the middle of nowhere with a lot of stuff to choose from. The Tires I got used from one of the few independent full service stations left in Albuquerque for 25 bucks. The tires & rims were missing from the rear-end when I acquired it.
 
/ Dump Trailer - start to finish
  • Thread Starter
#2  
Here are a few pictures trying to figure out the hinge for the dump bed. I needed to hinge the dump bed and also had to figure out how to build a frame for towing & keep it as low as possible all at the same time. My brain hurts!
Most dump trailers I have seen are huge and have a high center of gravity. I wanted to avoid this as much as possible.
I wanted the inside dimensions to be a little more than 4'x8' so as to be able to fit a sheet of plywood flat with a few inches to spare on each side. This is a multi purpose trailer for hauling many different type of materials, rocks, wood chips, dirt, & construction materials etc.
I wanted the bed to be as low as possible but still be able to dump the contents when needed.
Turns out the rear mounting ends of the leaf springs are 1" inside diameter - perfect for a hardened pivot pin.

I have a small milling / lathe machine and decided to round the edges of the hinge using my (very small) rotary table.

Here are all the hinge parts ready to weld.

After welding the hinge is complete:

Here I am testing the hinge to get an Idea of where I will have to mount the hydraulic cylinders to get 45* of tilt.


/ Dump Trailer - start to finish
  • Thread Starter
#3  
Oh, forgot to mention here is one of the old flat bed trailers I built / rebuilt a long time ago (30 years ago).
It was pretty much shot, the axles & toung part were falling apart.
However it had a bunch of 3" channel metal so I took it apart to recycle the metal that was still good.
 
/ Dump Trailer - start to finish
  • Thread Starter
#4  
So anyway, back to the trailer I am working on.
Here you can see I am fabricating the frame. This is what will be the support for the bed and leaf springs and give me something to attach the tong to for towing.
I used the 3" channel from the old trailer I took apart from the above photo. I "sandwiched" it together to make it into a square steel tube. Lots of welding. I ground off all the rust where it needed to be welded. I used my harbor freight MIG welder with 75% Argon 25% carbon dioxide. Using the MIG gives very pretty welds that penetrate very deep. The argon / Co2 gas keeps the splatter way down and there is NO slag. - I am happy with that welder.

In the background you can see one of my other trailers. Its the one painted Brown. I use it on the Jinma & ATV for collecting wood & wood chips. Its size is just right for the ATV but just a little too small for the Jinma. I have been using it to bring in the metal from my scrap pile over to the dump trailer construction site.

Here are my MIG welds:
I like the way they look and penetrate, now If I could only weld in a straight line!!!
 
/ Dump Trailer - start to finish
  • Thread Starter
#5  
Now it's time to make the hydraulic cylinder mounts. I used 1"x2" steel bar. Had to drill 1" holes through it. It was pretty easy drilling those 1" holes using the mill as a drill press.
I like my Harbor freight Milling machine too, it's not the best / most accurate, but it's affordable and works great for the kind of projects I do around here.
Here are the finished cylinder mounts. The long ones are for the bottom & The short ones are for the top.
You can see I have one of the long bottom mounts inserted inside the 3" channel. The short top mount is ready for welding onto the 3-1/2" x 3-1/2" x 1/4" thick angle iron for the tilt part of the bed.

Here is a close up of how the lower cylinder mount will be inserted into the 3" channel & welded. I am not a mechanical engineer - so I hope by over building this part will not fail / twist bend etc.

This is the overall lower mount / support for the hydraulic cylinders prior to the two half of the 3" channel being welded together
 
/ Dump Trailer - start to finish
  • Thread Starter
#6  
I got the tong mounted and then the actual tilt bed fabricated and ready to weld.
I used 2-1/2 x 4" I beams from the scrap pile for the tilt bed. My neighbor gave me those I beams a while back. He was cleaning up all his old "junk". The old saying "One man's junk is another man's treasure" is soooooo true.

I made the bed perfectly square by measuring diagonal on both sides and then positioning all the parts so the distance from diagonal corner to corner were exactly the same.
I then bound the whole thing together with ratcheting straps prior to welding.
 
/ Dump Trailer - start to finish
  • Thread Starter
#7  
Mounted the Cylinders to all those parts I made with the 1" holes.
This is the lower cylinder mount:

This is the upper cylinder mount:

Here I have lifted the bed hydraulically for the first time - It works, no binding - time for a beer.

OK here is the scoop on the Hydraulics - Long story short?
My job requires that I travel allot.
I stay at the Holiday Inn and collect zillions of points.
I cashed in those points for Northern Tool gift certificates.
I purchased all the hydraulic cylinders, hoses & fittings from Northern tool with those certificates.
So far I am out 25$ for the used tires.
 
/ Dump Trailer - start to finish
  • Thread Starter
#8  
After I enjoyed my Beer I went went out there and cycled the hydraulics a bunch. Just to make sure it was going to work. And to spot any potential trouble spots or interference that I had not planned on. SO far so good.


In the background you can see yet another of my home made trailers. It's a big one 8x16 flatbed. I used it for bringing home my Crate Jinma 354.
 
/ Dump Trailer - start to finish
  • Thread Starter
#9  
Last one for today.
Here is where I am at as of 8/6/06 and all for $ 25.00

In the background you can see my wife and I have already started on this comming winters fire wood. So far we have about 2-1/2 cords. We need about 2 more cords to make it through the winter.

I welded on the stakes to support the sides & front. It's 18" tall from the top of the bed to the top of the stakes. The stakes are 1"x2"x 1/8" hollow tube. I used 14 ga diamond plate for the front.
I am out of diamond plate and now have to go purchase 2 pieces 8' long x 18" wide. That's going to hurt. I priced it and will cost me 128$ for a full 4x8 sheet of diamond plate. They will plasma cut it for me for 10 bucks extra - at least that parts cheap.
Anyway I hope you have enjoyed this so far.
 
/ Dump Trailer - start to finish
  • Thread Starter
#10  
Ok - it stopped raining for a few minuets. So I got busy back at the dump trailer project.
I picked up the 14 ga diamond plate a few weeks ago. They plasma cut it for me, 2 pieces 18" x 8' for the sides and the left over piece 12" x 8' I will use for the fenders.
It's been raining here in Biblical proportions for 40 days & nights.
It's been lightning real bad as well so it's been tough to make any progress. But today I did.
Here is a shot of me welding a few rec-tube-ular pieces of steel together for the back of the trailer sides.


I welded from morning to night. It's late in the day as you can see by the length of the shadows.
In the upper left of the photo you can see how GREEN it is man I got to go mow one of these days.
 
/ Dump Trailer - start to finish
  • Thread Starter
#11  
Here is what I got done today. The sides are on.
I still have some "engineering" and fabrication to do on the rear of the trailer where the tail gate is to be installed.
 
/ Dump Trailer - start to finish
  • Thread Starter
#12  
An over all shot from a little distance.


I will use 2"x12"'s for the decking and paint them gray.
They will be installed with 5/16" carriage bolts, with some fancy stainless steel square cut washers I found on-line. They are designed for carriage bolts & wood and the exact name of them is Stainless Steel Torque Washers
CLICK HERE To see them
 
/ Dump Trailer - start to finish
  • Thread Starter
#13  
The weather was finally nice today (Labor-day) and I got busy on the dump trailer project. Took the twisted wire wheel cup & the angle grinder to all the rust. Cleaned it up real nice. Then I primed it.
Here is a picture of the primed trailer.
As always you may click on the picture to enlarge.
 
/ Dump Trailer - start to finish
  • Thread Starter
#14  
It took about two hours of the wire wheel to get all the rust off to my satisfaction.
 
/ Dump Trailer - start to finish
  • Thread Starter
#15  
After the primer cured for about an hour I proceeded to paint it black.
I had 12 cans of black but ran short by about 2 cans. It will need two coats of black so I need to pick up some more paint next time I'm in town.
 
/ Dump Trailer - start to finish
  • Thread Starter
#16  
When painting the underside I used the tractor hydraulics to "dump" the trailer so that is was easy to get to the bottom of things.


I still have a few things left to do.
Finish the black paint & give it a second coat.
Pick up the lumber for the floor, Paint the lumber, install the floor.
Make some brackets to hold the hydraulic hoses.
Make the tail gate.
After I do the above items I am going to use it around the homestead.
Then next year I think I will make it "Street Legal" by adding some fenders and lights, get it weighed, inspected and get a license plate for it.
 
/ Dump Trailer - start to finish
  • Thread Starter
#17  
Worked on the dump trailer again today.
Finished all the painting, it now has two coats of Black.
The hydraulic hoses can now be attached to the tong. I needed to make the clamps. I scrounged around the shop and remembered I have a bunch of steel bushings. So I cut four of them in half (long ways)
This first pic is cutting the bushings in half. I have cut pipe before but not like shown in the picture. I didn't want my fingers any where near the blade so I came up with this crazy idea:

Here they are all cut in half along with the center piece with mounting hole drilled and ready to weld together:
 
/ Dump Trailer - start to finish
  • Thread Starter
#18  
Got them welded together, primed and painted.

Here is a close up of one installed, I used 1/4-20 bolts, Drilled & taped the tong to install the clamp.
 
/ Dump Trailer - start to finish
  • Thread Starter
#19  
I installed four clamps evenly spaced ~ 20" apart to hold the hydraulic hose so that it would not sag.

I picked up the lumber for the floor yesterday. I started to install it as the clouds were starting to build up in the sky (AGAIN) :mad:
I got 3 of the 5 planks drilled & carriage bolted on. Then as I was getting ready to cut the fourth board it was lightening all around me, real close :eek: . Then the sky let loose and the rains came down. So I scrambled to pick up all my tools and took the last shot of the day. Just as well, I was getting tired and hungry the Mrs. was ready to serve up dinner.
 
/ Dump Trailer - start to finish
  • Thread Starter
#20  
It finally stopped raining! Probably for the rest of the year.
I had a little time this past weekend to finish the floor on my dump trailer in between celebrated my Mom & Dad's 60th wedding anniversary. My sisters from Florida & Ohio were there as well as my brother from Albuquerque it was also a family reunion. Had a wonderful time.
Anyway I got all the floor boards installed, primed & painted machine tool gray.
In the background to the right you can see my "Solar Powered Outhouse". It's stuccoed to match the house :D
I say solar powered because I installed a solar charged "reading" light :cool:.

This shot includes the Motorcycle "shed" It's finished inside complete with sealed concrete floor, Smooth finished & painted Sheetrock walls and textured celling.

Next is to make some fenders, tail gate, and install some tail lights. I will do that at my leisure as it's time to go get more firewood for winter.
 

Marketplace Items

UNUSED FUTURE FT36C STAND ON SKID STEER (A52706)
UNUSED FUTURE...
2009 Kubota RTV1140 (A57148)
2009 Kubota...
7050CFL (A59228)
7050CFL (A59228)
2005 Kobelco 135SR Hydraulic Excavator (A59228)
2005 Kobelco 135SR...
2021 NEW HOLLAND GS72 HD FRONT MOUNTED BRUSH CUTTER (A57024)
2021 NEW HOLLAND...
HYDRAULIC TILTING BUCKET FOR MINI EXCAVATOR (A58214)
HYDRAULIC TILTING...
 
Top