You are using an out of date browser. It may not display this or other websites correctly.
You should upgrade or use an alternative browser.
You should upgrade or use an alternative browser.
Geothermal Heat Pump Project
- Thread starter techman
- Start date
- Views: 20873
/ Geothermal Heat Pump Project
#21
Chapter 7
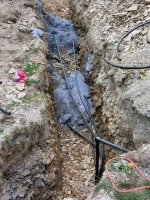
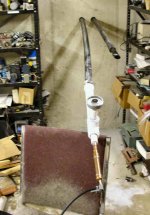
As the loop work progressed, I had the misfortune that a heat wave in the 90's was persisting for the entire time. No rain, but hot and tiring conditions. Laying the bottom pipe and covering it with screenings was relatively easy work. Carrying and maneuvering the coils, especially around the piles of dirt, was sometimes a challenge, but manageable. The greatest challenge was when the spoil pile transitioned from the inside of the loop to the outside. At that transition I had to carry the 2/3 complete coils over the trench, using a 2x6 I had as a plank over the hole. There was not much clearance with the spoil piles, and it was a bit tricky at times.
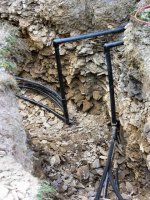
The next job was to put approx. 2' of backfill in the trench. Using the FEL I tried but was never able to get a nice even fill across the trench. Great effort with shovel, rake, hoe and pick was needed to get the layer somewhat level, so I could lay the tubes and cover them with screenings. Where possible I used the BH on the tractor and did a sweep with the side of the bucket to try to level out the dirt. It helped, but with all of the shale, way too much manual labor was still needed. This was the absolutely most difficult portion of the job. After the job was done, I spoke with another installer who said he had gone to digging with a 4' bucket and laying all 4 tubes on the bottom of the trench. A real labor saver which I will do on my next job this summer.
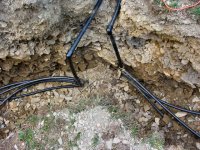
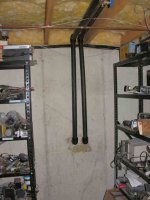
After both layers of tubes were in, and the header area was still fully exposed, I did a pressure test. I kluged together the fittings to get an air fitting and gauge in the line. I used air and pumped up to 100 PSI and held it for 1 hour, the reduced it 50 PSI and let it sit for 18 hours. I did not want to leave the high pressure in long term due to concern that daytime heating might push the pressure higher, and I did not fully trust my test jig. The 50 held solid, concluding my test. The loop will run at 20-30 PSI, so the test was 2-3 times higher.
Some recommend testing with water, which can show up leaks more readily due to the minimal compressibility, but water takes a lot more work and can get messy later on when working on the piping. It is not easy to get the water out again. Using air you need to let the temperature stabilize in the air so that temp variations do not effect the results.
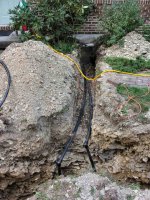
After the testing I finished the backfilling. The fill was over 600 tons (calculated) and took several solid days of tractoring. I was stopped twice by hose breaks on the tractor. Several years old and there was days of high load/high shock work so I was not entirely surprised. Trips to the local Parker hose store got me back in operation each time. In the end I had to have about 60-70 tons of dirt hauled away. This was a combination of the fact that all of the dirt never seems to go back in a hole (especially with shale) and all of the screening tonnage I put in.
Time for more pix.
Continued on Chapter 8
paul
As the loop work progressed, I had the misfortune that a heat wave in the 90's was persisting for the entire time. No rain, but hot and tiring conditions. Laying the bottom pipe and covering it with screenings was relatively easy work. Carrying and maneuvering the coils, especially around the piles of dirt, was sometimes a challenge, but manageable. The greatest challenge was when the spoil pile transitioned from the inside of the loop to the outside. At that transition I had to carry the 2/3 complete coils over the trench, using a 2x6 I had as a plank over the hole. There was not much clearance with the spoil piles, and it was a bit tricky at times.
The next job was to put approx. 2' of backfill in the trench. Using the FEL I tried but was never able to get a nice even fill across the trench. Great effort with shovel, rake, hoe and pick was needed to get the layer somewhat level, so I could lay the tubes and cover them with screenings. Where possible I used the BH on the tractor and did a sweep with the side of the bucket to try to level out the dirt. It helped, but with all of the shale, way too much manual labor was still needed. This was the absolutely most difficult portion of the job. After the job was done, I spoke with another installer who said he had gone to digging with a 4' bucket and laying all 4 tubes on the bottom of the trench. A real labor saver which I will do on my next job this summer.
After both layers of tubes were in, and the header area was still fully exposed, I did a pressure test. I kluged together the fittings to get an air fitting and gauge in the line. I used air and pumped up to 100 PSI and held it for 1 hour, the reduced it 50 PSI and let it sit for 18 hours. I did not want to leave the high pressure in long term due to concern that daytime heating might push the pressure higher, and I did not fully trust my test jig. The 50 held solid, concluding my test. The loop will run at 20-30 PSI, so the test was 2-3 times higher.
Some recommend testing with water, which can show up leaks more readily due to the minimal compressibility, but water takes a lot more work and can get messy later on when working on the piping. It is not easy to get the water out again. Using air you need to let the temperature stabilize in the air so that temp variations do not effect the results.
After the testing I finished the backfilling. The fill was over 600 tons (calculated) and took several solid days of tractoring. I was stopped twice by hose breaks on the tractor. Several years old and there was days of high load/high shock work so I was not entirely surprised. Trips to the local Parker hose store got me back in operation each time. In the end I had to have about 60-70 tons of dirt hauled away. This was a combination of the fact that all of the dirt never seems to go back in a hole (especially with shale) and all of the screening tonnage I put in.
Time for more pix.
Continued on Chapter 8
paul