Homemade Cab for Deere 2320 CUT

   / Homemade Cab for Deere 2320 CUT
  • Thread Starter
#21  
dtd24 said:
Nice project looking good. What are you thinking about the windows? I was wondering about how to keep them from frosting or fogging up. I did see the possibility of a heater which would help. Just thinking.

Nice fab work!!!

Thanks!

The plan right now is to build with Plexiglass windows. I had just about pulled the trigger on ordering custom cut tempered glass for the front and rear windows, but held off. There's a fair chance I'd manage to break one during installation with my luck. If I add wipers, I'll probably install a sacraficial piece of thin plex where the wiper runs, kind of like a tear-off in NASCAR.

As for fogging; Even if I don't add heat, I will probably put some type of fan or blower in to at least blow air at the front and rear "glass" to help with fogging. If I'm clever about it, may be able to leave a spot for a heater core to be added later on...
 
   / Homemade Cab for Deere 2320 CUT
  • Thread Starter
#22  
joes_427_vette said:
Great work so far. I was wondering is 2" tube overkill or would 1 1/2" be ok ? I was wondering if you researched this or had the 2" available. The tubing is really rigid for what it weighs and ideal for this type of project. Can't wait to see the door frames.

I chose the 2" tubing after running the engineering numbers. The factory ROPS is 2x2" x 3/16" wall tubing. My cab is 2x2" x just under 1/8" wall (11 gauge). So, it's approx 30% lighter than the factor ROPS stock. I weighed the fact than in a tip-over, I'll have 4 posts to land on vs the original 2 posts, but the light gauge tubing I bought is also a lower grade of steel than what ROPS structures are made of. If I remember the numbers, 4 of these should be stronger than the factory ROPs by just a little bit.

I looked at using 1 1/2" stuff too, but you loose a lot of rigidity due to the smaller width, even with a little heavier wall. Plus, I couldn't get the strength numbers to work out to where I wanted them while still saving weight, had to get into pretty hefty walls on the 1.5" for what I wanted.
 
   / Homemade Cab for Deere 2320 CUT
  • Thread Starter
#23  
Stage 2.5: "Fender" tubes

Yesterday, I finished up the second roof tube and welded it in place like the first. Really started to get the cab pretty strong.

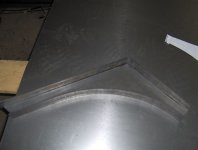
Next up were/are the pieces to bolt in along the fenders to join the bottoms of the two frames. These are tricker. Originally, I was going to make curved pieces that were 2" wide all the way along the fender. This posed some problems. The biggest issue this would drive was when I got to fabricating the doors, that extra curve might complicate things. I got to looking, and with the factory handholds on the fenders, a "straight-over, and angled down" line really didn't get in the way any more than the handholds do when entering the cab. Plus, that gives me a more normal corner when I get to the doors. So, plan "B" took effect today.

These pieces are basically fabricated channel iron. The twist with "plan B" is that It's not a constant height.

I pulled out the 4x8 sheet of 18 gauge cold rolled steel I bought along with the other steel. Using one of a couple of new toys, err, tools for this project, my new air shears, I cut off a large chunk to set aside for the roof.

Using posterpaper, I did some tracing on the 2 stub tubes from the front and rear frames and worked out a template to trace onto the steel. I cut pieces of 18g 1/8" smaller all the way around than the template. Straight lines were cut with the shear (which is an awesome tool) and the curved part was cut with my other new toy, the air powered nibbler, also cool. Next, I cut and bent/formed 2x1/8" flat iron to form the top and bottom flanges. Some adjusting, persuading, and cussing, and I had them tacked/welded together.

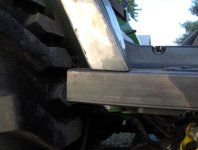
To attach to the rear frame tube, I welded 2 3" pieces of 1.5" flat stock to the inside of the top and bottom flanges of the new "channel". These slide into the tube on the rear frame. I lined up the tube and channel and drilled holes through the tube and those tabs. After opening the holes up to 3/8" and tack welding nuts to the inside faces of the tabs, That end was done. On the bottom end, I welded in a small plate across the bottom of the channel, drilled a hole in it and welded a nut on the top side. A hole in the bottom tube of the front frame lines up with this, and a bolt can come up from the bottom of the frame to tie the two together...

Tomorrow I'll have to weld up the second channel piece and drill the holes. Both of these will probably get some Bondo work to pretty up the seams on the outside before paint. There's plenty of weld on the inside to hold things together, but I don't have the patience to weld the outside and grind it perfectly right now...

Next up, the roof. Problem is, I have a design in mind that will probably require me to build some special tooling to make it. Not sure how I get myself into these things! :rolleyes: Either that, or I will continue to put off tackling the roof and work on doors instead...:cool:
 

Attachments

  • Fenderbar1.jpg
    Fenderbar1.jpg
    38.5 KB · Views: 1,329
  • RH Fenderbar in place.jpg
    RH Fenderbar in place.jpg
    84 KB · Views: 1,661
  • RH fenderbar1.jpg
    RH fenderbar1.jpg
    87.7 KB · Views: 1,449
  • Joint.jpg
    Joint.jpg
    72.8 KB · Views: 1,588
  • bottom_end.jpg
    bottom_end.jpg
    51.5 KB · Views: 1,171
   / Homemade Cab for Deere 2320 CUT #24  
Been following this since the beginning, & I was wondering how you were going to deal with the fender curve. I like your solution; elegant in it's simplicity, Brilliant!!

Was also wondering about the 2X2 ROPS replacement, but I don't have the education, or math skills, to do the calculations. My intuition, & 13 years building NHRA approved roll cages, says it's marginally adequate (seems to agree with your calculations) with the front piece calculated in. Personally, I'd have done the back in 2X3, but your 2320 is a bit smaller than my reference, my old 4400 which must be about 40% bigger.

Keep up the good work!
 
   / Homemade Cab for Deere 2320 CUT
  • Thread Starter
#25  
In a full rollover or if it went over backwards, I'm about 95% sure the cab won't be enough to really protect like a ROPs. My thinking was that since the machine is very tall and skinny, you'd really have to work at going completely over. Now, if I was running down the highway at 11-12 mph or whatever it'll transport at and drove into the ditch, yeah, it'll tumble. But, in the winter when I'm using the cab, if I slip of a culvert at low speed or something, I can't really imagine doing much more than tipping over onto it's side. In that case, I think the cab will do enough to keep it from continuing to roll. Likewise, if you went over backwards, the cab will have less strength than the factory ROPS, since it's not tied into the chassis with as many screws or as many big gussets at the rear. But again, with a rear mounted blower out there as a wheelie bar, can't really see it going over backwards either.

I don't intend this cab to be a real ROPS that could pass all the certification tests. I will be taking a "calculated risk" when using the cab. This is true any time the factory ROPS is removed, altered, folded down, etc.

I'm pretty happy with how the fender bars are turning out. They don't match the curve behind them very exactly, but from most normal viewing angles, they look fine. I may add some mostly cosmetic fenders eventually, which might hide any other irregularities.
 
   / Homemade Cab for Deere 2320 CUT #27  
My feeling exactly. The cab is only going to protect it from a 360 degree roll which at normal speed would be quite impossible ( unless it fell off the transport truck at 60 mph ). I mow with my 4110 at some rather steep angles locking the differential for traction and it is very stable. A couple angle gussets plus the 2x2 tube will be more than adequate. I always tend to build things alot heavier than they should be. I vote for your engineering skills and plans.
I have a feeling this post will be the basis for many more cabs to come. How can JD charge 4k for something like this.
Great reporting... keep up the great work.
 
   / Homemade Cab for Deere 2320 CUT #28  
Just to clarify: My "marginally adequate" comment isn't meant as a slur! Today with computer modeling & design, most things are engineered "barely adequate" IMHO (meaning they'll work as designed but there is NO "fudge factor" built in due to costs & profit margins). Like Joe, I also tend to over-engineer given half a chance. Also like Joe, I'd add half a dozen gussets to that back bar (three 6X6X11ga cut diagonally & welded to the lower edge of the inside face of the tube).

I agree, that structure WILL protect you quite well for the tractor's intended use in probably 98% or 99% of circumstances. If I was building something like this for myself, that would be more than good enough for me. If, however, I was building something like this for someone else, I would "over-engineer" it.
 
   / Homemade Cab for Deere 2320 CUT
  • Thread Starter
#29  
No offense taken at all dbdartman. I mainly wanted to clarify the point so someone reading this thread didn't assume that This design was a real ROPS cab and try driving off the edge of the world in one! :eek:
 
   / Homemade Cab for Deere 2320 CUT #30  
Nice work! Any new pictures and/or updates?

Ryan
 

Tractor & Equipment Auctions

2007 JOHN DEERE 624J WHEEL LOADER (A51406)
2007 JOHN DEERE...
Toro Workman HDX-D Utility Cart (A53421)
Toro Workman HDX-D...
2015 Toro Multi Pro 1750 175 Gallon Turf Sprayer Cart (A51694)
2015 Toro Multi...
12in Mini Excavator Tooth Bucket (A52377)
12in Mini...
2008 FORD RANGER SINGLE CAB TRUCK (A51406)
2008 FORD RANGER...
2009 JLG 1930ES ELECTRIC SCISSOR LIFT (A51242)
2009 JLG 1930ES...
 
Top