Homemade Cab for Deere 2320 CUT

   / Homemade Cab for Deere 2320 CUT
  • Thread Starter
#41  
I love it when a plan comes together...

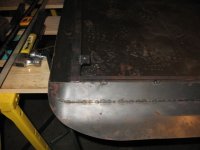
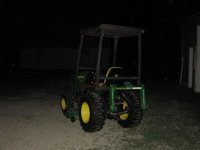
Unfortunately, today wasn't one of those days. Yesterday afternoon I got a little time out in the shop. I finished welding up the LH fender piece for the frame, drilled all the attaching holes and bolted it in. I then turned to the roof again. I cut 4 pieces of 1x1" square tubing, pretty lightweight stuff I had around. I clamped them to the top of the frame, lined up flush along the sides and set in by the thickness of the sheetmetal on the front and back. I used the frame as the jig since the sides and front are sloped. I tacked the tubes together and welded them up solid before pulling them loose from the clamps. The idea is that this would become the subframe that would attach the roof to the main framework, with the 1" perimeter providing a nice place for a seal of some sort...

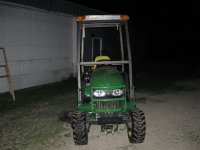
Well, This morning I went out and used the angle grinder with a flap wheel to clean up the ends of the small tube frame and grind down the welds flush where needed. When I set the frame into the roof, it fit perfectly front-to-back. However, I noticed that when I centered up the rear tube in the roof shell, the front wasn't centered at all! :eek:

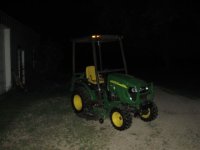
Turns out, the cab frame itself isn't square, not as square as I'd thought anyway. Using my digital level, I did a little investigating. The front frame appears to be leaning to the right a bit, maybe 0.25-0.4 degrees. Not good. That's throwing the top ot of square by a bunch. My guess is that the platform isn't as level as I'd assumed when I had the front frame resting on it. I don't remember checking level side-to-side when placing the front frame, mostly worked on centering it to the hood (it's still dead-on there) and getting both sides the same distance ahead of the rear frame (still there too)... Darn.

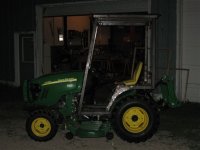
I'm pretty sure I can shim the front cab mount with washers/etc to level off the front frame and bring the top much, much closer to square. My main fear is that I'll have to rework the RH fender bar some. Near as I can tell, the front right may need 1/4" of shim. That may require trimming 1/4" off of the height of that fender bar. Would be easier if there wasn't that plate welded in the bottom end with the weld nut that anchors things... Not impossible, but a setback nonetheless. :mad:

Tomorrow after work I'll loosen things up and start shimming and see how things look. That should give me a better idea how much extra work I've made for myself...
 
   / Homemade Cab for Deere 2320 CUT #42  
Check the tire pressure on all 4 corners of the tractor, then verify your parking spot is dead level. Then check it for square again.

Even a seemingly solid tractor can flex.
 
   / Homemade Cab for Deere 2320 CUT #43  
I ran into a similar problem with the front posts I added to my canopy. The center hole along the front edge of the FEMCO sheet metal looked centered; but it wasn't, so I had to make sure I drilled the 1/4" flat steel that goes across the front posts and meets up with FEMCO sheet metal just right to get it to bolt up.

The I had the same 1/4" flat warp from the welding heat that I had to use washers to fill the gap before bolting everything down.
 
   / Homemade Cab for Deere 2320 CUT
  • Thread Starter
#44  
Defective said:
Check the tire pressure on all 4 corners of the tractor, then verify your parking spot is dead level. Then check it for square again.

Even a seemingly solid tractor can flex.

Thought of that briefely, but I'm pretty sure there's no flexing going on. The digital level read between 0.0 and 0.1 degrees when layed on the rear frame's crossbar. I hit the zero button to make that "level" and then moved to the front. Got around 0.3 degrees up front. The tractor's parked in the shop on concrete. With the front axle on a pivot, you'd have to have a front tire up on something large to hit the stops and get the chassis to twist. The 0-0.1 reading tells me the rears are sitting pretty well level.

The 2305's and 2320's have a plastic platform instead of the sheetmetal one on the 2520. My guess is that the RH edge may flex a bit more than the LH side (The hydro filter is under the LH side, that structure supporting the filter probably makes that side pretty stable). Plus, there's a chance that there's a slight difference in the height of the ribs and things on the plastic platform too. My own fault for not checking level on the front before moving on to making the other pieces. Other than possibly needing to trim the one fender piece, it should be relatively painless, just some shimming. The other kicker is that I went ahead and welded the roof frame solid (mostly). Had I left it tacked, it'd be easier to adjust. It'll be hidden, so I can hack at it quite a bit to "adjust" it. :D
 
   / Homemade Cab for Deere 2320 CUT
  • Thread Starter
#45  
mjncad,

"Measure it with a micrometer, mark it with chalk, cut it with a torch, beat to fit, paint to match, inspect it with a microscope." is sounding just about right...

What did our shop teachers always try to tell us? "Measure once, cut twice." or was it the other way around... I never can remember! :rolleyes:
 
   / Homemade Cab for Deere 2320 CUT
  • Thread Starter
#46  
Progress...kinda

Got back on the cab project tonight. Started out by loosening up the 2 fender bars and the RH front mount bolt. Using the digital level, I added washers and shims to the RH mount until the front cross bars measured the same angle as the rear did. Took right at 3/8" total. I found 3 washers that stacked up to about that and bolted the RH corner back down with the washers in place. A quick check with the tape measure revealed that the top of the frame was now square.

Using the angle grinder I sliced through some of the corner welds on the roof frame to allow it to flex back to square. Some persuading, welding, and a session of me practically bending it over my knee, and the roof frame matched up to the now square cab.

The frame was then set back on the cab and 4 tabs made of 3/16" x 1" flat iron were welded to the side rails. The tabs recieved a 3/8" hole in each to provide 4 attaching points to bolt the roof to the cab. The roof frame was then tacked into the roof shell.

I just had to see it, so I heaved the roof up onto the cab and clamped it with a couple of wood clamps. I pulled the tractor outside to see how things looked. I only had a couple of the amber flasher attaching holes drilled, so I hung the front ones on to get a feel for how that'll look...
 

Attachments

  • IMG_0009_roofframe.jpg
    IMG_0009_roofframe.jpg
    50.2 KB · Views: 625
  • IMG_0012_frametacked.jpg
    IMG_0012_frametacked.jpg
    42.2 KB · Views: 617
  • IMG_0013.jpg
    IMG_0013.jpg
    29.4 KB · Views: 593
  • IMG_0014.jpg
    IMG_0014.jpg
    46.1 KB · Views: 1,102
  • IMG_0016.jpg
    IMG_0016.jpg
    43.1 KB · Views: 1,249
  • IMG_0017.jpg
    IMG_0017.jpg
    34 KB · Views: 602
   / Homemade Cab for Deere 2320 CUT #47  
I still have to tell myself to allow some slop in my work to allow for manufacturing tolerances.

Like you I didn't rely on the ground as a reference point since tire flex/inflation, floor irregularities, etc could throw measurements off. I ended up choosing a couple of stout reference points for my front posts and then averaged the numbers out, which worked pretty well for me.
 
   / Homemade Cab for Deere 2320 CUT #48  
I can't wait to see the finished cab. Excellent work and keep the pics coming!

Ryan
 
   / Homemade Cab for Deere 2320 CUT
  • Thread Starter
#49  
Quickie Update

Not a lot of progress the last couple days. The last 2 nights I've been wrestling with my new sandblaster to get it dialed in to work worth a darn. Finally hit it tonight. I took some time to knock the rust off of the fender pieces of the cab frame, Bondo the outside surface and seams, sand, and get some primer on them to at least slow down the rust. They're not perfect, but the doors will cover part of them most of the time anyway. They do look better with the body filler filling in the seams since I just skip welded them on the inside. Probably won't paint them yet, since they'll be on and off the tractor a few times before it's all done.

I also made a small amount of progress on the roof again. The overhangs on the sides of the cab will end up creating some recesses that are going to be tough to paint later. So, I cleaned the rust off of the inside of where those pockets will be and gave those areas a good coat of that zinc-rich primer. When I weld the filler strips on, some of the primer will burn off, but I figure at least I know most of that area will have at least some primer. The zinc stuff helps a little more than just primer since the zinc can be a sacraficial lamb to corrosion. Should be able to pull the sides straight and weld in the filler strips and some gussets for the front and rear overhangs tomorrow. That will pretty well get the roof close to being done I think.

The plan is to finish up the roof fab, seal up the roof and clean up the rust, drill all the holes needed for lights/wires, and get the roof primed and painted. Then it can be set aside and I can get started on either the doors/windows or the pieces to fit around the pedals and hood...

Sorry, no pictures. nothing much exciting to take pictures of, the fender pieces still look like they did, only smoother...
 
   / Homemade Cab for Deere 2320 CUT #50  
What are you gonna use for windows?

Ryan
 

Tractor & Equipment Auctions

2023 Trailerman Gooseneck (A50514)
2023 Trailerman...
BUNDLE OF GALVANIZED CORRUGATED METAL SHEETS (A51244)
BUNDLE OF...
2023 Case IH 4412F 12 Row 30 In. Row Spacing Folding Corn Head (A50657)
2023 Case IH 4412F...
Heritage / Woods RD 72 3 pt Finish Mower (A50515)
Heritage / Woods...
Woods BW12 Batwing Mower (A50514)
Woods BW12 Batwing...
2020 FREIGHTLINER CASCADIA 126 TANDEM AXLE SLEEPER TRUCK (A52141)
2020 FREIGHTLINER...
 
Top