Jim's Pole Barn Project - hopefully

   / Jim's Pole Barn Project - hopefully
  • Thread Starter
#261  
Re: Jim\'s Pole Barn Project - hopefully

Here is the back. It is completely finished. I've even cleaned the mess up since the picture was taken. /forums/images/graemlins/shocked.gif /forums/images/graemlins/laugh.gif I think it looks odd w/o any gable vents, but since I used ridge vents and soffit vents they aren't needed. I'm also glad I finally got the facia up on this end yesterday. That helped the looks a lot.

I've also been inhabited by the birds. On the soffit on the South side a bird built a nest (before I enclosed the back) and laid eggs. At the time, I got out what I could of the nest and I didn't see any eggs. She must have figured out how to get to it from the inside (I'm still missing the door for the tractor bay). I've heard the babies in their chirping since Saturday. I'm assuming that she still must be getting in there to feed them - or at least I hope she is. /forums/images/graemlins/crazy.gif
 

Attachments

  • 705778-100_0598.JPG
    705778-100_0598.JPG
    37 KB · Views: 362
   / Jim's Pole Barn Project - hopefully
  • Thread Starter
#262  
Re: Jim\'s Pole Barn Project - hopefully

A shot of the south side and the tractor's future home. This side has the most work to do yet.

One thing I can say though, I'm glad I had my Epi-Lasek surgery done this past winter. It has been so much more enjoyable out working and sweating and not have the sweat burning my contacts. I typically where sun glasses - doubling as safety glasses - but if the sweat gets on them I can take them off for a second, finish what I'm doing and then clean them vs. w/ my normal glass I would have had to clean them as soon as the sweat dripped because I would have been able to see.
 

Attachments

  • 705779-100_0599.JPG
    705779-100_0599.JPG
    35.4 KB · Views: 305
   / Jim's Pole Barn Project - hopefully
  • Thread Starter
#263  
Re: Jim\'s Pole Barn Project - hopefully

Last one for now, another shot of the South Side. I want to finish this all this weekend. I'm on vacation next week and would like to start the process of moving the top soil out so I can start hauling the gravel in. That sounds like a lot more fun - no ladders involved and it does involve SEAT TIME. /forums/images/graemlins/grin.gif
 

Attachments

  • 705780-100_0600.JPG
    705780-100_0600.JPG
    46.2 KB · Views: 302
   / Jim's Pole Barn Project - hopefully #264  
Re: Jim\'s Pole Barn Project - hopefully

</font><font color="blue" class="small">( sounds like a lot more fun - no ladders involved )</font>

Jim,

I can understand your position on ladders one hundred percent!! Just about anything else is preferable, except for crawl spaces. /forums/images/graemlins/blush.gif /forums/images/graemlins/frown.gif /forums/images/graemlins/crazy.gif

Your barn looks really nice. The quality of workmaship really comes through in the finished product. I can't wait to see more.

Eddie
 
   / Jim's Pole Barn Project - hopefully
  • Thread Starter
#265  
Re: Jim\'s Pole Barn Project - hopefully

Thanks for the compliment Eddie. I've been watching you water & electric projects. That looks like some fun. Maybe one of these days when your finished I can hook a camper up, head to Texas and stay down in your park for a few days. It looks/sounds like it is going to be really nice.
 
   / Jim's Pole Barn Project - hopefully #266  
Re: Jim\'s Pole Barn Project - hopefully

Jim,
Looking great.......
If you need to add a box for a 30A-120V camper outlet, it still takes the same siding block. It all fits in a single gang box.
Take a new box, draw an outline, on the inside of the barn right next to a stud, where you want the outlet. Make sure it is on the same horizontal plane as any other boxes on that side. Use a bellhanger bit (which I have /forums/images/graemlins/grin.gif) to drill through the OSB and siding at all four corners. A bit that long will allow you to drill straight out from the side of the stud. That just gives you an idea where the box is gonna be.
Then you can hold up the siding block on the outside and mark where to cut the siding to accomodate the new block. Use a utility knife for that. Cut out the OSB to match the box. Next use a siding removal tool (which I have also /forums/images/graemlins/grin.gif ) to pop the siding apart. Slip the siding block in behind the siding and fasten it down as good as you can. Nail the box in from the inside and then you're good to go. Make sure you have a box with the nails at the rear of the box ( the dark brown ones, which I may have one or two of them laying around ) or you'll never get it nailed to the stud.

Does it sound like I have done this before? /forums/images/graemlins/grin.gif

I could even come down and do it for/with you anytime.
 
   / Jim's Pole Barn Project - hopefully #267  
Re: Jim\'s Pole Barn Project - hopefully

</font><font color="blue" class="small">( We think we are going to build a pole barn to serve as a garage for car, truck, and tractor as well as my workshop/tool storage. We are looking at going 30X48. Unfortunately where we wanted to put it was where my existing 8X16 tool shed sits. I said no big deal, I'll empty and hook the tractor on and away we'll go. Nope. Just bent the hooks that I put into the 4X4 runners. Also decided the tractor wasn't big enough. Put my tow strap and 2 of my racheting tie down straps around the 4X4 structure of the shed and hooked to the truck. Nope. Called dad he brought his truck hooked it to the shed. Nope. Hooked my truck to his truck hooked to the shed. Nope, just had 8 wheels spinning. I was getting frustrated. Not only wasn't where I wanted it to be, but wasn't where it was either - and I had cut the electric to it. For whatever reason I decided to hook the little tractor to the front of the train. Low and behold it moved and we moved it rather easily now. I think what really happened the tractor put weight to the front of my truck and allow it to bit better.

Here is a picture of where the shed had been sitting. )</font>

I have read this entire thread and viewed all the pictures. I am fairly New to this Forum and I am really learning alot from you guys. I know now that I want to build a pole barn like this as soon as the money is saved. However, I will have a lot more work to do with my tractor. I will have to level a place for my barn. Most all my property is on a hill.

This hilly property makes for some real fun farming especially when you have to fight erosion. I have just purchased a moldboard plow I will try and slow the water down with by diverting it from running straight down hill.

At any rate, I wanted to say how Very Nice your building looks. I live in South Carolina but I have some family in Upper Sandusky, Ohio. How far are you from there.

Thanks for all the ideals and learning tools here. I hope I can be as helpful to you as you have been so far to me.

May God Bless Each and Everyone of you and your families.

Jim Bonham
864-647-9810
bsm357@aol.com
 
   / Jim's Pole Barn Project - hopefully
  • Thread Starter
#268  
Re: Jim\'s Pole Barn Project - hopefully

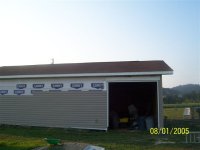
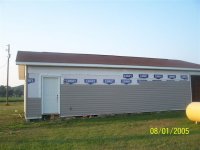
Thanks for the compliments and thanks for taking the time to view my thread. This has been a fun project - but a lot of work too. It has "put me in my place" a few times so to speak. I've learned a lot by doing it, been humbled a few times, but at the same time I'm really enjoying the fruits of my labor. I need to get some more pictures posted. The rest of the siding is on except for 1 little strip along the top of each side. Started doing that Sunday night until a quick storm blew in. Only last about a half hour, but by that time the tools were all put away and so was my Gung-ho. /forums/images/graemlins/laugh.gif I spent today changing the water line around a little bit. I wasn't happy how I had brought it in and my wife wanted a water line run to her flower garden/pond. I had decided that I wasn't going to rent a trencher and go through all the trouble to put in a frost free hydrant. The flowers don't need watered in the winter. /forums/images/graemlins/laugh.gif I figured I would just pull it with the sub-soiler and blow it out before winter with the air compressor and maybe put some RV antifreeze in it if I want to be overly cautious though probably not. I thought, why not we have had some rain, shouldn't be too bad? /forums/images/graemlins/shocked.gif I had a couple of places I wanted to dig by hand, right beside the garage and around the gas line. Remember what I said about being humbled, man that ground was rock hard. IF, IF you were lucky you got a couple ounces with each shovel full. Too make a long story short, ended up being lucky and only took 2 trips to Lowes /forums/images/graemlins/grin.gif - one to buy a 4" elbow to fasten behind the sub-soiler because the 2" was too tight to pull the line through. The second was because I had a little leak once I had a every put together clear back at the main line coming into the garage - before the shut-off valve. /forums/images/graemlins/shocked.gif /forums/images/graemlins/frown.gif /forums/images/graemlins/mad.gif. As I was putting this back together I snapped off one of the PVC fittings /forums/images/graemlins/ooo.gif /forums/images/graemlins/crazy.gif so back to Lowes to get replacements - I bought a couple extra while I was there. /forums/images/graemlins/grin.gif Made me /forums/images/graemlins/mad.gif, I ruined my valve too. It is a threaded PVC valve but it broke flush. I didn't have the time or energy to get it apart yet. I'll post pictures when I get a chance, but it looks like some type of bad science experiment gone bad with all of the valves so close together - 4 of them. One for the main line coming in, 1 going to the garage itself (won't really be needed once the rest of the plumbing is completed but needed for now), 1 to shut the water off to the flower garden, and one to shut off where I'll blow the air and/or antifreeze in from. Now I just need to get some pipe insulation to keep it away from concrete when we pour - hopefully around the first of September.

As far as Upper Sandusky, I'm guessing maybe 2 1/2 half - 3 hours. Don't remember how long it really took us the last time we went to Cedar Point. Though, I do remember I made pretty good time on the way there. Way back was another story, they didn't post a detour sign and we ended up driving for about 2 hours and was only 15 minutes from Cedar Point. /forums/images/graemlins/ooo.gif

Good luck on the barn/garage. We probably should've waited until we had saved more money. But so far we've been able to do everything w/o borrowing any money. Though we have taken advantage of Lowes 12 mo. deal. Our siding comes do in April. Perfect timing for tax return. /forums/images/graemlins/laugh.gif Be sure to post pictures of yours. I like to look at other people's projects.
 
   / Jim's Pole Barn Project - hopefully
  • Thread Starter
#269  
Re: Jim\'s Pole Barn Project - hopefully

Wooohoooo!!!!! Siding is finished. Haven't had time to start pulling the top soil out yet. Been trying to help the wife out with a couple of Honey Do projects. Also have taken the kids to the county fair a couple of times. They wanted to ride the rides and my son wanted to see the monster trucks last night. Spending time with them is more important than the garage at this point. The garage will get done, but they will also grow up and not be this age again - gotta have the priorities straight. /forums/images/graemlins/smile.gif

Any how, here is a picture of the front of the garage. You'll notice that I have put one of the outside lights up. Well, I had to get a little creative here. I couldn't put a traditional box there because there was a pole there. What I did was mounted the light holder to the OSB and then drilled a hole to put the wire through. Fortunately the wires were long enough that I can still put them in a junction box. Hope when the Inspector comes down to wire in the power he'll "Approve" of my alternate. /forums/images/graemlins/grin.gif
 

Attachments

  • 712281-100_0620.JPG
    712281-100_0620.JPG
    46.9 KB · Views: 282
   / Jim's Pole Barn Project - hopefully
  • Thread Starter
#270  
Re: Jim\'s Pole Barn Project - hopefully

Here is the North side. I managed to get that little strip up along the top as well. Still need to put the RV plug in yet though. Maybe one day this weekend.
 

Attachments

  • 712287-100_0621.JPG
    712287-100_0621.JPG
    41.1 KB · Views: 236

Tractor & Equipment Auctions

Loader Arm (A51691)
Loader Arm (A51691)
2020 KUBOTA RTV X1100C UTV (A51406)
2020 KUBOTA RTV...
2008 KOMATSU D39PX DOZER (A52577)
2008 KOMATSU D39PX...
Tri-Axle Police Travel Trailer (A51694)
Tri-Axle Police...
2001 Subaru Outback AWD SUV (A51694)
2001 Subaru...
14' Bi-Parting Gate (A50120)
14' Bi-Parting...
 
Top