John Deere 4300 complete rebuild

   / John Deere 4300 complete rebuild #341  
I see you decided to tackle the fuel gage problem.

Use gasket sealer.
 
   / John Deere 4300 complete rebuild
  • Thread Starter
#342  
I see you decided to tackle the fuel gage problem.

Use gasket sealer.

Good suggestion....I DID...both sides.

The potentiometer in the old one was not working well. I was going to put
a new float and arm on it, but I could not get steady resistance readings
from it. The price for a new one was OK.
 
   / John Deere 4300 complete rebuild #343  
Mine came apart the same way as yours, I thought about trying to fix it, but couldn't find anything to hold the parts together.
How were you going to attache the float to the potentiometer?
 
   / John Deere 4300 complete rebuild #344  
There no such thing as a stupid question-just stupid answers and he has not replied to this thread yet I don't think...

He will Kenny if Dave's next project involves a Kubota BX.

I'm looking forward to seeing Dave's tractor completed and his next restoration project started regardless of what it is.
 
   / John Deere 4300 complete rebuild
  • Thread Starter
#345  
How were you going to attache the float to the potentiometer?

The float was attached to a wire that seemed to be welded into the hole
of the pot on the fuel level sending unit. The weld had failed. I was
planning to weld a new wire in there. The heat could have further damaged
the pot I know. After all that, I may have to have purchased a new unit
anyway.
 
   / John Deere 4300 complete rebuild
  • Thread Starter
#346  
Quest- Why the sub frame for the BH mount and not use the TransAxel plates that JD uses for mounting a dedicated JD Model 47 Backhoe attachment? Or, are you custom fabbing a mount for a hoe (other than TPH) that you already own? I may have missed that in your novel! :D

There is another thread about this whole JD subframe issue.

In summary, the small JD subframe brackets that attach to the rear axle
housings are not strong enough. They use the same 4 bolts that hold the
aluminum housing together. I have now seen 3 JD 4x00s on eBay that
have been broken in half by backhoe use.

I will be mounting another Prairie Dog 7.5 (a clone of the Woods 7500),
which is about the size of a JD 48 or 448 hoe.

Stay tuned.
 
   / John Deere 4300 complete rebuild #347  
Ouch!!! Now I gotta think about that every time I run my 4200 w/47 hoe!! :eek::(:mad::eek:
 
   / John Deere 4300 complete rebuild
  • Thread Starter
#348  
Well I got all my new plastic body panels installed. It has certainly taken
some serious adjustment to get them fitting well. They look very sharp.
The rear fenders are original, so they won't be as shiney. The only
original plastic panel forward of the seat is the right cowl and the instrument
panel.

I will show the right side tommorrow.
 

Attachments

  • DEC7_3a.jpg
    DEC7_3a.jpg
    66.4 KB · Views: 746
   / John Deere 4300 complete rebuild #349  
Well I got all my new plastic body panels installed. It has certainly taken
some serious adjustment to get them fitting well. They look very sharp.
The rear fenders are original, so they won't be as shiney. The only
original plastic panel forward of the seat is the right cowl and the instrument
panel.

I will show the right side tommorrow.

What a difference from the hulk you brought home! Any idea what your costs have been so far?
 
   / John Deere 4300 complete rebuild
  • Thread Starter
#350  
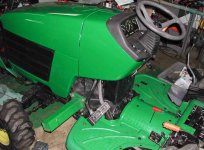
Here is the right side as it is now. The cowl panel is the only original
green plastic panel in the forward area. It looks much better now, but
you can see that it is not quite the same shade of green as the hood
and side panel. I tried polishing compound and a rag, then I tried my
buffing wheel with rouge polish. Glue from the old labels, I removed with
lacquer thinner. If anyone tries this, the thinner will dissolve the plastic.
If a power buffer is used, it is easy to embed the polish in the surface,
causing a stain. I removed the stains carefully with the thinner. It
looks OK, and will look even better when I put the new label on.

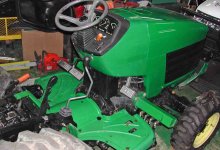
The second photo shows the label. I won't put it on until I can warm
the panel up a bit. It is in the 40s in my shop and I am concerned about
how well the plastic labels will adhere if mounted when the temps are
too low.

Meanwhile, I will have to remove and reinstall the floor due to interference
with the go pedals at full swing. I am probably close to $5000 into this
build, with no anticipated significant expenses left.
 

Attachments

  • DEC7_5a.jpg
    DEC7_5a.jpg
    63 KB · Views: 789
  • DEC7_7a.jpg
    DEC7_7a.jpg
    46.5 KB · Views: 490

Tractor & Equipment Auctions

Mower King Q.A Pallet Forks (A50121)
Mower King Q.A...
2006 John Deere HPX Gator 4x4 Utility Cart (A50324)
2006 John Deere...
1999 Toyota Camry XLE Sedan (A50324)
1999 Toyota Camry...
Pequea HR10 Rotary Rake (A50774)
Pequea HR10 Rotary...
Chery 6' 10 Drawer Workbench (A50121)
Chery 6' 10 Drawer...
2015 Ford F-250 Ext. Cab Knapheide Service Truck (A50323)
2015 Ford F-250...
 
Top