Metal Cutting Saw

   / Metal Cutting Saw
  • Thread Starter
#51  
Nobody is more interested in keeping all my original parts intact than me. So I appreciate various safety comments. Bukit and Stopper have made specific suggestions on clamping. Will revisit the clamping arrangement (currently one milling machine clamp) and make use of two sturdy holddowns. I believe other important questions raised about blade speed and push/pull have been resolved. Have installed a full shroud for additional safety.

To clarify one point. I am not using the RAS to save money, or for convenience. True, I am a believer in build it yourself rather than buy it yourself. But in this case I didn't find anything that would do the job so buy wasn't an option. I read every thread on metal cutting on TBN (there are lots of excellent posts). Have also checked out a couple other forums. Did not see a tool identified (up to light commercial scale) that would leave a perfectly square finished edge on mild 1/2" steel up to 12-16" wide with easy setup, no-measurement repetitive cuts, and no cleanup grinding. The modified RAS does that. I could have missed something though.

I will get some square tubing and try the bevel cuts described by Bukit, and the compound cuts described by Stopper, to see if it will meet those requirements too.

The issue on bevel and compound cuts of course is controlling the feed. Hand held RAS, as several have pointed out - and my own experience is the same - is difficult enough on wood.

I believe I can install a lead screw/handwheel arrangement in the cast iron arm, similar to a lathe or milling machine. Have ordered the parts. That will allow precise slow movement of motor head and blade into the work and address the grab/jump/kickback questions that have been raised. I will provide an update on that after installation.

In the meantime my wife and I are headed to the coast for a week of vacation after all the holiday family visits. So if I am incommunicado for a while it is definitely not for lack of interest. Many thanks.
 
   / Metal Cutting Saw #52  
Thats not fair!! You cant start a build and a thread like this one and just take off on Vacation. I cry foul!

Seriously have a nice vacation and enjoy yourself. I think, maybe, I can force myself to wait until you get back and finish the project.
 
   / Metal Cutting Saw #53  
Enjoy the coast... it's been pushing 70 degrees here in the Bay Area with blue sky and calm... and plenty of all the ice skaters at Union Square in shorts and swim suits...

My city got 3.5" of rain for all of 2013... about 1/5th of normal...
 
   / Metal Cutting Saw
  • Thread Starter
#54  
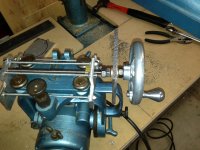
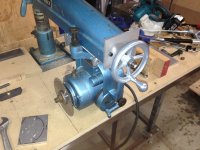
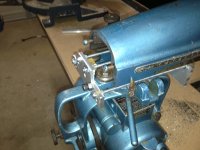
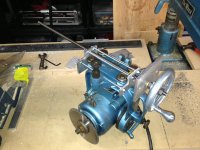
It took longer than I thought to fabricate the lead screw arrangement for the DeWalt metal cutting radial arm saw. There is not much room to work in. So it took a lot of measuring and whittling to get everything in place. The pictures below show what it looks like. It uses a standard 3/8" acme thread lead screw. The hand wheel and lead screw assembly works like a charm - extremely smooth, in fact cutting 1/2 steel feels just like taking a light cut on a milling machine. No jerkiness, grabbing, etc. And your hands are up on top of the saw where the hand wheel is, rather than down on the motor head. No more pushing and pulling within inches of the blade.

To explain the assembly from right to left:
1. jam nut.
2. handwheel with set screw.
3. jam nut.
4. oilite thrust washer.
5. thrust plate (this screws to the front of the cast iron arm in place of the original cover plate).
6. oilite thrust washer.
7. jam nut.
8. jam nut.
9. front guide (this is located by 1 pin and 1 stud using existing holes in the motor yoke).
Also, the front guide carries the 3/8" acme thread lead nut. The front guide and lead nut are pinned together with four #7 tapered pins that are hammered in from the thick end and then peened over on the thin end.
10. rear guide (also located by 1 pin and 1 stud using existing holes).
11. finally, front guide and rear guide are clamped together by four lengths of 10-24 threaded rod with vibration resistant nuts.

When I got started on this I did not foresee making the lead screw assembly, but now see it as an essential part of the modified saw. It provides increased control, quality of cut, and safety.

I need to trim the thrust plate for cosmetic reasons, and make a few other adjustments. Also need to install the upgraded clamping arrangement as previously commented on. The saw already exceeds my expectations with respect to flat cut 1/2 steel which is what I wanted to do. Sometime in the next few days I will go get some square tubing and see how it works on the more complicated cuts suggested by others.

As always I appreciate all comments. In fact it was the safety-oriented comments that got me thinking about making the lead screw assembly.

DW2.jpgDW3.jpgDW4.jpgDW5.jpgDW1.jpg
 
   / Metal Cutting Saw #55  
Having a counter weight pulling back on saw really helps on the grab & jump issue.
 
   / Metal Cutting Saw #57  
How are you cutting, pulling into the metal or pushing into the metal.
 
   / Metal Cutting Saw #58  
Well I am late to the party.. I have owned a Radial Arm Saw for about 30 years and have made thousands of cuts on it. Will it climb and push the saw head towards you? Yes, and it is caused by going to fast and or hitting a knot in the wood. You must be prepared for it to happen. I have had it happen many times, and still have all of my fingers. It has a stop at the end of the track, it isn't going to come back and cut your heart out. What happens is you pull too fast and it climbs and usually the motor stalls or nearly stalls. Common sense and technique go a long way here to prevent this.

I have never once tried to push a radial arm saw into the wood. For one thing this is not what the users manual tells you to do, and for another it would reduce your capacity considerably. I use the radial arm now for crosscuts only. It is convenient for throwing long stock up on the table and cutting.

Now as for ripping, my advice is forget it if you can. I have ripped several boards on the RAS, and that was the prime reason to buy a good table saw. RAS by design is a really poor design for putting sideways stress on a saw head hanging out there on an arm.. It is just not really good for this.

It will make compound cuts of course, but is not nearly as easy to set up and reset as a good compound miter saw. Beside that is also makes cut marks in your table. That is why I have a compound miter saw. My RAS manual says it will do it all.. unh huh. Like most things that will do it all, it may do it , but there are a whole bunch of other things that will do the job a bunch better and safer.

So bottom line I still use my old RAS a lot, but I sure use the other saws when they are much better for a particular purpose.
 
   / Metal Cutting Saw #59  
Kinda what I posted earlier in the thread James - or (unlike my NORMAL methods :rolleyes: ) to put it more succinctly -

The safest AND most dangerous tool in your shop is YOU... Steve
 
   / Metal Cutting Saw
  • Thread Starter
#60  
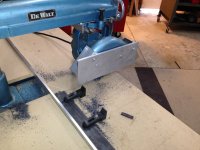
On JJ's question, I have done it both ways now. With the two milling machine clamps (see picture) to stabilize the work, and the 3/8x12tpi lead screw to stabilize the saw, I don't see a difference in ease of control. That being so, going forward, I will use it the traditional way (pull into work). I agree that is generally accepted RAS practice and also closer to the motion of the metal cutting chop saws.

By the way JJ, while I have you on the phone, so to speak, I have been researching my next task which is a thumb for the backhoe. In doing so I have been reading back through many TBN threads. THANKS for your longstanding support on hydraulic questions which I am now benefiting from.

On use of the radial arm saw more generally, I agree with pretty much everything James has said. What I would add is that the radial arm saw is likely at its best in a cabinet shop environment where it doesn't get moved around, and generally is not used on wood with knots, crooked grain, warp, or twist. Or wood that looks nice but has hidden stresses just waiting for the blade to release. There are a lot of things that can make the saw want to jump, perhaps encountered more frequently in a worksite environment. I used mine a lot - for several years - when I was just getting started, and I don't think my technique was any worse than others. I pulled when I could, pushed when necessary. But I quickly learned it could not be safely used for ripping, no matter what you did, so I got a table saw for that. Then, as soon as they were generally available, I got one of those Rockwell motorized miter boxes with the particle board table for small trim. And then a few years after that, one of the first Bosch sliding miter saws for just about everything else. Somewhere along there I gave away my first DeWalt, and didn't think of it for 20 years. That is because no matter how good a technique you might use with it, for almost all purposes there are easier, safer alternatives.

The heart of the matter is what Bukit says about safe and dangerous tools. Much of this thread as it turns out is about safety. I am extremely appreciative of these comments, which are based on many years of collective experience and a spirit of helpfulness.

DWCut.jpg
 

Tractor & Equipment Auctions

1049 (A50459)
1049 (A50459)
2019 Isuzu NPR-HD 24ft. Box Truck (A50323)
2019 Isuzu NPR-HD...
2016 FORD F-150XL SINGLE CAB TRUCK (A51406)
2016 FORD F-150XL...
2020 KUBOTA RTV X1100C UTV (A51406)
2020 KUBOTA RTV...
2019 TOYOTA 8FGCU25 PROPANE FORKLIFT (A51222)
2019 TOYOTA...
2020 CASE CX37C EXCAVATOR (A51242)
2020 CASE CX37C...
 
Top