MODIFY BRUSH HOG SOME MORE

   / MODIFY BRUSH HOG SOME MORE
  • Thread Starter
#41  
MJPetersen said:
Larry, thanks for the videos. I have heard LOTS about Plasma, but have never seen one in action. Now I have! That makes really nice clean parts, and FAST!

Rob, What program do you use to make your sketches and then the parts layout? I really like the way your plans come to fruition.

Mike
Hi Mike,
I use an old (very old) version Of CadKey 99. I have their workshop solid modeling v21.5 too, but don't know how to use it.:)
 
   / MODIFY BRUSH HOG SOME MORE
  • Thread Starter
#42  
I did get to play golf this morning and then went to my grandson's 5th birthday. He is my only grandson out of 10 grandkids, can you believe that? Anyway, since Larry has shipped the plasma cut parts already, I though about getting busy with some steel preparation on my end.

I told you about trying to use what material I had on hand and that I had to be frugal about it. I thought I'd share how I'm doing it. I had some 1/4" wall rectangular tubing that was 2" x 5" which was way to big and heavy to use for any of these pieces. My plan was to saw them in half to get "U" shaped pieces that would end up 2" wide and 2-1/2" tall. That gives me twice as much material then to use for this project.

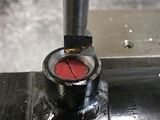
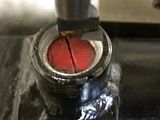
I don't have a vertical band saw so I made a mandrel for some small tooling slitting blades I had in my tool box. I bolted the tubing on the milling table and cut them in half. Didn't take very long at all.


And the cut came out as though it was milled finished, so I didn't even have to mill them afterwards at all. Here is the sawed finish and this is what they look like next to a whole bar of it.


These "U" shaped pieces will become part of the tail wheel assembly that moves up and down. I will make some more for the hydraulic pivot frame that is welded to the rotary cutter. And also some for the reinforcement of the cutter body instead of the usual angle iron. There will be different lengths, of course, for the different uses. These "U" shapes will be very strong when welded to each other but not nearly as bulky and heavy as a whole bar of it.
 
   / MODIFY BRUSH HOG SOME MORE #43  
Rob,

Those saw cuts sure did come out nice, pretty amazing to me the little saw sliced through all that 1/4" wall tube. What is the saw material?, Diameter?, TPI & what RPM did you use? It also looks like you might have used some sort of cutting fluid? How do you apply the cutting fluid? When I need some sort of cutting fluid, I just use a small plastic eye dropper to squirt it where needed. Is that what you do? I learned from you that most of the time you use compressed air to clear the chips & cool the cutting tool, after I saw you doing that, thats what I do 90% of the time, it sure works great and avoids allot of mess, so thanks for sharing that tip.

I know it's a bunch of questions but I always like to learn something new from the master of machining.

OK one more question, which way is the blade spinning? CW or CCW.

Thanks,

Larry
 
   / MODIFY BRUSH HOG SOME MORE
  • Thread Starter
#44  
GuglioLS said:
Rob,

Those saw cuts sure did come out nice, pretty amazing to me the little saw sliced through all that 1/4" wall tube. What is the saw material?, Diameter?, TPI & what RPM did you use? It also looks like you might have used some sort of cutting fluid? How do you apply the cutting fluid? When I need some sort of cutting fluid, I just use a small plastic eye dropper to squirt it where needed. Is that what you do? I learned from you that most of the time you use compressed air to clear the chips & cool the cutting tool, after I saw you doing that, thats what I do 90% of the time, it sure works great and avoids allot of mess, so thanks for sharing that tip.

I know it's a bunch of questions but I always like to learn something new from the master of machining.

OK one more question, which way is the blade spinning? CW or CCW.

Thanks,

Larry
Hi Larry,
The tubing is probably just CRS or HRS standard stuff. I put the blade on the shaft so the teeth are facing the same direction as when you tighten the screw that holds the cap on. Like when you put a wire wheel on an angle grinder. When it is running, it is tightening the screw. These blades are for cutting exact slot width so the teeth are not off sett at all. This one happens to be only .016" thick but they come in different thickness.

I use regular dark cutting oil in this case because the teeth for this slitting saw are very fine. The saw blade is 3" in diameter this one has ??? 100 teeth?...very fine. I apply the oil with an acid brush to keep it lubricated and clean the teeth. I have air on it as well. I have a little oil holder for that with a heavy bottom so it doesn't get tipped over too easy. A dropper is fine too, but with the brush I can clean the teeth as I lubricate. Rpms are very slow at around 60 to 80 rpm and feed is about 1"/min. approx. You can depth mic down to the blade if you want an exact measurement for the cut.

 
   / MODIFY BRUSH HOG SOME MORE #45  
Seems to me to be a self defeating effort. You mow the same places time after time. My Brush Hog is pretty heavy duty and will scalp right down to the dirt really well and become a dirt forming tool. After a while the repetitive scalping tends to level the rough spouts out. Your work will help preserve your rough spots. ;) ;)

The only time I have ever put a wrench on my tail wheel assembly is when a bolt was loose or broken. I never felt the need to adjust the tail wheel up and down.

Maybe a push rod running to your parallelogram tail wheel mount and attached to the 3ph for actuating power would do automatically what you intend to do manually. I have TNT. If I used the angle between my top lift and the deck or even between the deck and the lower arms to act as a bell crank to actuate the push rod, I'd get automatic tail wheel adjusting. Changing the length of the control horn at the tail wheel end would adjust the amplitude/proportionality between the tail wheel adjustments and the change in angle at the front end of the assy. Changing the attachment points at the 3ph end would change the amount of movement of the push rod. If I missed something and the adjustment is backwards, just mount a bell crank midway to reverse the direction of the push rod's activation. Changing the effective radius of a connection at this direction changing bell crank would change the front to back movement ratios as well.

Simple, mechanical, no need for dynamic user intervention. Once provided with your input through static adjustment it will make all the dynamic adjustments automatically as you mow and operate the 3PH and or top link if you have a hydraulic one which makes for VERY HANDY implement adjustments.

Pat
 
   / MODIFY BRUSH HOG SOME MORE
  • Thread Starter
#46  
All good advice especially the bell and horn part.;)
That is ... all except the part about having your Brush Hog become a dirt forming tool and the suggestion of leveling via repetitive scalping. LOL ... I would advise against doing that myself. It's no wonder when these guys ask about how to level their fields, you recommend the brush hog...I could never figure that out.:)
(Just messin' with ya a little Pat):D

Did I mention I don't mind a little user intervention? Man, I love doing that. To me, that's what makes all this stuff so fun. And that's one reason I'm doing this mod.
Like it says in your signature "Never be afraid to try something new", right?
 
   / MODIFY BRUSH HOG SOME MORE #47  
"Seems to me to be a self defeating effort". Sort of just like your comments, geeze Louise Pat.


Maybe a push rod running to your parallelogram tail wheel mount and attached to the 3ph for actuating power would do automatically what you intend to do manually. :confused:

Sounds like an interesting idea, I suggest starting your own thread to impress us. You could draw it up and post a picture or two of how it's all going to work. Please show your construction efforts with exact details and video animation.

I think there are at least a few of us who are really looking forward to seeing Rob's project completed and working to his satisfaction.

Don't be a spoil sport, Now hush up and let Rob proceed.
_______________________________________________________________


Rob, hey Bro, - thanks for the machining tips and answering my questions about those cool saws you use to cut metal.

Your plasma cut parts should be there tomorrow. I used good boxes to ship them and a whole roll of packing tape to make sure they get to you safe & sound. I'll be on the road most all this week. After you get your parts and check them over, give me a call and let me know if they meet your specifications, I will be in cell phone range.


Larry
 
   / MODIFY BRUSH HOG SOME MORE
  • Thread Starter
#48  
Hey Larry,
Thanks for watching over me man, you're the greatest!
I will give you a call for sure. I'm really looking forward to your surprise package too. Good luck on your road trip and be careful.
 
   / MODIFY BRUSH HOG SOME MORE #49  
Larry,
Great video's. That CNC plasma table is too cool. If I were rich I would have to have one of those. I know that you get special deals, barter or what ever, but what do they normally charge for that service. It is so fast that if it is an hourly rate it must be pretty high.
Great work, keep it coming. There are a lot of us out here who like to read and not say much. We appreciate the effort.
Thanks
Doug
 
   / MODIFY BRUSH HOG SOME MORE #50  
3RRL said:
It's no wonder when these guys ask about how to level their fields, you recommend the brush hog...I could never figure that out.:)
(Just messin' with ya a little Pat):D

I guess some folks just didn't understand that my post was tongue in cheek humor! I was laughing out loud while reading your post. Hey everybody lighten up. I have a reminder announcement for everyone: We are all under a death sentence which can be carried out at any time but in the meantime don't be tooooooo serious.

GuglioLS, I'm sorry but like the pregnant lady you took seriously what was poked at you in fun.

My lack of skill with a brush hog does get me into dirt shaping and I suppose if I stayed with it long enough in a couple decades of concentrated effort I would get the desired results provided the rain didn't erode the bare dirt!

Of course I don't recommend or expect anyone to build what I described. Sure it would probably work but so what.

If I had thought about it I may have started a separate thread for my "BRAINFART" including such brush hog improvement suggestions as digger teeth to loosen the soil for the rotary dirt leveler blades. We could have discussed the pros and cons of hydraulic raise and lower for the scarifier teeth and whether teeth in front, in back, or both would be better.

Regarding the consumables comment as applied to plasma cutting. I was concerned about that situation when I bought my second (larger, 40 amp) plasma cutter with drag-while-in-contact style torch. I get amazing long life with the consumables. Maybe I'm just lucky or has the torch designs improved. Of course I'm free hand and template based not with x-y table (covet covet!)

Pat
 

Tractor & Equipment Auctions

2021 Toyota Tacoma 4x4 Crew Cab Pickup Truck (A50323)
2021 Toyota Tacoma...
2025 K0720 UNUSED Metal Farm Driveway Gate Set (A50860)
2025 K0720 UNUSED...
Adams Load Out Conveyor - Stainless Steel Assembly - Baldor Electric Motor (A51039)
Adams Load Out...
2006 International 4400 LP Crew Cab Heavy Haul Truck Tractor (A49461)
2006 International...
2010 CAT 140M MOTORGRADER (A50854)
2010 CAT 140M...
Quick Cool Camper A/C Unit (A50860)
Quick Cool Camper...
 
Top