Mule Bed-lift Installation

/ Mule Bed-lift Installation #1  

jinman

Rest in Peace
Joined
Feb 23, 2001
Messages
21,059
Location
Texas - Wise County - Sunset
Tractor
NHTC45D, NH LB75B, Ford Jubilee
I was tempted to title this post "Mule Takes a Dump" /forums/images/graemlins/shocked.gif but I figured that wasn't too PC. /forums/images/graemlins/blush.gif /forums/images/graemlins/laugh.gif

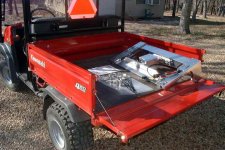
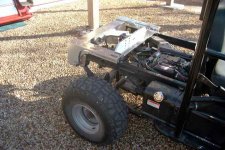
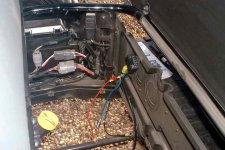
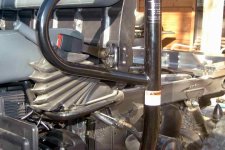
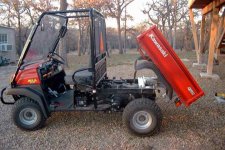
I received the Power-Hoist hydraulic bed-lift kit for my girlfriend's Kawasaki 3010 Mule last week and we installed it yesterday since the weather here in Texas was perfect. As promised, I took pictures of the installation and I'm putting the major parts of the installation in a series of photos in this post. If you are only interested in what the kit looks like out of the box and how it looks installed, just look at the picture attached to this post and then scroll down to the 9th post and look at the finished product.

I'll try to keep my descriptions brief, but if anyone wants more information, I'll gladly furnish the info if I can.

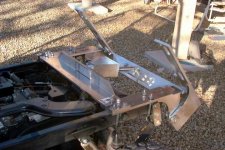
1st photo: I purchased the bedlift kit from Beartooth Kawasaki (see link above) for $699 + $35 shipping. Delivery was excellent (by UPS) and the entire assembly and parts were packed in a foam filled box (no danger of damage). /forums/images/graemlins/grin.gif The contents of box were 1. lift assembly (fully assembled) 2. mounting hardware, 3. wiring harness 4. detailed step-by-step instructions. (see attachment)
 

Attachments

  • 360640-Bedlift1.jpg
    360640-Bedlift1.jpg
    59.3 KB · Views: 2,287
/ Mule Bed-lift Installation
  • Thread Starter
#2  
2nd Photo:

First we removed the Mule's bed. It has a wiring harness for the tail lights and two pins for the bed pivot points. We set the bed aside, out of the way.
 

Attachments

  • 360643-Bedlift2.jpg
    360643-Bedlift2.jpg
    70.6 KB · Views: 3,266
/ Mule Bed-lift Installation
  • Thread Starter
#3  
3rd Photo:

The Power-Hoist assembly sits directly on top of the Mule's frame and is slid forward until two stop pins contact the frame.
 

Attachments

  • 360644-Bedlift3.jpg
    360644-Bedlift3.jpg
    63.6 KB · Views: 2,129
/ Mule Bed-lift Installation
  • Thread Starter
#4  
4th Photo:

The operating relay mounts underneath the Mule's seat. There is no hole to drill (it's already there) and the hardware includes a screw and aircraft locking nut. After the harness is attached, the red and black wires attach to the battery terminals. All connectors are pre-installed for an easy job.
 

Attachments

  • 360648-Bedlift4.jpg
    360648-Bedlift4.jpg
    49.4 KB · Views: 1,989
/ Mule Bed-lift Installation
  • Thread Starter
#5  
5th Photo:

The control swithch mounts close to the operator's seatbelt and then the lift assembly cable is routed and connected to the wiring harness. Detailed instuctions on routing and cable ties are provided for this step.
 

Attachments

  • 360650-Bedlift5.jpg
    360650-Bedlift5.jpg
    47.9 KB · Views: 1,445
/ Mule Bed-lift Installation
  • Thread Starter
#6  
6th Photo:

After the harness is routed and tied, testing the Power-Hoist is in order. After cycling through a few up-down cycles, the U-bolts are added to permanently mount the hoist to the Mule's frame. There are some close tolerances and tight fits at this stage, but everything fit perfectly.
/forums/images/graemlins/cool.gif /forums/images/graemlins/cool.gif
 

Attachments

  • 360652-Bedlift6.jpg
    360652-Bedlift6.jpg
    58.8 KB · Views: 2,136
/ Mule Bed-lift Installation
  • Thread Starter
#7  
7th Photo:

It's now time to reinstall the bed. The pins that were removed to take the bed off are used to attach the bed to the Power-Hoist. You have to grind one side of the pins flat so they will fit, but there are detailed instructions on how to do this.
 

Attachments

  • 360655-Bedlift7.jpg
    360655-Bedlift7.jpg
    53.2 KB · Views: 1,655
/ Mule Bed-lift Installation
  • Thread Starter
#8  
8th Photo:

Sorry about the darker photo...
After attaching the bed with the pins, you have to drill two 1/2" diameter holes into the bed for the front mounting of the lift arms (see yellow circle in attachment). After the holes are drilled, a 1/2" carriage bolt is placed through the lift arm and a white nylon spacer installed. Only one of these is visible in the photo.

To complete installation, spacers are added to the Mule's frame so they will hit the bed's pads when the bed is lowered. See the blue circles in the attachment.

Finally, the taillights are reconnected to the Mule's wiring harness.
 

Attachments

  • 360656-Bedlift8.jpg
    360656-Bedlift8.jpg
    32.4 KB · Views: 3,121
/ Mule Bed-lift Installation
  • Thread Starter
#9  
9th Photo:

Finally, the job is done and it's time to back off and look at the finished product. /forums/images/graemlins/cool.gif /forums/images/graemlins/smile.gif

This product was a pleasure to install and the only way I can describe the way it works is "WOW!". The entire bed is raised 1-1/2 inches and this will allow larger diameter rear tires if you want them. The lift capacity of the Power-Hoist is 1,200 lb, and that's above the rated capacity of the gasoline Mule.

Also, notice the mirror installed on the windshield. This is a perfect addition if you drive on any street or county road.
 

Attachments

  • 360660-Bedlift9.JPG
    360660-Bedlift9.JPG
    66.3 KB · Views: 2,029
/ Mule Bed-lift Installation #10  
Great pics Jim! /forums/images/graemlins/cool.gif

Thanks for the walk through. It was really interesting. /forums/images/graemlins/smile.gif
 
/ Mule Bed-lift Installation
  • Thread Starter
#11  
Thanks, Gary. Shooting the pictures was probably the hardest part to the job. It's so nice when something works as good or better than advertised. /forums/images/graemlins/grin.gif
 
/ Mule Bed-lift Installation #12  
How much is the kit? I'm getting close to buying a mule and really like this lift.
Ken

Sorry, I thought I read the start of this thread but obviously I was wrong. Thanks for the how to.
Ken
 
/ Mule Bed-lift Installation #13  
I been thinking about getting one of these. Let us know how this thing works with a load in the bed.
 
/ Mule Bed-lift Installation #14  
jinman,

Super job, my hat goes off to you !!!

Nice lookin' unit also >>>>

Enjoy & Stay Safe !!


~~~~ jamie
 
/ Mule Bed-lift Installation
  • Thread Starter
#15  
Bigk56 said:
How much is the kit? I'm getting close to buying a mule and really like this lift.
Ken

Sorry, I thought I read the start of this thread but obviously I was wrong. Thanks for the how to.
Ken

It's been several years since I posted this. My "girlfriend" is now my wife, and we still have the Mule. The liftbed has worked perfectly everytime we press the button. We still have the factory battery in the Mule, so there are no undue stresses from the bedlift.

I've hauled heaping loads of sand from a creek bottom to our garden with the Mule and it lifted all of them except once when the sand was heaped into the front of the bed. Then, all I did was give the lift a small assist and it did fine by itself after the bed lifted about 6".

We've been very happy with the PowerHoist lift. I've noticed that it's now advertised as $799 instead of $699. I think you can find cheaper ones, but I don't think they'll be any better.
 
/ Mule Bed-lift Installation #16  
Second the great pics and good walk thru. Looks like a well designed kit.

I'm looking for one to not only dump sand, dirt, gravel etc. but there is a neat trick for moving things that might or might not fare well in say a front end loader or have to be lifted into a truck box like giant ceramic pots.

Tilt the bed, pad it and strap the thing in. Lower the box. Reverse the process when you get to the spot for the pot.

John O
 

Marketplace Items

2018 Ford F-350 (A55973)
2018 Ford F-350...
2001 CATERPILLAR 621F MOTOR SCRAPER (A60429)
2001 CATERPILLAR...
2018 Chevrolet Tahoe SUV (A59231)
2018 Chevrolet...
2008 DOOSAN G25 GENERATOR (A55745)
2008 DOOSAN G25...
2018 Chevrolet Tahoe SUV (A59231)
2018 Chevrolet...
CAT CB34 (A60462)
CAT CB34 (A60462)
 
Top