New Driveway and Polebarn

   / New Driveway and Polebarn
  • Thread Starter
#201  
After we got most of the topsoil removed Jeff started to cut a rough grade with the Bobcat .... and Zack decided to get a little seat time of a different sort. :D
 

Attachments

  • IMG_1270.jpg
    IMG_1270.jpg
    186.6 KB · Views: 367
  • IMG_1271.jpg
    IMG_1271.jpg
    181.9 KB · Views: 265
  • IMG_1269.jpg
    IMG_1269.jpg
    168.8 KB · Views: 258
  • IMG_1267.jpg
    IMG_1267.jpg
    170.8 KB · Views: 241
  • IMG_1266.jpg
    IMG_1266.jpg
    195 KB · Views: 237
  • IMG_1265.jpg
    IMG_1265.jpg
    171.1 KB · Views: 309
   / New Driveway and Polebarn
  • Thread Starter
#202  
By that time it was getting fairly late in the day and so they headed home for supper and I started to work on the finish grading.
 

Attachments

  • IMG_1274.jpg
    IMG_1274.jpg
    191.7 KB · Views: 326
  • IMG_1273.jpg
    IMG_1273.jpg
    175.3 KB · Views: 286
  • IMG_1272.jpg
    IMG_1272.jpg
    185 KB · Views: 321
   / New Driveway and Polebarn
  • Thread Starter
#204  
Thanks mc.

With the insulation guys scheduled to arrive shortly I needed to get a few loose ends tied up (pun intended)
 

Attachments

  • IMG_1278.jpg
    IMG_1278.jpg
    148.8 KB · Views: 352
   / New Driveway and Polebarn
  • Thread Starter
#205  
Ideally I would have gotten the service cable run in before I had the panel all wired up .... but all of the conduit is not laid yet and I have had some trouble getting ahold of my electrician friend who was going to help me run the 4/0 4/0 2/0 AL URD

But I needed to get everything that was going to be inside the walls cleaned up and handled before the insulation guys started spraying so I went ahead and tied in all the branch circuits to the panel.

Thanks to those helped and provided advice (you know who you are :D )
 

Attachments

  • IMG_1286.jpg
    IMG_1286.jpg
    153.7 KB · Views: 327
Last edited:
   / New Driveway and Polebarn
  • Thread Starter
#206  
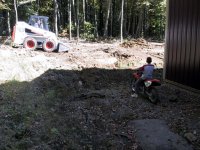
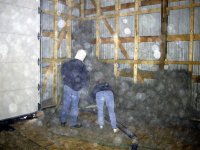
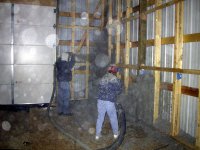
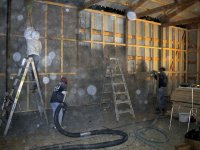
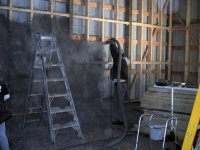
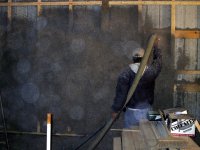
This past Monday the insulation crew from Dave Ritsko Insulation arrived and in fairly short order were spraying the insulation in the walls. It's Nu-Wool cellulose fiber insulation that is ground up/fluffed and sprayed in "wet" (damp actually - the moisture level is about 20%)

Their website is here:

Nu-Wool Insulation: Manufacturer of WALLSEAL, a spray-in-place cellulose insulation

The cellulose is shot down a big hose (3") under pressure and at the end there are a pair of smaller nozzles on either side that add water to the cellulose as it's coming out the end, making it slightly wet so that it sticks together once it's in place. The insulation is sprayed out past the face of the studs and then trimmed off flush with a a device that is kinda like long paint roller powered by a cordless drill. One of the crew sucks up the trimmings with a vacuum hose that feeds back into the blower in the truck so that the trimmings are recycled back into the mix so there is very little waste. If I had a concrete floor rather than just gravel the amount of waste would have been practically zero.

The result is a sprayed-in-place insulation that completely fills and totally conforms to the cavity, is very dense, and pretty much totally seals the wall. They (Nu-Wool) claim that it stops air inflitration to such a degree that a vapor barrier isn't required .... other than just some drywall or wall board.

The wall cavity is 7" deep and it should provide an effective R-value of about 27.

The other advantage is that I didn't have to do it. I was looking at putting standard fiberglass batts - I would have had to cut it all to fit and put it up, there still would have been gaps and voids, I would have been breathing 'glass, etc. These guys were in and out in about 5 hours (would have went a little faster but they had to work around the stuff I had piled in the barn.) Since the cost of doing this (installed) was only about 50% more than the price of materials alone for fiberglass, not counting my labor and it resulted in a better end product with a far greater r-value, it seemed like a no-brainer.

I noticed immediately after they had finished that it completely quieted the barn. I know that most of the heat loss in a building is through the ceiling but it has already made a huge difference - I guess the cold steel of the walls was really sucking out the heat .... I just didn't realize how much. I can now fire up the torpedo heater and within a couple of minutes it's already feeling warmer. After 15 - 30 minutes I've seen a temperature rise 6 to 8 degrees - something that didn't happen before I had the insulation up.

Once I get a celing up I'll probably blow in cellulose myself into the attic.
 

Attachments

  • IMG_1289.jpg
    IMG_1289.jpg
    196.3 KB · Views: 1,696
  • IMG_1291.jpg
    IMG_1291.jpg
    181.9 KB · Views: 1,666
  • IMG_1292.jpg
    IMG_1292.jpg
    168.8 KB · Views: 1,657
  • IMG_1293.jpg
    IMG_1293.jpg
    151.9 KB · Views: 1,581
  • IMG_1295.jpg
    IMG_1295.jpg
    156.6 KB · Views: 411
   / New Driveway and Polebarn #207  
Thanks for the updates. I'm not familiar with that type of insulation and appreciate you posting pics of it going on. How long will it hold it's shape? Do you have to put up wall board of some type right away? Do you have to let it dry first, or do you seal it up wet?

Eddie
 
   / New Driveway and Polebarn
  • Thread Starter
#208  
Eddie,

Thanks for the updates.
Glad to oblige. :D

It should hold it's shape indefinitely, particularly in a typical home wall that's studded 16" O.C. - provided nothing disturbs it - it basically just sits there. It's stacked 12' high on my walls. It is somewhat fragile - you could easily dig it out with your hand.

In my case it's a little different, being a polebarn and the sheetmetal flexing from wind has the potential to disturb it and push it out I suppose. Also I have my walls studded out at 24" to 28" inches O.C. - 24" is their limit really ..... because of the width of the trimming tool. They had to "freehand" the trimming on a couple of sections here because they were over 24" O.C. If I had to guess I'd imagine that wide spans are less stable and more prone to falling out than narrower ones. Shorter is probably better than taller too. I've had two areas where some fell out - both about 2' x 2', where I think they didn't get good adhesion in the first place. The first one occurred later in day after they left. The second one occurred on the second day. The rest of the sections are looking pretty solid so far. I'll take a couple of shots where they fell out and post them later today.

I'm lucky in that my walls are open at the top (no top plate) - so I can put my wall board on and stuff the insulation back in from the top. They did offer to come back if I had any problems with it falling out. The guy said "just put up all your wallboard and give a call - we'll come out and stuff the hose down from the top and fill the cavity."

Putting up wallboard right away is probably a good idea - we've managed to get up about twenty 4' x 8' sheets of OSB so far on the backwall and I'm planning to get all of it covered as quick as I can.

You don't have to let it dry - you seal it up "wet" (slightly damp really) the humidity difference between the damp insulation and the environment (air, wallboard, studs) will wick out the remaining moisture until the two are in balance. This probably wouldn't work quite as well in a really humid environs but then I'm not in the tropics or the Northwest. :D The exposed insulation surfaces are already noticably drier to the touch in just a couple of days - and it ain't exactly warm or dry here now, although running the torpedo heater probably dries the air a good bit.
 
   / New Driveway and Polebarn #209  
Thank you for the details. It sounds like a really good product and indeal for the irregular shapes the come from pole barn construction.

I'm looking forward to following your progress and seeing your pics.

Thanks,
Eddie
 
   / New Driveway and Polebarn #210  
Rswyan glad you posted the pictures as I missed out on seeing how the insulation was applied. Did they just scrape off the excess or was some type of machine used for that step?

Who got the pleasure of cleaning up the mess on the floor when it was all done?

I was really surprised at how well the insulation dampened the noise level of your barn and I suspect that you're going to have a warm place to work come winter. Now if I could just talk you into using natural gas and hanging a unit heater instead of heating with wood.
 

Tractor & Equipment Auctions

2008 CATERPILLAR 304C CR EXCAVATOR (A51242)
2008 CATERPILLAR...
2019 John Deere 8295R MFWD Tractor (A50657)
2019 John Deere...
48ft Low Boy T/A Trailer (A49346)
48ft Low Boy T/A...
2019 CATERPILLAR D3K2 XL CRAWLER DOZER (A51242)
2019 CATERPILLAR...
2018 JOHN DEERE 204L WHEEL LOADER (A51242)
2018 JOHN DEERE...
2015 Ford Escape AWD SUV (A50324)
2015 Ford Escape...
 
Top