NEW DUAL AXIS SLOPE INDICATOR

   / NEW DUAL AXIS SLOPE INDICATOR #41  
Rick,
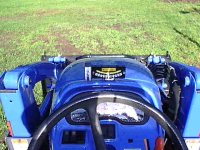
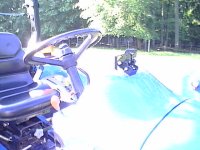
A top mount would work, but I have been thinking. One of the problems is that the dual axis part is fixed to the regular tilt meter, requiring the whole unit to be plumb. What if you attached it to the side with an independent adjustment to vertical. This would allow the regular tilt meter to be angled toward the driver for easier viewing and if the dual axis part was mounted slightly higher it would give enough clearance to mount on an angled surface like my previous application. Just a thought. Thanks again for letting us be part of this development.

Greg
 
   / NEW DUAL AXIS SLOPE INDICATOR #42  
</font><font color="blue" class="small">( What if dual axis part was
mounted on top with a brace? Would this help? )</font>

I guess you would have to do the geometry to calculate how much of the range would be more visible by raising it the 1" or so to put it on top.

One other factor that is totally beyond your control is the operator's height. I am 6' 3" and even with it mounted on the highest point on my dash, I will always be sighting downward. Operators who have a canopy or FOPS would be able to mount theirs just above eye level if they mounted it there.

If the zero reading were relocated to where the 15 degree uphill reading is now, then the full range would be more visible. I'm not an engineer, but it would seem to requre: adding a bend to the "pointer", relocating the stickers, and angling the mounting bracket 15 degrees to allow for the extra travel.

For those who wanted to mount them HIGHER, the same parts could probably be assembled in reverse to compensate for not being able to see the read the upper readings.

Just ideas....

Hey, it stopped raining! I'll go out with the camera and get some pics.

Mark
 
   / NEW DUAL AXIS SLOPE INDICATOR
  • Thread Starter
#43  
Greg,Markie61,
I worked on the unit up til 11:00 last night. I will start on
a few changes today. Not sure how much I can do without
a new mold, ($4000.00+.) I do have two changes I can make
without a new mold that will help a lot. One has to do with
label. The other has to do with the way it mounts to
the other one. Please keep feed back coming. Thanks to all.
Rick /forums/images/graemlins/smile.gif /forums/images/graemlins/smile.gif /forums/images/graemlins/smile.gif
 
   / NEW DUAL AXIS SLOPE INDICATOR #44  
For changing the mounting angle: how about a 10-15degree plastic wedge between the horizontal meter and the attaching bracket?

Attached is a picture from the seat.

Mark
 

Attachments

  • 277245-Dash.jpg
    277245-Dash.jpg
    38.4 KB · Views: 217
   / NEW DUAL AXIS SLOPE INDICATOR #45  
Closeup attached.

Mark
 

Attachments

  • 277246-Tiltmeter.jpg
    277246-Tiltmeter.jpg
    39.3 KB · Views: 203
   / NEW DUAL AXIS SLOPE INDICATOR #46  
Sideview mounting attached.

Mark
 

Attachments

  • 277248-TiltmeterMount.jpg
    277248-TiltmeterMount.jpg
    39.6 KB · Views: 213
   / NEW DUAL AXIS SLOPE INDICATOR #47  
Rick,
I like Markie's idea about the bend in the needle. I am only 5'9" and I had trouble with the downhill readings, so height of gauge is not as important as angle, in my opinion. The only problem with that would be anyone wanting to mount it overhead, like on a canopy. As far as the independent mount, how about two pieces of plastic mounted with stickyback on each component with slots in one and screws in the other. I know you have probably thought of all this,... but just in case.

Greg
 
   / NEW DUAL AXIS SLOPE INDICATOR #48  
yes, definately up off of the end with a swivel mount would definately be a help.............thanks for YOU
 
   / NEW DUAL AXIS SLOPE INDICATOR #49  
Rick, I received mine and wanted to say thanks a lot!

Some feedback: I got it installed last week and liked the options for mounting it: included screws or adhesive (or both). I decided upon my location, removed the screws completely and used the adhesive to mount it to the lower guage bezel on my Cub. Once mounted, I worked on leveling it. Once I had it level front to back, I tightened the smaller allen screws (black) on the back for right-left level. I didn't tighten them too much, just enough to make it snug. However, when I tightened one of the larger bolts going though the face of the gauge (one was already tight), the extra torque must have popped the plastic around one of the smaller allen screws on the back, leaving only one holding the gauge to the mount. It's still maintaining level though and worked great while mowing. It was interesting to see actually how steep some stuff was that I always mow without a second thought.

Hindsight, I should've tightened the large allen screws before mounting it, thus eliminating the extra twist on the whole unit. Why was the screw loose from you guys? It wasn't involved in any of the leveling steps.

I agree with a few others' suggestions. Make the fore-aft gauge more visable. It's especially hard to see when mounted lower, like mine. Wouldn't be so bad if mounted on the hood, but that makes it open for damage from limbs, etc.

Let me know what more info I can provide you regarding my cracked gauge, ie pics, etc.

Thanks again.

- Gerald
 
   / NEW DUAL AXIS SLOPE INDICATOR
  • Thread Starter
#50  
Hi GSS,
Working on a fix for better viewing. Please e-mail your
address, and I'll send out another back plate, etc. I may
not be here, and Brenda will need the address. Thanks, Rick
e-mail: RandBMfgInc@worldnet.att.net
 

Tractor & Equipment Auctions

2014 Ford F-150 Pickup Truck (A51692)
2014 Ford F-150...
2006 Toyota Tundra 4x4 Crew Cab Pickup Truck (A50323)
2006 Toyota Tundra...
Adams 5 ton Fertilizer Buggy / Wagon (A52748)
Adams 5 ton...
80in HD Tooth Bucket with Side Cutters ONE PER LOT (A52748)
80in HD Tooth...
Heavy Duty Hydraulic 84" Broom  (A52384)
Heavy Duty...
2009 John Deere 468 (A50120)
2009 John Deere...
 
Top