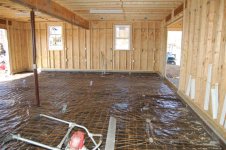
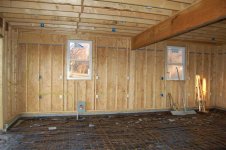
Concrete is in. It was a fiasco, but went as well as you could hope for given the circumstances. To recap, my uncle is a stonemason, and a **** good one at that. He was the supervisor and brains fo the operation, I and two of my teenage mentor kids were laborers. The contractor ordered the concrete and set up the delivery time. We previously leveled, graded, compacted, and prepared the site. Went with 3500psi mix with fibermesh, rebar into the frost wall every 3-4 feet, and 6" remesh, with a 6mil plastic liner underneath.
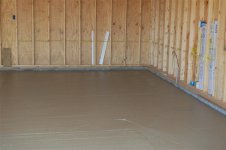
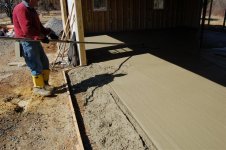
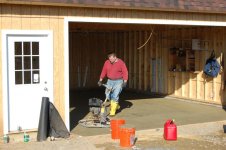
First fiasco, concrete truck didn't come till 1045. Next, he came with 7 yards?!?!? He said he could fit 8 in that truck, but the contractor only ordered 14 yards so they're sending two 7 yard trucks. I'm sorry, did you say 14 yards? That ain't gonna cut it. Call to the contractor, he said yup, 14 yards should do it. I said no it ain't. He said if I run short, call him and he'll send another truck. Yay. Anyhow, we start wheelbarrowing it to the back. My uncle works on the edges and directs me and one of the kids on where to dump the crete. The other teen is pulling and leveling the crete, and lifting the mesh as needed. The garage is 28' deep, the chute on the truck is 12' long so we have to wheelbarrow the back half in. We specced 1% accelerant in the first load, and 2% in the second truck so hopefully it'd all cure at roughly the same time. We got half the garage done with the first truck, and went to the second. Repeat of the same, and lo! we are a yard short. FWIW, my uncle, who does this for a living, said he would absolutely never have tried this with 14 yards. He'd have gone for 15 minimum and probably 16. Well, rather than deal with the contractor, the driver calls for another truck with one yard. We heave and pitch to get a nice line in the setting concrete and leave the big apron for the last truck. It arrives, and it's almost entirely rock. Just what you want to try to finish the last bit with. We (we meaning my uncle) get it smoothed and looking nice anyhow. He brought with him a power screed with a 10' bar, which is absolutely a must have for something like this. He used it to set grade lines (we put rebar pegs at height across the floor, and had 1/2"x4" expansion joint at finished height around the perimeter) and then put me on the screed. I just had to keep the edges level with his marks, and he moved the concrete back and forth behind me so the screed only had to move a little material. Once that was all done, he put a rougher finish on the aprons and let it set for a while. This was about 10pm. Then he got his 4' power trowel and commenced to smoothing and leveling, and did the entire floor about once an hour till 1:30am when we called it a day. Most of the floor had set enough by that point that it took a nice finish, but the first section that we wheeled in hadn't so it's just going to have to have a rougher finish. He was hesitant to use any water on the surface to make it prettier, as it also makes it weaker and he knows how I'm going to abuse the floor. This morning, we took a saw with a diamond blade and cut 1" deep slits across the apron breaks, and across the center of the floor to divide it into 4 equal sections. After much cleanup, he hopped back in his truck for the 5 hour drive home so he can get to work again on sunday. Holy crap, what a guy! I did some more cleanup, then started to apply the sealant we bought. First I used a roller, which was somewhat like trying to paint a car with a brush. It looked like crap no matter what I did. So then I went to get my garden sprayer, only to find that it was half full of frozen 2-4-d. I thawed that out and decided which part of the yard doesn't need plants and dumped it out, then filled the sprayer with the sealant. Pumped it up, pulled the trigger, nothing. Ended up having to entirely disassemble the spray wand and clean/lubricate/adjust the whole dang thing to make it work, then I got to fight the cheap plastic nozzle that is apparently designed to put the product anywhere but directly where the wand is pointing, and certainly in any manner other than that of an even, steady application. It was kind of like a power washer with a flex hose on the end instead of a solid wand. I ended up just drilling the thing out and keeping the drill in my pocket for tuneups as I went. As it sits (literally) the sealant is drying and I'm taking a break, then a nap. I have pics of the whole shebang, but won't be able to put them up till I get back to work monday at the latest.


") Any pictures?
Any pictures?