Only in Texas, Don and Harv doing

   / Only in Texas, Don and Harv doing
  • Thread Starter
#71  
My rule of thumb on the eight foot centers and wood fence is to never let it go over eight foot. In fact I like to even the spaces out even if the spacing comes down to seven feet or even six. I dislike the appearance of a short section at the end of a fence line.(A lot of fences we go six foot spacing but that's another situation)

The reason we do that is we're nailing the pickets on site and post spacing isn't that critical. The other thing is we like to use sixteen foot rails if the posts are on eight foot centers and twelve foot ones if they're on six foot centers. The logic behind the longer rails is we don't have the rail joints all on the same post. The staggered joints help keep the fence straight if a post isn't as good as it's neighbors.

I don't do the watersealing thing. I like the weathered look, personal taste. But the fence needs to dry out good before you seal it. I wouldn't consider sealing it before August. Then you come in and pre-wash it with a bleach based solution and then apply your sealer. The sealer will have to be applied once a year for the first couple of years and then you can back off and do it every three years of so.

I haven't priced the commercial installation in awhile. But ten cents a square foot comes to mind. So you figure on a six foot hight fence once every year or so a dollar twenty a linear foot for color maintence (two sides).
 
   / Only in Texas, Don and Harv doing #72  
Harv, I agree completely with your spacing method and rail lengths (we have two ends now with posts less than 2' apart). /forums/images/graemlins/frown.gif And I'd have applied the pickets on site, but not nailing; I prefer only screws. These panels the neighbor bought were built with a nail gun; two nails per picket per rail on each end; one nail per picket per rail on the rest. The neighbor says he's going to add 3 galvanized screws to each picket; one per rail.

As you said, personal preference, but I just really don't like the weathered gray look. And I know you need to give treated lumber time to dry, but I didn't think that applied to cedar, or does it? And supposedly one of the advantages of the Thompson's® Water Seal® Advanced Tinted Wood Protector is that you can use it immediately, even on treated lumber. And of course, since I have no prior experience and don't know anyone who has used it, I don't know how good it really is. They claim to be good for 3 years with one coat, but I would plan on applying two coats the first time. The stuff is $19.97 plus tax per gallon in one gallon cans and $89.97 for a 5 gallon can which would supposedly cover 200 square feet (I'd figure on using twice that much).
 
   / Only in Texas, Don and Harv doing #73  
<font color="blue"> "...but think Don made a mistake on not getting his pad level first." </font>

Eddie, I laser leveled each post to be sure they were all above the 8' mark. I guess I should have made them above the 8'4" mark to leave room for the slab. We also have some extra room on the slab because the metal will come lower on the side of the slab and rest on a ledge.
Also, as you were saying, the outside metal can be cut to any length when ordered. I am working in-between rain showers and only have 5 poles level and in cement.
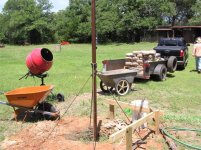
Attached is my set-up for installing the poles. I open the bags and put them in the gray cart then I shovel the cement into the mixer to the right consistency then pour it in orange wheelbarrow then into the hole. The re-barb/pipe stabilizers help make this a one man job. It takes about two cement mixers full to fill each hole which is about 5 bags.
 

Attachments

  • 879346-firstpole.jpg
    879346-firstpole.jpg
    85.3 KB · Views: 465
   / Only in Texas, Don and Harv doing #74  
</font><font color="blue" class="small">( re-barb/pipe stabilizers )</font>

I don't believe I've seen that before, Don; pretty neat idea.
 
   / Only in Texas, Don and Harv doing
  • Thread Starter
#75  
Those are pretty kewel, aren't they?
 
   / Only in Texas, Don and Harv doing
  • Thread Starter
#76  
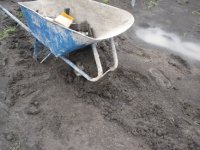
Don I shut down yesterday after lunch because the mud had made it too difficult for an old man. I've found I'm not near as agile and hearty when my tail is tucked between my legs.

I tried using the wheelbarrow to get the tools and brakets to the new barn from the old barn.

I got about half way.
 

Attachments

  • 879506-DSC02684.JPG
    879506-DSC02684.JPG
    71.2 KB · Views: 407
   / Only in Texas, Don and Harv doing
  • Thread Starter
#77  
I left the wheel barrow where it sits. I did turn it upside down so if we did have another storm it would hopefully wash the mud off the wheel.

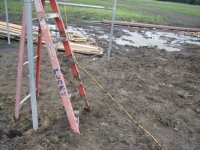
It's one of those situations where mud is on everything. That includes throwing the GFI circuit often. It seems mud is a conductor of electricity as well as misery. /forums/images/graemlins/grin.gif

Check out the rungs on the ladder.
 

Attachments

  • 879510-DSC02683.JPG
    879510-DSC02683.JPG
    80.2 KB · Views: 370
   / Only in Texas, Don and Harv doing
  • Thread Starter
#78  
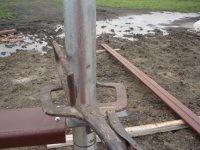
Here's the tool I made to help install the brackets correctly. I still need to fine tune it but it helps a lot as it is.
 

Attachments

  • 879513-DSC02687.JPG
    879513-DSC02687.JPG
    73.3 KB · Views: 401
   / Only in Texas, Don and Harv doing
  • Thread Starter
#79  
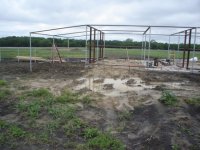
This horse barn will have a 1 1/2 to 12 pitch.

Mud everywhere. /forums/images/graemlins/frown.gif

I know we need the rain, but mud? /forums/images/graemlins/blush.gif
 

Attachments

  • 879514-DSC02681.JPG
    879514-DSC02681.JPG
    78.7 KB · Views: 355
   / Only in Texas, Don and Harv doing #80  
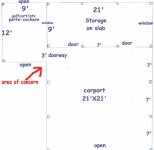
After Harvey and I drew up the basic design I added the golf cart/ATV porte-cochere. This will be where the golf cart will recharge during the night.

Harvey I have a question? See Attachment.
Do I need to put in another pole at the front corner of the porte-cochere and the carport. The 3' door way will not have a door it will only be an opening. I have an extra pole. Another Idea is to add a cement threshold and shoot in a bracket. I haven't cemented in the middle poles on that side so another idea is to move the poles on that side to 9', 9',3' but that might interfere with the rafters since the other side is 7', 7', 7'.

Another concern is: Do I have enough connectors with this addition.

I like your clamp! /forums/images/graemlins/smile.gif

The pole holders were Karen's idea - a larger diameter pipe, cut in half, with a strip of foam inside, (so it won't scratch up her paint job or slip) and a re-barb angled welded to it. /forums/images/graemlins/laugh.gif
 

Attachments

  • 879646-carportdrawing.jpg
    879646-carportdrawing.jpg
    21.5 KB · Views: 423

Tractor & Equipment Auctions

1984 AM GENERAL HMMWV HUMVEE (A51222)
1984 AM GENERAL...
1996 Chevrolet IMPALA SS (A51222)
1996 Chevrolet...
2015 Ford Focus SE Sedan (A50324)
2015 Ford Focus SE...
2015 CATERPILLAR 573C FELLER BUNCHER (A51242)
2015 CATERPILLAR...
80in HD Tooth Bucket with Side Cutters ONE PER LOT (A52128)
80in HD Tooth...
2016 Ford Explorer AWD SUV (A50324)
2016 Ford Explorer...
 
Top