OP
You are using an out of date browser. It may not display this or other websites correctly.
You should upgrade or use an alternative browser.
You should upgrade or use an alternative browser.
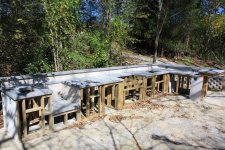
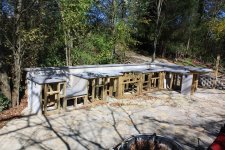
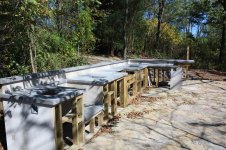
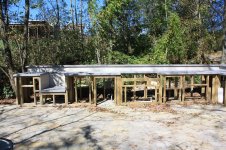
Outdoor Kitchen
- Thread starter buggyman1
- Start date
- Views: 49250
More options
Who Replied?
/ Outdoor Kitchen
#121
OP
buggyman1
Platinum Member

pmetal
Member
Looking good, man!
OP
buggyman1
Platinum Member
Looking good, man!
Thanks, i think its gonna turn our pretty good.
MikeA57
Silver Member
Man, that looks GREAT!! That dinner bell is cool too. Our next door neighbors had one and it was used a LOT to call us kids in from the pastures that they had. What part of KY are you in? I grew up just outside Louisville. Still miss all the hills and exposed rock. Things are pretty flat and featureless here in MS...
OP
buggyman1
Platinum Member
Man, that looks GREAT!! That dinner bell is cool too. Our next door neighbors had one and it was used a LOT to call us kids in from the pastures that they had. What part of KY are you in? I grew up just outside Louisville. Still miss all the hills and exposed rock. Things are pretty flat and featureless here in MS...
I'm in Mount Sterling, east of Lexington. The bell was my wife's idea. Thanks for the props, its a work in progress. Hope to get most of it done before winter...its not looking good, getting down to 33 tonight. I was just in Louisville last weekend, ate at the Cheesecake Factory...good food.
OP
buggyman1
Platinum Member
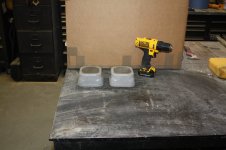
Wet grinder came in tuesday, its a Secco 5 inch variable speed, had to change the water line, it was way to short. I got to try it out tues. night, works way better than my sander, but you get soaked. Its been raining here sense wednesday, but its supposed to clear up this weekend.
SPIKER
Elite Member
how about some pics of the sander in action? now when you get the sanding done to 400+ then slurry coat for pin holes ect correct? what then additional sanding & polish to what grit? I'm very interested in the process as I have a lot of counter top to put into the pole barn home upstairs work shop...
thanks for great info so far.
mark
thanks for great info so far.
mark
OP
buggyman1
Platinum Member
how about some pics of the sander in action? now when you get the sanding done to 400+ then slurry coat for pin holes ect correct? what then additional sanding & polish to what grit? I'm very interested in the process as I have a lot of counter top to put into the pole barn home upstairs work shop...
thanks for great info so far.
mark
Spiker: After sanding to 400 grit, apply the slurry, when dry resume grinding starting with 400 grit. After sanding the slurry with 400, wipe clean and check to see if the pin-holes are covered, if not, repeat the slurry process. When the surface is free of pin-holes continue to the next grit (800). I'm gonna sand through 1500 grit. Speed-up your RPM's as you go up in grits. Example: 50 grit=800 rpm, 100=1000 rpm, 200=1500 rpm, 400=2000 rpm, 800=2500 rpm, 1500=3000 rpm. You won't believe how smooth the surface is after just 400 grit. Good luck with your counter tops, "upstairs" sounds like fun, but do-able.
OP
buggyman1
Platinum Member
bruceha2000
Gold Member
Compared to everything you have done so far, laying that tile will be a walk in the park! It really is quite easy. And since it is a back splash, no kneeling! I did the floors in our bathrooms and the tile on the walls around the tub.We picked out the tile for the back splash. I've never laid tile before, should be interesting.
Keys:
- If it won't be full tile all the way, you need to measure the half way point (vertical and horizontal) and start laying where they intersect so you don't end up with cheesy short pieces on the perimeter. Besides not looking good it is a LOT of work and waste to cut narrow pieces. Use a water saw, nipping them takes forever and won't be nearly as clean. ou may have planned ahead so it IS full tile. That would be good, cutting tile takes time.
- use the right kind of mastic for the job
- a toothed rectangular trowel sized for the tile to spread the mastic in arcs, not TOO much at a time.
- 'plus sign' shaped nylon spacers. You just toss those babies in and presto, perfect alignment. If the tiles are tall enough you can leave the spacers in and just grout over them. Of course, then you need to buy more for your next job.
- IMPORTANT! Use a flat wide board to press the tiles into the mastic after you lay so you don't have a lumpy surface. It has to span several tiles in all directions.
The hardware/tile store people will fix you right up with the proper equipment and materials.
I think that outdoor kitchen is bigger than my house. Looks great.
And about that beautiful brindle, you ARE going to leave the tail and ears natural, right?
OP
buggyman1
Platinum Member
Compared to everything you have done so far, laying that tile will be a walk in the park! It really is quite easy. And since it is a back splash, no kneeling! I did the floors in our bathrooms and the tile on the walls around the tub.
Keys:
- If it won't be full tile all the way, you need to measure the half way point (vertical and horizontal) and start laying where they intersect so you don't end up with cheesy short pieces on the perimeter. Besides not looking good it is a LOT of work and waste to cut narrow pieces. Use a water saw, nipping them takes forever and won't be nearly as clean. ou may have planned ahead so it IS full tile. That would be good, cutting tile takes time.
- use the right kind of mastic for the job
- a toothed rectangular trowel sized for the tile to spread the mastic in arcs, not TOO much at a time.
- 'plus sign' shaped nylon spacers. You just toss those babies in and presto, perfect alignment. If the tiles are tall enough you can leave the spacers in and just grout over them. Of course, then you need to buy more for your next job.
- IMPORTANT! Use a flat wide board to press the tiles into the mastic after you lay so you don't have a lumpy surface. It has to span several tiles in all directions.
The hardware/tile store people will fix you right up with the proper equipment and materials.
I think that outdoor kitchen is bigger than my house. Looks great.
And about that beautiful brindle, you ARE going to leave the tail and ears natural, right?
Thanks for the info, the tiles measure out right, the only cutting is around the plugs (i think). Yeah, Charlie is safe.
OP
buggyman1
Platinum Member
Put the first slurry coat on today, what a mess!!! There is no way you could do this indoors. I got more slurry on me than the counter tops. Ok, no more bragging on the concrete coming out just right, as i wasted over 2/3's of a bag. The sun was out, and there was a small breeze, but the slurry dries almost as fast as you put it on because the coat is so thin. You have to work fast, and do a small area at a time. Did i mention its messy, it didn't help that i tore a hole in my rubber glove with the plastic puddy knife 5 mins. into the job. If you don't like, or can't do drywall this job ain't for you. The holes are hard to fill, i had to keep rubbing the slurry to fill the holes then scrape it off with the puddy knife before it dries. I will need at least one more coat because when it dries it kinda does like drywall mud (leaves little dimples in the bigger holes) I know im not explaining this very well. This is by far the worst job in the counter top process. Make sure you put down a drop-cloth because some (in my case a lot) slurry is gonna hit the ground. Don't over wet the tops with water as it will make the slurry too thin to work with. Next coat im gonna just mix a little slurry at a time. Im really glad i didn't try this in my garage as i was not prepared for the mess it makes. I'll sand it off tomorrow and see what it looks like weather permitting. Tip of the day: have a spare pair of gloves.
SPIKER
Elite Member
Buggy:
ya familiar with shrinkage and ya familiar with drywall mud, most of my brothers and I have all done it Hanging is OK hate finishing it or sanding it... I'll be taking care of a lot of that in future after my pro finisher brother passed. he did a lot of very artistic designs & such in mud ceilings... looking at one now. when the moisture leaves the mud/slurry the stuff left behind shrinks.
mark
OP
buggyman1
Platinum Member
Buggy:
ya familiar with shrinkage and ya familiar with drywall mud, most of my brothers and I have all done it Hanging is OK hate finishing it or sanding it... I'll be taking care of a lot of that in future after my pro finisher brother passed. he did a lot of very artistic designs & such in mud ceilings... looking at one now. when the moisture leaves the mud/slurry the stuff left behind shrinks.
mark
Sorry to hear about your brother. I don't mind hanging drywall, but i hate finishing it to, i used to watch a pro and man he made it look so easy. It takes some talent to be good at it. Its been raining here for three days and its turned off cold (32ish) post to clear up the first of the week, maybe i'll get them finished next week.
OP
buggyman1
Platinum Member
Started sanding on the slurry coat today. Make sure you get the slurry off the underside of the counters before it dries, i didn't and its a pain in the butt. I worked on the underside for the better part of two hours on mine, i used a file to scrape, file, sand, anything to get it off. Something else that would help is another source of water to wash off the ground off slurry. I'm going to get a simple splitter for my water hose so i don't have to disconnect from my grinder. The temp. was around 60 degrees here, but i still froze from being wet all day (it would help to have a rain suit). I didn't get much grinding done, but what little i did do looks good enough with just the first coat. I think i can get by with just a few touch-ups.