PA160 STH unboxing!

   / PA160 STH unboxing!
  • Thread Starter
#71  
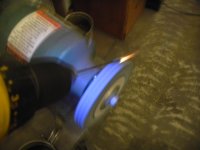
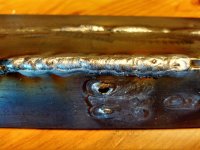
WOOT WOOT! After picking up my argon cylinder yesterday, tracking down all the gas leaks in my clamps, and figuring out (thanks to Mark @ Everlast) that I had forgotten to reverse my leads' polarity when switching to TIG, I finally got to put down some TIG welds with my PA160-STH today! I'm as excited as can be! One thing that I didn't realize about the unit, that is definitely worth mentioning, is that the finger switch is operable in both HF and lift mode. I realize this may be obvious to experienced TIG welders, but I didn't know it. I mistakenly thought that you had the choice of lift-start (where the finger switch activated the lift-sense voltage and broke the arc at the end) and HF with pedal. Currently, I plan to practice using the finger-switch only, with fixed output set on the panel. Since I'm working on steel (vs. aluminum), I suspect that modulating temperature halfway through the bead is not going to be as necessary, and I doubt that I have the sensitivity at this point to really know what I should be doing with the pedal anyway.
 
   / PA160 STH unboxing!
  • Thread Starter
#72  
I think it would help if you had some plate that wasn't so rusty. It looks like your plates have no gap at all.

Thanks for the feedback on the gap. You're right that I didn't actually leave one. Thanks also for the description of the whipping motion. I like the analogy of digging out, then filling. If I understand correctly, you dig forwards on the "whip", then push the puddle back to "fill" the crater(s) you've left behind. At least, that's what I picture myself doing. Dig forwards and watch the keyhole form, then push backwards and watch the puddle wet out to the edges of the bevel. Is that right?

As for the rusty plate, I confess that I let myself get a little lazier when working with 6011, and sometimes just wire brush the scale off, vs. grinding down to clean metal. I'm more conscientious about other rods.
 
   / PA160 STH unboxing! #73  
Joshua,
The purpose of whipping forward is to pull out of the puddle and barely lengthen the arc (keep it tight though) and then slam it back into the puddle as it starts to cool. That's how the ripples are formed. The key hole is on the front edge of the puddle, and you'd whip it a little in front of the key hole to keep the key hole from blowing out on you. I prefer to make quicker, more rapid stepping/whipping motions, with a steady move forward (may 1.5 times a second. Others use a slower (1 to a little under one complete cycle per second). When you whip forward and pause the idea is to let things freeze a little.
 
   / PA160 STH unboxing!
  • Thread Starter
#76  
I'm egear to hear how it works with 6011 electrodes.

It runs 6011 just fine. The welds around post #66 on this thread are 6011. Really, I think any welder should run 6011 okay. It's 6010 that seems to be a real test for some welders.

I wanna see pictures of his welds!

Honestly, I ran, like three inches of weld before it started raining and I had to run in. Technically, the last two inches of bead were in the rain! Here's what I'll give you, though:

2013-06-01 19.38.11.jpg

This is the very first weld I ran: 130 amps, 3/32" 2% lanthanated, 1/8" material, butt weld, beveled. No filler wire--just getting a feel for the torch. I think I may have misread the chart when I looked up my amp range, because Miller's weld calculator shows a max of 120 amps for 1/8" material, and this weld did seem pretty hot. You should see the back side! Drippy! Anyway, there it is. I'll post some more pics when I have a little more time with it and feel like I've got something worth posting.
 
   / PA160 STH unboxing! #77  
Actually that's not bad at all, in fact that is pretty dam good for just starting with Tig! :thumbsup::thumbsup:
 
   / PA160 STH unboxing!
  • Thread Starter
#79  
All right. Here are a few more pics. Only the best few, that don't look like an arthritic monkey was holding the torch. Ironically, my best TIG welds look not dissimilar to some of my worst stick welds. Take from that what you will.

Settings were: variable (pedal) amps, 3/32" 2% lanthanated electrode, 1/8" material, argon at up to 20 cfh, #4 cup.

Starting out, I was working with fixed amperage and the finger switch, but I got tired of seeing volcanoes at the end of my welds, so I switched to the pedal just so I could back off slowly at the end. I planned to still run flat-out / fixed amperage, using the pedal's rheostat to set the max output, but I immediately saw how useful it was to be able to adjust the heat mid-bead, and ended up throwing the plan to the wind and just going for it.

I fouled a lot of electrodes. I ground both ends of the electrodes to a point so that I could go twice as long without having to walk back to the barn and regrind.

Early in the process, I thought the electrode was eating itself up kind of fast. It ended up balling up. I turned the gas flow up from about 14 cfh to about 20 cfh and that fixed it. The Miller weld calculator only calls for 11 cfh for this joint, with between a #4 and #6 cup, so I'm not sure why my flow is so much higher. Possibly the gas flow wasn't the cause for the electrode balling up so fast. I dunno.

The Miller calculator only calls for a 1/16" electrode for this joint. What's the effect of using a larger electrode than is called for? I know larger electrodes have more current-carrying capacity, so the down-side of using too small an electrode is obvious, but what's the tradeoff for using a larger-than-necessary electrode?
 

Attachments

  • 2013-06-02 16.55.02.jpg
    2013-06-02 16.55.02.jpg
    923.9 KB · Views: 178
  • 2013-06-02 16.55.28.jpg
    2013-06-02 16.55.28.jpg
    993.8 KB · Views: 148
  • 2013-06-02 16.55.55.jpg
    2013-06-02 16.55.55.jpg
    993.4 KB · Views: 155
  • 2013-06-02 16.57.14.jpg
    2013-06-02 16.57.14.jpg
    997.6 KB · Views: 142
   / PA160 STH unboxing! #80  
I've got to the point now where I just use ceriated (orange) tungsten for everything. Zap over on WW has a really great idea for sharpening tungsten with a drill motor and bench grinder. Don't get too hung up on everything you read. It's not a perfect world, you have to find what works best for you, and your equipment. ;)
 

Attachments

  • Tungsten grinder zap.JPG
    Tungsten grinder zap.JPG
    232.2 KB · Views: 154

Tractor & Equipment Auctions

2020 JOHN DEERE 524L LOADER (A51242)
2020 JOHN DEERE...
IH Farmall 504 Tractor (A50514)
IH Farmall 504...
30ft Sticks Mix Match Irrigation Pipe with Trailer (A52128)
30ft Sticks Mix...
New 4-17.5 Forerunner Skidloader Tires (A50774)
New 4-17.5...
30ft Pole S/A Towable Trailer (A49346)
30ft Pole S/A...
2020 New Holland 105 Workmaster MFWD Compact Tractor with 632TL Front Loader - Poultry Special (A52128)
2020 New Holland...
 
Top