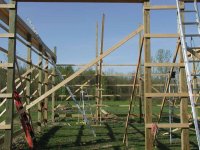
Your end truss should be fairly stable and where you need to start from.
All your purlins should start and stop on different trusses, or at least as often as possible. Depending on your spacing of trusses and length of your purlins. On four foot centers, I have mine hit the same truss every fourth purlin.
For the first purlin, you want it near the peak. You don't put them at the very peak since your metal roof is always a few inches short of the peak and your metal caps overlap your metal roof panels. The top purlin needs to be about six inches from the peak so that you can screw both the panel and the peak into the purlin, and still have space for your vents.
Are you installing peak vents?
Measure the inside distance between the two trusses. Use this number and mark two purlins for each side. Mark each purlin 3/4 of an inch from the end and then mark one at that distance. On the next purlin, make another mark at 1 1/2 inches and another at the distance your third truss will be.
Will you have an overhang on your roof? A soffit of any kind, or will the roof end flush? Depending on how far out you want your purlins to exend past the wall, or if they will be flush, that is the length of your purlin. From the end of the wall, to the middle of the truss.
The first purlin will be short. If flush with the wall, then the length of the space between the purlins plus 1 1/2 inches for the first truss and 3/4 of an inch for the second truss is how long to cut it.
The next purlin will be the length of the distance between the two trusses, 1 1/2 inches twice and 3/4 of an inch for half a truss.
Measure up your trusses to where you want your purlins. At the highst place on your truss, attach the short one to the outside truss first. Since your outside truss if plumb, the pulin will line up and hold the second truss plumb when it's exactly the same distance from the first one. The marks on your purlin will show you where that is. Just nail or screw them together.
This will hold it in place, but it will still have allot of wobble to it.
The next purlin should go on before the third truss is installed. Attach it to the two trusses in place. The purlin will hang out to where the third truss will be located. This should make setting the trusses a little easier too. Maybe. LOL
The third truss will make the other two more steady and it will just keep getting better as you progress and attach more purlins to the roof.
With all the purlins in place, the roof will still seem bouncy and have allot of sway to it. The metal will lock it all into place once it's installed.
To increase the strength of your trusses and stiffen them up a little more, add prulins to the tops of the bottom chords the full lenght of your barn. Two of them evenly spaced will do the job and make a huge difference. This is required in some areas, yet I've seen some barns where it's not done.
If you will have the trusses in position for awhile before installing the roofing metal, then temporary diagnal bracing should be used on top of the purlins. This will stiffen it up considerably. You can also put diagnal bracing under your top chords, but it's not needed once the metal is in place. It will make the roof stronger, but not so much more then the metal will accomplish when it's installed. Some manufactures recomend it, others don't.
While working alone, I like to use lots of temporary bracing and jigs. For fliping trusses, I'd put in stop blocks along both walls with screws so that I can easily remove them and install them again.
You're doing a great job, thanks for the updates,
Eddie
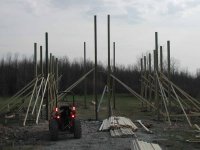
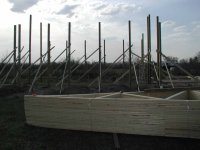
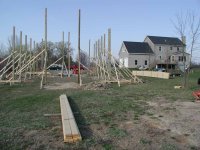
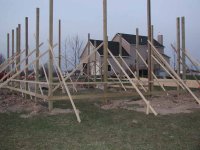
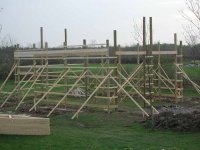
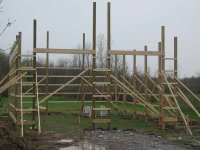
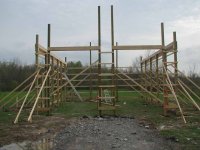
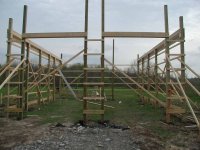
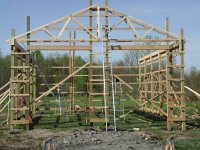
") ! But that is a few weeks down the road. Here are some more pictures with all the poles up!
! But that is a few weeks down the road. Here are some more pictures with all the poles up!