Question on JCB swing cylinders

   / Question on JCB swing cylinders #1  

Richard

Super Member
Joined
Apr 6, 2000
Messages
5,057
Location
Knoxville, TN
Tractor
International 1066 Full sized JCB Loader/Backhoe and a John Deere 430 to mow with
I've got a JCB 1550-B. Noticed the other day that the swing cylinders on the hoe are starting to leak. I've had the machine for maybe 10 years or so and have repacked (removed and taken to shop) virtually all the cylinders but for these two swing cylinders and the main cylinder for the hoe.

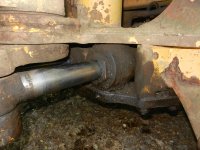
Poked my head back there and it looks like my presumptions are wrong.

I was presuming I could remove bolts A & B & C and slide the cylinder out so I could take it to the shop.

Doesn't look like it will be that easy.

Looks like I have four large bolts holding the bottom plate on (the plate that 'sandwiches' the cylinders and allows them to pivot left/right)

If this is accurate, it seems the entire assembly comes off which means it's going to weigh a ton and rip at least two of my fingernails off.

Anyone know if this is accurate?

If it is accurate, would I be better off trying to repack them myself (while staying on the machine) after buying or paying someone to make a large wrench so I can unscrew the ends?

I've done some internet searches and have only found some you-tube videos....bad thing there is something is wrong with this PC and it will not play a video at all. They turn to a snowy screen so, I've be unable to see any of them showing how it's done.

Thanks for any thoughts!
 
   / Question on JCB swing cylinders #2  
Wow, don't know the answer but that does sound odd,
is there no way of removing the pin that holds the cylinder in, at the back of it:confused:
You would think there would be, and then just slide out the cylinder.
I think mine is similar to yours so I'll have a look.
I have a question for you, when you check your trans fluid level, is the machine running or off?
 
   / Question on JCB swing cylinders
  • Thread Starter
#3  
I have always checked my trans fluid level while the machine was running (but that doesn't mean that's the right way to do it)

I'm simply a home owner who has a big toy to play with as contrasted to a contractor or someone who's using it for their job or other type of constructive purpose :D

Looked at it closer yesterday with my brother in law.... he kind of came to similar conclusion.

When you look at the underside of the plate that is under the cylinders, one of them looks like there is a "mushroomed rivet" dead center under the cylinder. A huge rivet to be sure....but it has a domed shape. Interestingly, the other cylinder has what appears to be....how to describe this.... umm.... has what appears to be a top side view of a pin BUT, there is no pin otherwise visible.

This got me thinking & wondering....

(and I don't know this so I'm wondering out loud)

What if this bottom plate were simply loosened. Could each cylinder have some form of "pin" already formed into the cylinder itself such that this 'pin' rests in a small/shallow receiver hole for it on the steel plate that is holding it?

If true, then the steel plate on the bottom could 'simply' (hahahahahaha) be loosened and perhaps the cylinder could be wiggled out without the entire ensemble falling to the ground and crushing my pinky finger.

I then asked my (very mechanically inclined) brother in law.... "do you agree that it looks like it might be just as easy to get a huge pipe wrench (or other) and just try to wrestle the cap off myself and change the gaskets while on the machine?"

"Yep"

So I'm going to try to find/rent something like a six or eight inch pipe wrench to see if I can wrestle the nut loose. If I can, I might try my first rebuild ever. If I can't.... on to stage two.
 
   / Question on JCB swing cylinders #4  
My older Case 580 has trunnion mount cylinders for swing - same on loader curl (backward from most loaders, gives more force for curl than for dump) -

Your description sounds like the JCB may be made that way too - your "lumps" are probably the pivot points or "trunnions" - if so, the heavy plate above the cylinders has two "sockets" (probably your "lumps") , one for each cyl's "stub axle", and can be unbolted from the hoe's subframe and lifted off - there should be two LOWER sockets also, one for each cylinder.

My swing is plumbed with the two cylinders teed in parallel (but reversed) - push on one is teed to pull on the other, and the tee lets each cylinder get the amount of fluid it needs (because one's pushing while the other is pulling, displacement of the rod makes the push cyl. need more than the pulling one.)

I hadn't had mine very long when I started re-doing cylinders, didn't even TRY to take those cylinders out of the machine but re-sealed them in place. I just centered the hoe, blocked it up, loosened hoses at the cyl's, pulled the pins that connect the rods to the swing tower, fought the glands off the cyl.s and re-sealed.

That's what I would do (without seen a picture of yours, hint hint ;) )

This is what Case swing cyls look like

New Swing Cylinder 580C 580D 580E 680G 680H 680K Case Backhoe 1346044C1 | eBay

As soon as we can see YOUR PIC :licking: we should be able to verify this... Steve
 
Last edited:
   / Question on JCB swing cylinders
  • Thread Starter
#5  
Had to recharge camera battery.... :rolleyes:

Here's pic of the end nut and the underside.

You can see the 'mushroomed' pin on the right and the other shape on the left. I've not banged around on it to see if the right side might be a cap and the left side is missing.... I've just got down on one knee and cranked my head around like Regan to try & see up. Finally, I just (blindly) took the camera and tried some pot luck shots.

Looks like the end nut is just a hair under 4" across.

What kind of wrench to you use (if I do it myself) to take those off? A huge pipe wrench? Buy the 'correct' wrench from the dealer and have something I'll probably never use again?
 

Attachments

  • BH1.jpg
    BH1.jpg
    414 KB · Views: 1,418
  • BH2.jpg
    BH2.jpg
    518 KB · Views: 2,692
   / Question on JCB swing cylinders #6  
OK, yours is pretty much upside down from the way Case does it - on mine, the lower support plate is one piece with the support frame and the upper plate is a glorified C channel with the trunnion caps welded into it - that "c channel" is bolted to the support frame at both ends, IIRC the bolts are maybe 3/4". Also, my cylinders have totally different glands (the removable end that the cylinder rod pokes thru) - I would LOVE it if mine had that big a** nut on 'em, but instead Case decided that 4 wimpy little 5/16" holes in the end cap (gland nut) were good enough to stick a spanner into and unscrew a 4" diameter LONG-threaded cap after it's been in service for a couple decades :confused:

If I were working on your JCB, I'd first find a manual for it - usually they will at least give you some sort of idea what you're gonna run into, which can be somewhere between "slightly helpful" and "Lifesaving" :rolleyes:

Then I'd crank my pressure washer up to about 3000psi and clean all the crud off the cyls and immediate area - your pix look to me like the gland nut MIGHT be the full diameter of the cylinder tube, I can almost see/imagine a crack going around the cylinder about 3/8" from the face of the cylinder cap (gland)

Either way, if my biggest pipe wrench would fit I'd try that, without a cheater first - if not, I'd plasma cut a chunk of 3/4 steel plate into a wrench head with maybe a foot long handle 2" wide and slip a 4-5 foot piece of trailer hitch receiver tube over it and go from there.

From there (in my experience) it stands a good chance of getting pretty ugly - a couple of the cylinders on my Case I had to retract the rod (keeps the piston seals away from the gland) then heat the whole circumference at the gland a dull cherry red (don't even try this without acetylene torch, propane torch will NOT get it hot enough) - Then, while it was still hot enough I shot some penetrating oil along the crack til it quit catching fire, slipped a 4 foot piece of pipe over the handle of my 3 foot pipe wrench (heavy welding gloves unless you like 3rd degree burns)

The gland nut FINALLY started to budge, which gave me a bit more room for penetrant - at last it came apart, I let it cool and dug/scraped/polished the burnt up seal materials from the open end of the cylinder (rod still in it) then pulled the rod/piston out with a comealong, cleaned a bunch more, then put it all back with new seals.

Most of this type cylinder needs the piston-to-rod connection torqued down to around 400 foot pounds or more - I used my 3/4" impact wrench to R&R, you do NOT want the piston to unscrew itself inside the cylinder...

Considering that I have no idea whether you have welders, big tools, comealongs, etc, if you DON'T then you may be ahead putting a floor jack under your bottom plate, cleaning up the threads on those 4 bolts, and (carefully) dropping the whole thing - I can't really tell if your hydraulic fittings are accessible, hopefully they are and should be removed BEFORE you do anything else.

Where I'm going with this is farming the job out to a pro hydraulic shop - if there's one in your area, they would be a good outfit to make friends with whether for having them do the job or for some useful suggestions.

BTW, if you go the pipe wrench route I would NOT recommend Harbor Freight - their pipe wrenches seem to have too soft a jaws and will slip off under high torque. The price of cylinders like these, even USED, will scare the crap out of you - ones for my Case typically run $6-900 on flea-bay USED. Also, a REAL pipe wrench in larger size can run you well over $100, possibly $200.

If it comes to it, better to pay a good hydraulic shop a couple hundred than mess up due to improper tools.

Hopefully I've given you a few options that'll help - or at least a good reason to run away :D Good luck... Steve

Oh, forgot to mention - the bottoms of your trunnions look like they had a domed cap tack welded over them, and the one on the left either fell off or got removed at some time. I see zerk fittings that appear to be in the right place to lube those bushings.

Also, when/if you put it back together I would suggest finding 4 more nuts for the ones holding the support - the threads sticking out like that are a good candidate for getting mashed; a second nut would protect them so you can get the main ones off without having to re-shape the threads or destroy the nuts/studs...
 
   / Question on JCB swing cylinders #8  
The gland is the screw-in (or in some cases) the snap-ringed in part with the hole in it for the rod - the piston is typically bolted to the inner end of the rod - so how would one go about removing just the rod by pulling it thru the hole in the gland?

Seems like it'd pull pretty hard trying to get a 4" diameter piston thru a 2" diameter hole... Steve

Here's a typical Case cylinder (not a swing cylinder, but same internal design)hyd-piston-assembled-2.JPG
 
   / Question on JCB swing cylinders
  • Thread Starter
#9  
Ok, so I'll admit to a couple things.

1 I've never done one of these.
2. I'm not shy about taking anything apart if I'm able to
3. I'm pretty mechanically inclined

That said, given what I see on my machine and Steve's picture above....

I would expect to unscrew the end cap (pardon that I don't know all the correct terms for their respective parts).

Once the end cap is unscrewed, I would anticipate seeing something like the picture above. Some more of the cylinder rod with the "piston" at the end and several gaskets on the piston.

I would imagine, the gaskets get wrestled off somehow, new ones installed and the whole assembly gets reinserted back into the cylinder, screw the end cap in and "done", easy peasy.

I don't understand the comment above about pulling a 4" piston through a 2" hole?

I would think the whole ensemble would come out with the end cap dangling during the process.

I wouldn't need to actually remove the piston from the rod would I ??
 
   / Question on JCB swing cylinders #10  
Ok Rick, took a look at mine and its completely different to yours.
My cylinders are one on top of the other and on the same side, I have a side swing backhoe, it moves from side to side. Two "C" brackets hold them in.
In your case, can't you just remove those "4" nuts and drop that bottom plate?,, whats stopping you from doing this or am i missing something here.
 
   / Question on JCB swing cylinders
  • Thread Starter
#11  
My fear is if I were to drop the bottom plate, both cylinders would come crashing down with it.

That would be the easy part. The hard part would be to then lift both cylinders (at what I surmise to be the same time), get them lined up while then setting the plate.

If perhaps the cylinders would be 'held' from above, then I'm worrying about nothing. I just don't think that's going to happen from what I've seen (or not seen).

I'd have to fabricate some kind of lift (I do have a hydraulic jack for an auto) balance the plate & two cylinders on the plate while lifting and keeping my fingers clear.

I have a small voice in the back of my head that is telling me I'm still missing something about how they come apart.
 
   / Question on JCB swing cylinders #12  
The end of the gland must be threaded so the rod and the plunger can slip right out. Clean it up and you should see a seem 1/4" from the end of the gland. Figuring out the first few I did had me confused as well. Then if you can't pull the rod with the end on it out by hand use the hydraulics to push it out ( to not take it off and then have to use air to push the rod out to dangerous I know from experience.) I have one to do in the next couple day myself on a stabilizer.
 
   / Question on JCB swing cylinders
  • Thread Starter
#13  
Been looking around....

Would I need a "Gland nut wrench" to remove the end cap?

Amazon.com: gland nut wrench

I see 'pins' on these which make me think these would be similar (on a smaller scale of course) of what you would use to unscrew the back of a watch case that has the notches in the outer rim.

I don't see these as being a 'wrench' per se' where they will grab the nut and hold it.

Right? Or is this exactly what I need? (I've not yet cleaned the nuts up to see if there is perhaps a hole for the pins to go into)
 
   / Question on JCB swing cylinders #15  
"I would expect to unscrew the end cap (pardon that I don't know all the correct terms for their respective parts)."

I tried to clarify some terms in the marked up pic.

"Once the end cap is unscrewed, I would anticipate seeing something like the picture above. Some more of the cylinder rod with the "piston" at the end and several gaskets on the piston."

Correct - except those gaskets would be called "rings" or "seals"

"I would imagine, the gaskets get wrestled off somehow, new ones installed and the whole assembly gets reinserted back into the cylinder, screw the end cap in and "done", easy peasy."

Correct, except for the "easy peasy" part - usually not so much, due to heat/cold cycles, time, being put back together previously without anti-seize lube on threads, etc...

"I don't understand the comment above about pulling a 4" piston through a 2" hole?"

This was probably due to Billrog/my misunderstanding of terms - What I meant was that, unless you take that gland (AKA "end cap") out, you cannot just take out the rod because the piston is (hopefully) still attached to the rod, and the hole thru the gland is only the diameter of the ROD, not the PISTON.

"I would think the whole ensemble would come out with the end cap dangling during the process."

Correct.

"I wouldn't need to actually remove the piston from the rod would I ??"

Sorry - I am ***-u-me ing you found the leak because it's EXTERNAL (dripping) rather than INTERNAL (can't see it but cylinder is weak operating, bleeding past the piston seals) - if so, then the main seals you need to replace are the ones INSIDE THE GLAND - and the ONLY way that can be done is to completely remove the rod from the gland once you've removed the "whole ensemble" as above - hyd_cyl_split_piston.JPG

And that requires removal of the piston from the rod, since the welded end of the rod won't go thru the gland and the OTHER end can't either, unless the piston is removed.
Item# 5 is the front wiper seal, #6 is main seal, and there is sometimes another rear seal (not shown in diagram) - ALL these must go INSIDE the gland, which can't happen unless the rod is out of the gland. These are the items that will cause an EXTERNAL leak if bad -

Also, in some cylinders (older Case, for example) the piston is split (see items 12,13,15) - regardless, since it's likely your GLAND seals are bad, the piston has to come off the rod in order to get the rod out of the gland.

From an optimist's point of view, you might NOT have to remove the cylinder BODIES - I didn't when I did the swing on my Case - I centered the boom, pulled the pins that hold the rod ends to the swing tower, unscrewed the glands, broke hydraulic connections so pistons could move, hooked a comealong into the rod eye and pulled the entire rod/gland/piston out of the cylinder tubes.

Next - big vise, big table, smooth metal "shoes" over vise jaws, grab ONLY the flattened sides of the rod end, 1-1/2" impact socket/big air impact gun, remove nut retaining the piston, slide the gland off the rod, match up new parts in kit to what was removed, reverse the procedure to re-assemble.

NEVER touch the rod with anything metal - any part of the rod that isn't perfectly smooth will cause you to start OVER with new seals :confused:

Also - the Case cyl's use an internal rod seal (item#6) that's usually a BEAR to get in and out - it goes into a deep groove inside the gland. Getting the old one out will usually take a couple of "hook picks", something like this

Pick and Hook Set 7 Pc

Getting them out isn't usually as hard as getting the new one back in - my method for that is (1) dunk the seal in nearly boiling water for maybe 10 seconds to soften it - (2) as soon as it's not painful to touch the seal, grasp it on one side with thumb/finger, then use SMOOTH-JAWED (no sharp edges or serrations) pliers and grasp the OTHER side of the "donut", and TWIST the seal (in the same plane, this will cause the part between your fingers to become smaller diameter, with a small "inside out" half-circle where the pliers are) - then, holding the seal in this "omega" shape, insert the part held in your fingers into the big groove in the gland, twisting the pliers back and forth til MOST of the seal is where it belongs - finally, smooth out the seal with a finger so ALL of it is in the groove.

Re-assembly - wet a finger with hydraulic fluid and pre-lube the seal and wiper before attempting to insert the rod back into the gland.

I may have forgotten a step or two, feel free to ask about anything that isn't clear... Steve
 
   / Question on JCB swing cylinders #16  
I have that spanner "wrench", haven't used it yet (built my own, different size for each size cylinder)

As near as I can tell, you WON'T find little holes in yours - that's what the BIG A** hex nut is for.

IMO, your next step should involve a 3000 psi pressure washer so you can better see what you have... Steve
 
   / Question on JCB swing cylinders
  • Thread Starter
#17  
I'm all over the pressure washer. Have one at father in laws house next door so right now, I'm trying to research the other items that will take longer to organize.

For example.... I found this monster wrench

36" Adjustable Wrench | OTC Tools

Something like 36" long, 31 pounds and....$826 (ouch) Although I presume that is list price and am presuming if I go that route, it could be had for less.....but......still.......ouch!
 
   / Question on JCB swing cylinders #18  
Unless I just wanted one of those for "bragging rights", or intended to go into watch repair :laughing: I'd see if anyone close has a CNC plasma table they're trying to pay for - I would think a simple "open end wrench" with maybe a foot of 2" wide, all cut from 1/2 to 3/4" steel, then a cheater pipe over that "short handle" - shouldn't cost more than $100, maybe less.

You may get lucky - I wouldn't get too excited shopping for tools (OK, I lied :rolleyes:) until it's CLEAN enough to see more.

Also - watch for little set screws around the periphery of the gland, thru the sides of the cylinder body - Case used these in most cylinders, keeps 'em from backing out. Also messes up threads in the gland if you don't take 'em out first... Steve
 
   / Question on JCB swing cylinders
  • Thread Starter
#19  
I just had a "omg, I could have had a V8" moment....

You are correct in that the cylinder is leaking on the outside. It's a slow leak but it's there none the less.

I was thinking "remove everything, slap some new seals on the piston and put some new seals on the screw in cap"

I was thinking the seals would be on the outer/threaded portion.... enter my V8 moment....

It's the INNER hole that is leaking, not the threaded portion. It is because of the inner thread leaking that the whole package needs to come apart so the inner seal can be replaced.

duh....

By the way, I do appreciate all the help.

This has me wondering if perhaps I might contact my hydraulic shop, see if they would simply take care of the guts if I can pull them out of the machine.

I really, really, really don't want to fight the cylinders out. If I can pull their innards, drop them off to be fixed and slide them back in..... that would be nice.
 
   / Question on JCB swing cylinders #20  
Probably the less painful way to go - if you do, re-read my previous comments along that line - also, if your father-in-law doesn't have a floor jack you can borrow, I would suggest NOT using a bottle jack - not enough support to avoid the whole (heavy) sub-assembly from tilting off the jack.

The way that JCB is made, it doesn't appear that you can take things out "piece-meal" - and that lower plate plus TWO fat cylinders ain't gonna be "pinky finger" work :eek:

A smooth surface and a floor jack (a transmission jack would be even better) should keep all your "digits" attached... Steve
 

Tractor & Equipment Auctions

2013 ISUZU NPR STAKE BODY TRUCK (A59904)
2013 ISUZU NPR...
2025 CFG Industrial QK20R Mini Excavator (A59228)
2025 CFG...
2007 FORD F750 XLT SUPER DUTY SERVICE TRUCK (A58375)
2007 FORD F750 XLT...
SEMI AUTOMATIC QUICK-CHANGER FOR MINI EXCAVATOR (A58214)
SEMI AUTOMATIC...
(2) POLY DRUMS (A52708)
(2) POLY DRUMS...
Pat's QH and hydraulic top-link.
Pat's QH and...
 
Top