Step by step photos of new garage

   / Step by step photos of new garage #91  
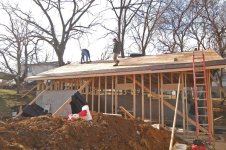
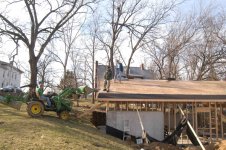
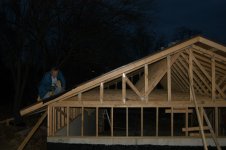
I would get some diagonal bracing up before roofing. I would use osb on your two exposed corners. I don't trust the bracing with all the weight and potential wind.
 
   / Step by step photos of new garage
  • Thread Starter
#92  
snaped this picture early this morning as the sun was comming up. I think he was waiting for me to build a chimeny so he could get in to the garage.

Roger
 

Attachments

  • santa 1.jpg
    santa 1.jpg
    300.1 KB · Views: 571
   / Step by step photos of new garage
  • Thread Starter
#93  
well here is what has been done to date:

1st rain is comming in on Fri night.

I got 3 squars up on the roof, one bundle on the back of my brother. Then I came up with the ieda of saving some time and got my tractor out. That was better.

We got the 3/4 of the east side shingled and the other side papered. Going to hit it early and hope to have it finshed by 3:00 or so. We are not fast, my brother in law as 14 square he could put down in 6 hours. But the roof needed alot of prep today, some blocking on the rakes then the paper and drip edge etc. The lumber company brought a left later that brought the 42 bundles up all we had to do was walk it down and stack them at the top.

I got lucky, I started today thinking today I would do this alone. The neighbor saw me and came over to help, then son in law came over, then my brother. I took advanatge of the help and put them to work. In the past I helped my brother roof his house so he took pitty, the neighbor I help build a shed remove trees and bulid a play house and shed. What can I say my son in law thought he better help his father in law or maybe my daughter told him to help. But all in all it heart warming to know people are there to return a favor.

Tommorow better pictures of the what we have finished, we worked until and past dark so no pictures of the nice half finished roof.

Roger
 

Attachments

  • 1.jpg
    1.jpg
    338.7 KB · Views: 488
  • 2.jpg
    2.jpg
    274.9 KB · Views: 415
  • 3.jpg
    3.jpg
    340.8 KB · Views: 415
  • 4.jpg
    4.jpg
    346.8 KB · Views: 383
  • 5.jpg
    5.jpg
    214.8 KB · Views: 473
   / Step by step photos of new garage #94  
Not to rain on your parade, but you are taking an awful chance putting the roof on, with all its attendant weight, without any plywood or OSB on your sidewalls. You have no lateral stability built into your building. I'll bet your building shakes a bit when you walk across the roof. If you have a wind storm come up, you may have a big problem.

Corm
 
   / Step by step photos of new garage #95  
Corm said:
Not to rain on your parade, but you are taking an awful chance putting the roof on, with all its attendant weight, without any plywood or OSB on your sidewalls. You have no lateral stability built into your building. I'll bet your building shakes a bit when you walk across the roof. If you have a wind storm come up, you may have a big problem.

Corm

I agree!:eek:
 
   / Step by step photos of new garage
  • Thread Starter
#96  
Corm:

Thanks for the note. Your right, shortly after the pic were taken but after the all the roofing was put up on top, one of us started talking about the movement. We did put bracing on the studs running down the garage length. it to the shake out right then and there. If my friends show up some will roof while others will start on the boxing. Thanks for the pointer.

Roger
 
   / Step by step photos of new garage #97  
Corm,

I brought up the point of corner bracing a week ago before he started roofing. I have seen where entire framed structures have fallen due skipping this little but very important step. Trusses fall like dominos, often killing the carpenter.

Be safe, it will take all of 10 min to sheet the corners.
 
   / Step by step photos of new garage #98  
Roermo those guys are right. It is amazing how much difference bracing makes. I had all of the OSB on the walls before I started putting my trusses up. Once I got the trusses up they were a bit shaky we put in the first of three 2 x 4 bracing that we wanted in immediately and it was amazing how much difference that made. I have several pieces of bracing going from the trusses down to the walls now and will probably put some more in when I get all of the outside work done. You are coming along fast with yours. My work slowed down a bit but I am hoping to get pretty well all of the outside work done next week. I will have to take some pics this weekend but basically my garage sets on the end of my house the house did look like an T now it looks like an H. I decided while I was doing it to go ahead and add a cover over my front porch, Since I had to roof the garage and front porch I decided to just remove all the shingles from the whole house and reroof everything. As of today. The garage is all decked including the rafter system that ties the house roof line into the garage, the beams for the front porch are set in place and braced up. We were going to do the porch joists but a big rain is sceduled and we did not want to have tar paper removed from the porch and then have rain come down. The entire front of the house and the original part that made the T has had all the shingles removed and new drip edges installed. My last roofer did not put any flashing on any valleys or anywhere so where the roofs come together and where the valleys are I am having the roofers put 20 " flashing. That has been installed and the 30# felt put over them. ALL :) 
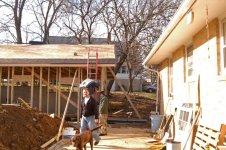
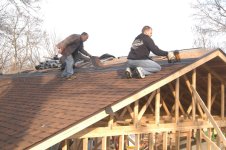
that I have left is put sheathing and sideing on the gables. put the porch joists in place, deck the front porch roof. Tear the shingles off the back side of the house. finish covering everything that needs it with flashing and 30 # felt, shingle the one side of the garage and the rest of the house, paint the garage and probably the house, install the new front door with the 12 inch side windows that my wife bought, install the two windows and one 36 inchdoor that go in the garage walls, install the 2, 16ft garage doors and the garage door openers and then I will be finished, I am almost done :)
 
   / Step by step photos of new garage
  • Thread Starter
#99  
Well we got the roofing on up to the peak, I had to make a choice to run the roofiing just short of the peak or take the time to cut the last strips 3 inch wide on both sides then run the shingles up. I knew I was going to run out of time if I filled in all the gaps, so I ran up to the last row, folded over the tar paper and tacked it down and placed bundles over the crown. We are gong to have 3 days of rain this weekend. So next week I will put on the ridge cap.

Tomorrow I will run boxing if I can work under the over hang on the sides and when I get help the front and back.

Now any thoughts on when to take down the braces out into the yard as I do the boxing. The side braces are on the inside so I will leave them on until the boxing which is 7/16th of a inch.

thanks

Roger
 
   / Step by step photos of new garage
  • Thread Starter
#100  
sorry forgot to post the pictures.

Roger
 

Attachments

  • 1.jpg
    1.jpg
    220.5 KB · Views: 442
  • 2.jpg
    2.jpg
    263.7 KB · Views: 383
  • 3.jpg
    3.jpg
    274.1 KB · Views: 422

Tractor & Equipment Auctions

John Deere MX6 Rotary Brush Cutter Tractor Attachment (A55787)
John Deere MX6...
UNUSED WOLVERINE BC-13-72W 72" HYD BRUSH CUTTER (A54757)
UNUSED WOLVERINE...
2013 FORD F450 XL SUPER DUTY BUCKET TRUCK (A51406)
2013 FORD F450 XL...
2010 Ford Edge SE SUV (A51694)
2010 Ford Edge SE...
UNUSED LANDHONOR 82" FORK EXTENSIONS (A54757)
UNUSED LANDHONOR...
UNUSED LANDHONOR LHR-MS0810 METAL SHED (A54757)
UNUSED LANDHONOR...
 
Top