Step by step photos of new garage

   / Step by step photos of new garage
  • Thread Starter
#111  
One call to the truss company and I found out what I needed to know, or I think I did.

1. They told me if I am going to have a ceiling in the garage a 2x6 down the middle if fine. that ties all the bottom stingers together.

2. They also said ( to tie the building together) a v run of 2x4 one going from the front to the center and the other way from the back is a good idea.

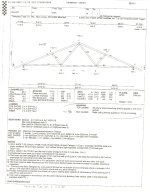
they are going to send me a fax with a drawing which I will post.

It seems like I am over my head here but it helps to have the input, otherwise I could be in for a big promblem. I have always wanted to be safe than sorry.

I have already made a few big blunders and do not want any more.

1. the back wall was 1/8 or so (hair off middle bubble) or less out of square when I tied the the long wall to it before the trusses came I did not catch it now the wall looks a bit out of square. it is on the low side of the garage where the roof almost catch the ground so you can not tell. I showed it to other and they did not see it. But I do.

2. by my 32 inch door the wall is out of line by a hair where I used a bent treated seal plat. Again no one has notiched but all along the wall I set the wall back 7/16 of an inch to allow for the sheeting, at the door there was not the space for the sheet so it over laps the concrete. I think the siding will cover this boo boo.

So I want the roof right, as it was said if it fails so will the rest of the building.

thanks bundles

Roger
 
   / Step by step photos of new garage
  • Thread Starter
#112  
ok now I know I am in over my head.

Here is the info they sent. (truss company)

I have posted two types of files. 1. pdf. 2 jpeg.

Hope you can see one or the other,

Not sure what to do now. there are so many option, The 1st page is the type of truss I have installed.

Any ideas.
 

Attachments

  • garage plan pdf.pdf
    820.7 KB · Views: 536
  • truss 1.jpg
    truss 1.jpg
    902.3 KB · Views: 524
  • truss bracing.jpg
    truss bracing.jpg
    895.7 KB · Views: 455
   / Step by step photos of new garage #113  
Roger,

Did you tell the truss manufacturere that you sheeted the top of the trusses?

There is a difference between temporary bracing, permanent bracing and what you need depeing on what type of roof you put on. From the information you recieved from the manufactures, it sounds like your fine.

The trusses cannot fall over like a dominos when the sheeting is attached. If the sheeting was on just one side, or if you didn't have any sheeting, then this could happen. Once you have the sheeting in place on both sides of the roof, you have locked it all together. There is no way your trusses can fall over with your sheeting in place.

Try to imagine the trusses falling over like dominos before you put the sheeting on. It's pretty obvious how easy this can happen, so you put up temporary bracing while installing them.

Now imagine two sheets of plywood, osb or any 4x8 foot sheet of material. You can do this with two playing cards or anything stiff. Put them together like a tent, or similar to your roof. If they are attached to each other at the peak, it is impossible to push it over lengthwise.

This is what's happening with your roof. The sheeting makes it impossible for your trusses to fall over like dominos.

The same principle applies to your walls. Puting sheeting on your walls at the corners locks the entire building into position. Doing the entire wall adds to the strength, but it's the corners that do most of the work.

Your roof is the same thing, it's just in a different angle. With the peak sheeted on both sides, your locked into position.

Adding more lumber won't hurt anything, but it's not needed and doesn't offer any significant advantages.

Eddie
 
   / Step by step photos of new garage #114  
EddieWalker said:
Roger,

Did you tell the truss manufacturere that you sheeted the top of the trusses?

There is a difference between temporary bracing, permanent bracing and what you need depeing on what type of roof you put on. From the information you recieved from the manufactures, it sounds like your fine.

The trusses cannot fall over like a dominos when the sheeting is attached. If the sheeting was on just one side, or if you didn't have any sheeting, then this could happen. Once you have the sheeting in place on both sides of the roof, you have locked it all together. There is no way your trusses can fall over with your sheeting in place.

Try to imagine the trusses falling over like dominos before you put the sheeting on. It's pretty obvious how easy this can happen, so you put up temporary bracing while installing them.

Now imagine two sheets of plywood, osb or any 4x8 foot sheet of material. You can do this with two playing cards or anything stiff. Put them together like a tent, or similar to your roof. If they are attached to each other at the peak, it is impossible to push it over lengthwise.

This is what's happening with your roof. The sheeting makes it impossible for your trusses to fall over like dominos.

The same principle applies to your walls. Puting sheeting on your walls at the corners locks the entire building into position. Doing the entire wall adds to the strength, but it's the corners that do most of the work.

Your roof is the same thing, it's just in a different angle. With the peak sheeted on both sides, your locked into position.

Adding more lumber won't hurt anything, but it's not needed and doesn't offer any significant advantages.

Eddie
Eddie everyone I have talked with, the manufacturer of his trusses, my next door neighbor who makes his living building trusses, and every web site on truss bracing I looked at on the internet says you are wrong. Maybe you are right and it does not make any difference but someone I have talked with that I know has done several roofs tells a story about his brother in law that had a house with trusses no braceing other than something down the middle and it was sheathed with osb he said when they went to walk on the roof the whole roof shook he went to find out why and found that he had no braceing after he got everyone off of the roof and braced it according to what the web site says. The next time he got on the roof you could feel how much steadier it is. Roermo is free to do what he wants obviously. I am building a garage that is about the same size as his I believe. I know how much money I have tied up in it. If I was in his shoes I would follow the advice of the people that manufactured my trusses. That is what I did.
 
   / Step by step photos of new garage #115  
What I usually see done is putting angled bracing on both gable ends, sloped down to the top plate where the end trusses set, and the other end is notched and braced against the top chord of a truss that is 3 - 4 trusses in from the end truss. Put several of these at each end and the roof will be very solid with the sheeting on. Part of this is also running stingers across the top sides of the bottom truss chords a the same locations to tie the end trusses together at these points. Essentially you are bracing the entire roof structure and creating a monolithic unit.
 
   / Step by step photos of new garage
  • Thread Starter
#116  
well every one that has posted on the bracing issue that I have sturred up, thank you. The following is what I have found out and what I am going to do.

1. The truss company said that the 2x6 down the middle is a must.

2. I got the impression that the v shap bracing on the bottom was more for building support than the rafter staying put. I am not sure about that one.

3. The icing on the cake is a agent in my real estate office is a premiere builder here in our town building 5,000 to 10000 sq.ft homes. His answer was he puts in the bracing in the v form and every 10 ft up in the truss.

So I am at this point not sure what is right but I am going to take the time to make sure and beef it up.

I was thinking the sheet rock or plywood would tie the bottom of the truss and sheeting for the roof would tie it all together at the top. I could understand the bracing before the roof or ceiling but afterwards I would think it would be mute. But Iam not an engineer nor builder, so I am going for better safe than sorry.

I hope every one keeps pointing out issues if they have thoughts or better ways to do something I am doing wrong, again thats whats great about this site.

Thanks

Roger
 
   / Step by step photos of new garage #117  
kmdigital said:
What I usually see done is putting angled bracing on both gable ends, sloped down to the top plate where the end trusses set, and the other end is notched and braced against the top chord of a truss that is 3 - 4 trusses in from the end truss. Put several of these at each end and the roof will be very solid with the sheeting on. Part of this is also running stingers across the top sides of the bottom truss chords a the same locations to tie the end trusses together at these points. Essentially you are bracing the entire roof structure and creating a monolithic unit.

Bingo! For the cost of a few 2x4's, doing what is suggested above will remove all doubt regarding whether or not your building is braced sufficiently.

Corm
 
   / Step by step photos of new garage #118  
I didn't read through the truss manufacturers info but Eddie is correct if the roof was installed as a diaphram (just the nailing details and type of sheathing) I'd think the truss company could be a bit clearer to you.
 
   / Step by step photos of new garage
  • Thread Starter
#119  
Ok here we go, yet another question. If any one is still willing to talk to me after the truss postings.

This weekend I am going to put ventilation in the garage. I am plaining to have end gable vents (size?) & sofit vents. Or is it better to go with a ridge vent the lenght of the building. 26x34. Blown in insulation. R 17 in the walls and tie vec on the outside.

Roger
 
   / Step by step photos of new garage #120  
slowzuki said:
I didn't read through the truss manufacturers info but Eddie is correct if the roof was installed as a diaphram (just the nailing details and type of sheathing) I'd think the truss company could be a bit clearer to you.[/QwUOTE]

To me the truss company diagrams are pretty clear if you look at the second diagram down it shows braceing that makes kind of a w going to the center 2x6 braces then it shows 2 x 4 braces running perprendicular to the truss about halfway up the truss.

There seems to be several opinions about this. Basically my opinion is that he has a lot of money invested. Unless an engineer that is licensed and insured in missouri with malpractice insurance and is contracted to draw up the braceing he needs to put as much in as he can. The garage cost thousands of dollars braceing will be around 50 or so. It is not any money to speak of.

I have some braceing up in my garage as soon as I am through with the roofing all the toe boards that were nailed up are going to be put in the garage for more braceing. You cannot have too much but you can have not enough.
 

Tractor & Equipment Auctions

2010 Ford Edge SE SUV (A51694)
2010 Ford Edge SE...
2019 Chevrolet Tahoe SSV 4WD SUV (A55758)
2019 Chevrolet...
UNUSED IRANCH SEMI AUTOMATIC QUICK CHANGER (A54757)
UNUSED IRANCH SEMI...
2016 BOBCAT S850 SKID STEER (A52705)
2016 BOBCAT S850...
UNUSED FOLDING WAGON (A54757)
UNUSED FOLDING...
2007 OVERLAND  TANK TRAILER (A53843)
2007 OVERLAND...
 
Top