Step by step photos of new garage

   / Step by step photos of new garage
  • Thread Starter
#101  
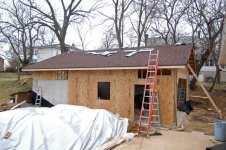
well this day I got the boxing up, using 7/16 osb.

Now I have to figure out how to get the ends up by myself. Does any one know how this can be done. All my helpers have something eles to do.

In case any one was wondering why the concrete in the back, today I shot the back side of the garage. the last shot is from the next door neighbor home that that yard is even with the black tar line or just about.

Tomorrow if no rain I am going to put in the window and door and try to put up the osb on the ends if I can figure out how to handle the larger ones in the midle. thethe center to the 2x12 bottom is about 7.6 feet more less.

Hope some one can help me out here, I have one 20 foot latter and on 6 footer.

Thanks


Roger
 

Attachments

  • 1.jpg
    1.jpg
    334.2 KB · Views: 744
  • 2.jpg
    2.jpg
    301.5 KB · Views: 567
  • 3.jpg
    3.jpg
    294.9 KB · Views: 573
  • 4.jpg
    4.jpg
    290.9 KB · Views: 566
  • 5.jpg
    5.jpg
    328.8 KB · Views: 682
   / Step by step photos of new garage #102  
I would wait till I got a helper for that. If you fall off the ladder while trying to hold the osb nail and maintain your balance then you might be longer finishing if you wait until someone is available to help you.
 
   / Step by step photos of new garage #104  
How about using a block and takle to lift the OSB up and hold it. Scab a piece of 2x4 onto the OSB to attach to. Premark the nailing lines. Use longer spikes to set the bottom of the osb on to help guide it into place.

Just suggestions.
 
   / Step by step photos of new garage
  • Thread Starter
#105  
Ehchvac: thanks for the drawings, I am going to check the truss manafacture Tues. To see what they call for bracing, I was told a 2x6 down the middle is called for here in this area. Know you have me thinking.


I tried to start back filling this morning on the back side. But the yard is too wet and the dirt pile is a mess too. so I am going to have to let it dry out some more.

Roger
 
   / Step by step photos of new garage #106  
roermo a 2 x 6 down the middle will absolutely not be enough. with just that brace your roof can just fall to one side kind of like dominoes falling the brace in the middle will not stop that. The diagram that you were given is a lot like what i was told to do. I have just the bare braceing in place to hold everythign in place plus my trusses are anchored to the end of my house. As soon as I get everything done I will go back in and put in additional braceing. What I have now will hold but you cannot have too much braceing. For something quick just take a 2 x 4 16 feet long and take from the corner of the building and put the other end next to the center of the truss so that you have a diagonal. nail this to every truss and do it every corner. You really need to do that soon If a big wind comes up it could literally blow your rood over. Your garage is loking good. we got all the rafters up for my porch and got the rest of my decking down where the garage ties into the house. All I need to do now is get the porch decked and then The roofers can roof the rest of the garage and house I still have to put sheathing and sideing on my gables but I am getting closer and closer to being done. We are supposed to have sunny weather with a high in the mid 50s this week so I am going to try and get everything finished :)
 
   / Step by step photos of new garage #107  
Roger,

I'm gonna disagree with Gemini on the bracing topic. The diagrams that were posted looked like they were for a metal roof with purlins. It's a totally different type of roof than what your doing. With your sheeting in place, your trusses are locked in place. They won't be going anyplace.

I would run a pair of 2x4's the length of the building on edge. Attach them to your virtical 2x4's just outside the center suport of your trusses. That will take out the flex you might get in a bad windstorm.

I don't see where you'd need anything more than that.

Eddie
 
   / Step by step photos of new garage #108  
roermo,
All trusses require bracing! If you cannot get the info from the truss manufacture, seek out some other qualified source for the correct procedure.
 
   / Step by step photos of new garage #109  
EddieWalker said:
Roger,

I'm gonna disagree with Gemini on the bracing topic. The diagrams that were posted looked like they were for a metal roof with purlins. It's a totally different type of roof than what your doing. With your sheeting in place, your trusses are locked in place. They won't be going anyplace.

I would run a pair of 2x4's the length of the building on edge. Attach them to your virtical 2x4's just outside the center suport of your trusses. That will take out the flex you might get in a bad windstorm.

I don't see where you'd need anything more than that.

Eddie

Eddie I have seen a lot of what you have built and there is no doubt that you are a craftsman but on this I feel that you are wrong. I have a friend who is one of the most talented people I have ever met. He was over helping me with the decking and told me about the problem with just bracing down the middle. If you get a high windstorm the roof can rack. The end gable truss starts falling one direction the next one falls behind it etc etc. granted the decking will help some with that but it is still possible to do it. The cost of a few 2 x 4,s to do what i suggested wont even be 50.00 is it worth that small an amount of money versus the cost and the labor of redoing the entire roof.
He can do a bit of work and a small amount of money and make sure.
 
   / Step by step photos of new garage #110  
It does need longitudinal overlapping cross bracing on the vertical.

Longitudinal on top of the bottom truss member at the third points and center will not hurt either. This bracing may depend on the type of ceiling material used.

As suggested go see the truss manufacture for the proper information.:D
 

Tractor & Equipment Auctions

2025 Platform Safety Basket Attachment (A53421)
2025 Platform...
1718 (A54756)
1718 (A54756)
2002 VOLVO L150F WHEEL LOADER (A51406)
2002 VOLVO L150F...
2010 Ford Edge SE SUV (A51694)
2010 Ford Edge SE...
2008 DOOSAN G25 GENERATOR (A52472)
2008 DOOSAN G25...
2002 Wacker RD11A Tandem Smooth Drum Roller (A51691)
2002 Wacker RD11A...
 
Top