Step by step photos of new garage

   / Step by step photos of new garage #61  
I am visually challenged when it comes to doing building in my mind. I flunked drafting so many times the instructor gave me a d so that I could get my degree. I am not sure that I understood your answer to my question, which means I probably did not compose it very well.

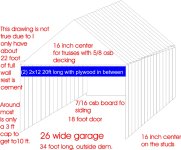
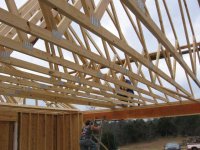
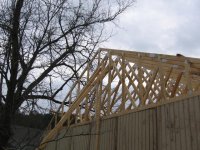
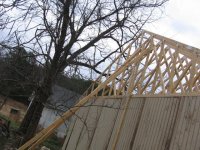
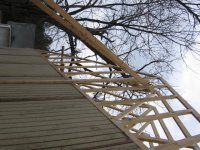
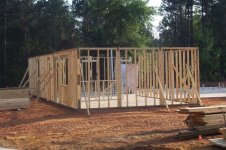
When you put your trusses up will they be running parralel with the garage doors or will the ends of the trusses be sitting on top of the header for the garage doors. The reason I am asking is because when I started researching the project I was going to do the two 2/x12 pieces of wood as headers. My 28 foot trusses have the end sitting on top of the headers. (not directly on top there is the top plates between them and the headers) everything i read on the web said that the 2 x12 double up would not carry the weight. I asked my neighbor who designs trusses for a living and he said it would not carry it. I went to a LVL beam to carry the weight. Each of my garage doors are 16 feet but it sounds like you are going to have similar issues if your headers carry the weight of the trusses.

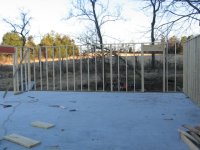
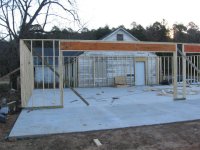
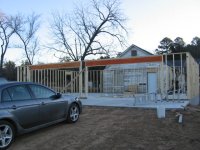
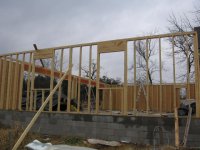
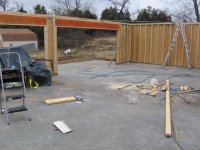
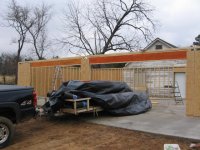
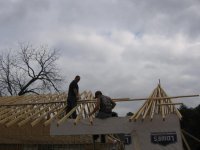
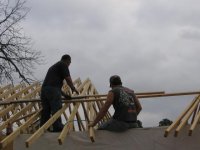
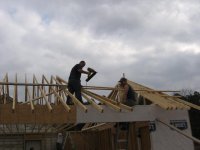
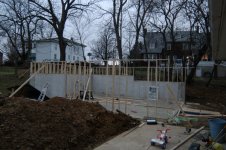
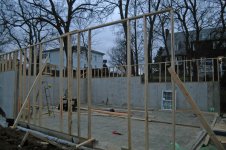
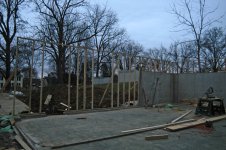
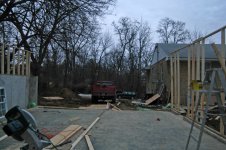
We have finished framing and putting up the plywood sheathing around the framing. I got my trusses today and I am going to be installing them tomorrow If we come up with any easy way to do this I will post it
 
   / Step by step photos of new garage
  • Thread Starter
#62  
gemini thanks for the note, I am very bad at drawing and typing. can not make a square with a ruler. but check out my drawing and see if this shows what I am doing. I have my brother in law helping and he builds homes and has been doing it for 30 years. Now I wonder if he has been doing it right. I think I will check with the lumber yard and see what the load is for 2x12 and down the street I have a nieghbor that is an eng. Maybe he will feel like giving advise on my header. His kids play in my yard. Maybe he will have pitting on me. If a person does not get this right I would be in a world of trouble down the line. I know my footings are good the rest of the building should be as strong.

thanks for the input

Roger
 

Attachments

  • garage drawing for tbnc a.jpg
    garage drawing for tbnc a.jpg
    251 KB · Views: 765
   / Step by step photos of new garage #63  
roermo,

gemini is talking about a different design. In his application, the truss's are resting on the wall with the header to support them. The load factor on the header is significantly more than in your application. In fact, in your design, the load on the header is rather insignificant compared to the overal load rating of the roof.

The 20 foot span is more than I expected and this might be an issue. Did you mention that before? I've always used and seen two 2x12's with half inch plywood used on 16 foot doors. I don't know if it will work for 20 feet.

There are a few engineers on here that might be able to help, or you can check what code is. Do you have an inspector? If so, his opinion is all that matters. Ask if he'll pass you with 2x12's or if you have to buy a gluelam. Cost will be double or more for the gluelam, but the strength will be significantly more.

Eddie
 
   / Step by step photos of new garage #64  
Roermo. Eddie is absolutely right my garage design is different than yours. To visualize the difference imagine if your trusses were turned so that they ran the length of your garage instead of the width. Then the weight of your trusses would be sitting on top of the header. That is the way my garage is designed. Eddies coments about the 20 foot width is a concern I would have although I believe from your earlier posts that the door is going to be 18 feet wide If that is correct I am assuming that you will have cripple studs under the other two feet of header so the header will have 18 feet that it carries. I am not an engineer so I dont know anything about this. What I did when I had header questions was to call the company that built my trusses. They have engineering programs that compute loads. They are the one that told me that i needed an LVL beam instead of the two 2 x 12's

We installed the trusses today. There are some things that you need to install them

1. two good ladders at each of the walls
2. This is the most important Two Strong Tall Young guys to put them on the walls

We had 4 people the two young guys and me and the older gentleman that is helping with the carpentry work. the 4 of us carried the truss in the garage then we put one end up over the wall one of the kids would climb a ladder on the other end and put that end up over the wall. at this point the truss is pretty close to parralel to the ground with the peak low enough for us to grabe it. We put the two young guys on the ladders and had them hold the trusses while me and the other old guy took a 2 x4 each and pushed the truss up to vertical then we let the top fall over 16 inches to rest on the previous truss. The young guys made sure the truss was on the indicated mark on the top plate then they measured 14 1/2 inches between the upper side of the truss so that they would be on 16 inch centers then they nailed a 2 x4 to hold the top side at that distance and then we did another one.

Before we started we made a brace on one end of the wall we put the first gable truss up then got it plumb and nailed the brace to it. We nailed it down solid on the bottom and that held it in place for the next truss to lean against when we put it up. the first couple of trusses we used 4 foot pieces of 2 x 4 across the tops to make the spaceing. after we got 4 trusses up we went to just nailing extra 8 foot studs up and then slideing each truss under them as we put them up. We cut a notch in the boards we were useing to lift the truss to vertical this helped to catch the truss a bit better.
 
   / Step by step photos of new garage #65  
I hit the wrong button so I am continuing my post.

After we had about 8 or so trusses we ran a brace from the last truss down to the wall and nailed it in place to keep the trusses from falling down like a stack of dominoes.

One final warning be very very careful. When we were putting up the last gable we put it up with the idea that we would lean the last ten trusses against that. After we got the last ten trusses in place we could slide them down the wall and nail them. When you get down that close to the end you cant push them to vertical because you dont have enough room to do that. We were putting them all up while we still had the room to get them vertical. We were repeating the way we did the other gable end. We put a brace up and were going to nail the gable end to the brace to hold it in place. the board we used to go from the ground to the brace hit right where the gable truss was going to sit. The decision was made to just saw it flush with the brace. while i was getting a different ladder the guy holding the brace saw it was at an angle and he let it go to do something else. Just as he let it go the wind came up and blew it over. it fell off the wall right on top of my sons head ( he was one of the big guys putting trusses on the wall.) Luckily he seems to be ok but it could have been worse. He was hit hard enough to break the 2 x4 in half. The one that was the bottom of the truss. Other than that mishapd it went very well.
 
   / Step by step photos of new garage #66  
here are the pictures of my garage they are not in the correct order but I wanted to show you the bracing and also how it looked when we got down to the last few trusses. You have to the last ten or so up at once so that you can have room to get them up there then you slide them back into place
 

Attachments

  • IMG_0965.JPG
    IMG_0965.JPG
    66.9 KB · Views: 670
  • IMG_0966.JPG
    IMG_0966.JPG
    75.7 KB · Views: 509
  • IMG_0967.JPG
    IMG_0967.JPG
    64.8 KB · Views: 502
  • IMG_0968.JPG
    IMG_0968.JPG
    61.9 KB · Views: 423
  • IMG_0969.JPG
    IMG_0969.JPG
    71.1 KB · Views: 421
  • IMG_0970.JPG
    IMG_0970.JPG
    54.1 KB · Views: 383
  • IMG_0971.JPG
    IMG_0971.JPG
    58.9 KB · Views: 378
  • IMG_0972.JPG
    IMG_0972.JPG
    62 KB · Views: 358
  • IMG_0973.JPG
    IMG_0973.JPG
    70.7 KB · Views: 352
  • IMG_0974.JPG
    IMG_0974.JPG
    77.5 KB · Views: 357
  • IMG_0976.JPG
    IMG_0976.JPG
    43.4 KB · Views: 340
  • IMG_0977.JPG
    IMG_0977.JPG
    43.9 KB · Views: 359
  • IMG_0978.JPG
    IMG_0978.JPG
    33.2 KB · Views: 357
  • IMG_0979.JPG
    IMG_0979.JPG
    86.1 KB · Views: 372
  • IMG_0980.JPG
    IMG_0980.JPG
    94.4 KB · Views: 371
  • IMG_0982.JPG
    IMG_0982.JPG
    70.3 KB · Views: 343
  • IMG_0983.JPG
    IMG_0983.JPG
    70.3 KB · Views: 349
  • IMG_0984.JPG
    IMG_0984.JPG
    58.3 KB · Views: 386
  • IMG_0975.JPG
    IMG_0975.JPG
    38 KB · Views: 427
  • IMG_0981.JPG
    IMG_0981.JPG
    88.2 KB · Views: 608
   / Step by step photos of new garage
  • Thread Starter
#67  
Gemini: Looks like you are well under way to parking in your new garage. Looks great. I whish my tractor would reach up as high as yours. I only have 4110 Jd with a reach of about 70 inchs.

I got all the walls up today except for the front where the garage doors are going. I will need help with the (2) 2x10 headers, so that is next week. In case any one notices there are a few studs missing on the long 10 foot wall. For two reasons they are missing. 1 ran short on 2x10 10ft. and I was not sure what size windows I wanted and where I was going to put them until I had the wall up and could see it in real space not on the floor.

My wife and I up the last section the 10ft x 22, it was all we could handle, plus it kept bending in the middle where there was a joint. Finally we got it stable and she took the middle. Now I had to set the brace but frist I took some claps at the top where it meet the shot 3ft wall, this made it much less work and we got it set.

Now to plumb and brace some more and I am ready for the trusses.

Good luck on your garage.

Roger
 

Attachments

  • tb1.jpg
    tb1.jpg
    301.8 KB · Views: 596
  • tb2.jpg
    tb2.jpg
    313 KB · Views: 467
  • tb3.jpg
    tb3.jpg
    309.3 KB · Views: 445
  • tb4.jpg
    tb4.jpg
    285.7 KB · Views: 425
  • tb5.jpg
    tb5.jpg
    301.3 KB · Views: 454
  • tb6.jpg
    tb6.jpg
    300.2 KB · Views: 574
   / Step by step photos of new garage #68  
Gemini & Roger,

It's not clear on your pictures, but it looks like you are both framing your corners in a way I've never seen before. I'm not an engineer and code varies, so maybe it's ok in your location. It's not in other areas.

Your outside wall needs at least another stud and three pieces of 2x4 to create the outside corner. You can also use three studs, but that's overkill and a waste of one good stud. I usually cut up my warped ones or use scrap.

Imagine the three pieces laid out flat on the ground. Line the top and bottoms of them with the tops and bottoms of your studs which are on edge. Place the third one in the middle and nail them all together. Kind of like the diagram in the parenthisis. ( l_l )

The inside wall is nailed to the end stud "AND" the short scrap pieces. I've had an inspector look for this in California, but that's earthquake country and pretty severe code. The other thing that you get from this is a place to attach your sheetrock or interior siding.

Attached is a picture that shows it, but you have to look close.

Eddie
 

Attachments

  • May 29 2005 008 (Small).jpg
    May 29 2005 008 (Small).jpg
    63.9 KB · Views: 626
   / Step by step photos of new garage
  • Thread Starter
#69  
Eddie: your right about the corners but I have not put in the front wall, and I will go back and set in other studs. Tomorrow I will try to square things up. and make the return walls for the front. Just ran out of time today and I did not think I could pick up much more weight my self so I thought once up I could do my beefing up in the corners. I wanted to put the osb on the studs while down on the ground but once picking up the studs with out the osb I knew that was out of the question.

As always I learn a lot on this site and it helps to have the feed back that I have had.

Thanks Roger
 
   / Step by step photos of new garage #70  
To add to what Eddie has suggested, I would put some "let in bracing" in the high walls. If you look at the picture that Eddie provided, that is the diagonal bracing that you see that goes at a 45 degree angle. The purpose of this is to strengthen the wall. Check with your local library to see if they have a carpentry instructional book that will give you a lot of good tips. I purchased one about 30 years ago called Modern Carpentry, and it has been one of my most referenced books when I am not certain of a detail and for the structural tables in it.
 

Tractor & Equipment Auctions

2022 Chevrolet Tahoe FL SUV (A51694)
2022 Chevrolet...
2013 FORD F450 XL SUPER DUTY BUCKET TRUCK (A51406)
2013 FORD F450 XL...
UNUSED WOLVERINE PFF2-13-45W PALLET FORK FRAME (A54757)
UNUSED WOLVERINE...
2014 HINO 338 26FT CDL REQUIRED BOX TRUCK (A54607)
2014 HINO 338 26FT...
UNUSED LANDHONOR 3.5X2X2M GREENHOUSE (A54757)
UNUSED LANDHONOR...
2015 CATERPILLAR CT660 TANDEM AXLE DUMP TRUCK (A54313)
2015 CATERPILLAR...
 
Top