John Deere 4300 complete rebuild

   / John Deere 4300 complete rebuild
  • Thread Starter
#261  
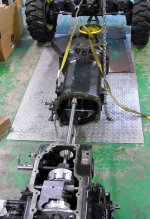
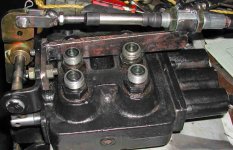
Here I am installing the tunnel section onto the gearbox. When I took
these sections apart, I was outside and I used my loader to lift and
separate. That was pretty crude and imprecise.

To put them together, I am using an overhead hoist and trolley....the
tunnel weighs about 200# and the MFWD drive shaft has to be accurately
guided into its bearing and seal. To add complications, the 4WD shifter
fork has to be guided onto the shift collar inside the tunnel. That is what
the access hatch is for. You have to stick your hand in there about
10 inches or so and wiggle the whole tunnel and fork to get them to
mesh properly. (I couldn't do this if I had my dad's gargantuan hands.)
Still, it was disconcerting to have your hand in there, wedged between
sharp-cornered chunks of steel in a massive moving structure.
 

Attachments

  • final_5.JPG
    final_5.JPG
    91 KB · Views: 660
  • final_6.JPG
    final_6.JPG
    80 KB · Views: 576
  • final_7.JPG
    final_7.JPG
    59.4 KB · Views: 515
  • final_8.JPG
    final_8.JPG
    84.1 KB · Views: 588
   / John Deere 4300 complete rebuild
  • Thread Starter
#262  
I hadn't thought about adding a hole to the bellcrank like you are planning on doing. What I've been thinking about doing is replacing the cable with some sort of 'Rube Goldberg' series of levers and rods to allow near full movement at the operator's lever, which is probably a 60-degree arc; but step down the total movement when it reaches the spool. Right now it's not a high priority item, so I just dabble with it in my mind.

I just made these parts last night. The new hole in the bellcrank will give
my cable more leverage, while assuring full travel of the spool. I noticed
my bellcrank hits the factory mount when actuated in one direction, limiting
the spool travel. I fixed that by grinding the bellcrank a bit. My cable
came from SurplusCenter for $18, BTW.

My push-pull cable shown here allows more than an inch of travel in each
direction. If your hand lever restricts the cable travel, maybe you can
relocate the pivot hole on that lever? Could be tough. How do you like the
friction action of the levers?
 

Attachments

  • ThirdSCV_welded.JPG
    ThirdSCV_welded.JPG
    58.9 KB · Views: 384
  • thirdSCV_parts.JPG
    thirdSCV_parts.JPG
    56.7 KB · Views: 440
   / John Deere 4300 complete rebuild #263  
I just made these parts last night. The new hole in the bellcrank will give
my cable more leverage, while assuring full travel of the spool. I noticed
my bellcrank hits the factory mount when actuated in one direction, limiting
the spool travel. I fixed that by grinding the bellcrank a bit. My cable
came from SurplusCenter for $18, BTW.

My push-pull cable shown here allows more than an inch of travel in each
direction. If your hand lever restricts the cable travel, maybe you can
relocate the pivot hole on that lever? Could be tough. How do you like the
friction action of the levers?

I don't care for the friction action of the cable on the levers. I'd rather the spring in the valve spool return the lever to center and the cable's natural friction prevents that. Of course if one needs the valve to stay open on its own, then the friction fit is probably a good thing.
 
   / John Deere 4300 complete rebuild
  • Thread Starter
#264  
Here I have mounted the HST to the tunnel. Since I have to align
two shafts (main and PTO) to their spline couplers, I needed to make
use of the access hole in the tunnel again.

I spent a lot of time adjusting my two new controller tie rods to get
them just right. I am sure this is easier than after the bell housing
covers up the forward half of these shafts. After the bell housing goes
on, you have to make those adjustments through the bottom access hole.
I took apart the main pedal pivot shaft, but it seems OK.
 

Attachments

  • final_9.JPG
    final_9.JPG
    86.4 KB · Views: 518
  • final_10.JPG
    final_10.JPG
    66.1 KB · Views: 455
   / John Deere 4300 complete rebuild
  • Thread Starter
#265  
I don't care for the friction action of the cable on the levers. I'd rather the spring in the valve spool return the lever to center and the cable's natural friction prevents that. Of course if one needs the valve to stay open on its own, then the friction fit is probably a good thing.

I do not get why they use friction levers....I have never seen one before,
on any tractor or hyd equipment. The proper approach is a detented valve.
The spring action on the 3rd SCV spool is very strong....a friction lever
would make feathering harder, I would think. Why not disable the friction
brake on one lever and try that?

Anyway, here is my completed bracket, sans paint. Of course, I will need
to attach all the hardlines and fittings before the bracket goes on because
of the clearance. I have not yet bought the metric adapters I need for the
work ports. Clearance is a big issue here. That is why I am trying to do all
this BEFORE I remount the valve block to the gearbox.
 

Attachments

  • third_SCV_bracket.jpg
    third_SCV_bracket.jpg
    67.1 KB · Views: 557
   / John Deere 4300 complete rebuild #266  
I do not get why they use friction levers....I have never seen one before,
on any tractor or hyd equipment. The proper approach is a detented valve.
The spring action on the 3rd SCV spool is very strong....a friction lever
would make feathering harder, I would think. Why not disable the friction
brake on one lever and try that?

Anyway, here is my completed bracket, sans paint. Of course, I will need
to attach all the hardlines and fittings before the bracket goes on because
of the clearance. I have not yet bought the metric adapters I need for the
work ports. Clearance is a big issue here. That is why I am trying to do all
this BEFORE I remount the valve block to the gearbox.

The Quadra-stat lever assembly moves quite nicely, it's the blasted cables themselves that introduce all the friction. I think Deere went with cables for cost savings since it's easier to route a cable then come up with a linkage design to go from the right fender to the SCV valves. As I recall, Deere wants $80 or more just for the cable, so your Surplus Center cable is a bargain.

I think the SCV ports may be SAE instead of metric. I don't recall finding any metric fittings in the kits based on the I.D. system Deere printed in their instruction.
 
   / John Deere 4300 complete rebuild
  • Thread Starter
#267  
The Quadra-stat lever assembly moves quite nicely, it's the blasted cables themselves that introduce all the friction. I think Deere went with cables for cost savings since it's easier to route a cable then come up with a linkage design to go from the right fender to the SCV valves. As I recall, Deere wants $80 or more just for the cable, so your Surplus Center cable is a bargain.

I think the SCV ports may be SAE instead of metric. I don't recall finding any metric fittings in the kits based on the I.D. system Deere printed in their instruction.

Cable remote-controlled valves are commonly used on lots of industrial
machines now, and my Kioti uses them. They are quite smooth and free
of sloppiness. The cable I bought is quite large (5/16" threads) and
is surplus from some industial equipment....I was going to use it for my
hand speed control remote, but it was just too big.

This JD tractor is a confused hodge-podge of SAE and metric hyd fittings:
The work ports on the valve are M18-1.50 ORB-style, while the IN/OUT
ports are M22-1.50. The adapters on the IN/OUT ports (and 3-pt valve)
are M22-1.5-to-1"ORFS. It seems that all the ORFS fittings are SAE
sizes, including the 3/8" ORFS loader hose fittings. On the gearbox, I was
looking for a tank dump port, and I found a 9/16"-18NF ORB (-6) one on the
left side and a M18-1.50 ORB on the right side near the toplink support.
I think you used the latter. I would like to, too, but it may be too close to
the upper 3-pt lift arms.
 
   / John Deere 4300 complete rebuild
  • Thread Starter
#268  
Now the bellhousing. This was quite easy, as this is a clutch-free HST
tractor. The only hard part was installing the HST pedal spring into its
guide after the housing was on.

Next, the engine.
 

Attachments

  • final_11.jpg
    final_11.jpg
    82.3 KB · Views: 600
   / John Deere 4300 complete rebuild #269  
Its starting to come together. Gerat job on the rebuild and documentary.
 
   / John Deere 4300 complete rebuild #270  
This JD tractor is a confused hodge-podge of SAE and metric hyd fittings:
The work ports on the valve are M18-1.50 ORB-style, while the IN/OUT
ports are M22-1.50. The adapters on the IN/OUT ports (and 3-pt valve)
are M22-1.5-to-1"ORFS. It seems that all the ORFS fittings are SAE
sizes, including the 3/8" ORFS loader hose fittings. On the gearbox, I was
looking for a tank dump port, and I found a 9/16"-18NF ORB (-6) one on the
left side and a M18-1.50 ORB on the right side near the toplink support.
I think you used the latter. I would like to, too, but it may be too close to
the upper 3-pt lift arms.

Yes it is a hodge-podge in a lot of ways. I'm ecstatic that NPT fittings weren't used at all! When I added my hydraulic top-link, JIC and BSPP fittings entered into the mix since the cylinder and check valve came from Italy.

Yes, I used the tank return port per the kit instructions that you mentioned, and it's fine from a clearance issue. Fortunately Deere chose to use an elbow that you tighten the lock nut down last to seal the fitting. I'd hate to see the clearance hassles if a non-adjustable elbow was used.

I'm really enjoying this rebuild you've tackled.
 

Tractor & Equipment Auctions

2020 Utility Trailer Manufacturing, 53' Trailer (A52384)
2020 Utility...
2011 Chevy 2500 Pickup (RUNS) (TITLE) (A50774)
2011 Chevy 2500...
2000 FORD F450 SUPER DUTY SINGLE CAB FLATBED TRUCK (A51406)
2000 FORD F450...
2003 Honda 4x4 ATV (A50324)
2003 Honda 4x4 ATV...
2012 Chevrolet Cruze LS Sedan (A50324)
2012 Chevrolet...
2015 JEEP PATRIOT (A51406)
2015 JEEP PATRIOT...
 
Top