At Home In The Woods

   / At Home In The Woods #861  
As or the BH when you get the concrete slab make a dolly for the BH. I have made dollys for all my stuff and man does it make it easy. For a BH I would either weld up one or bolt together some 4x4 timber and use nice 4" or larger casters. Just roll the implement over to the tractor and make all the small adjustments needed. I have one for my Bush Hog, 2 bottom plow, 6' disc, grader blade, 7' snow plow, FEL bucket, ect. Works great and saves your back and will keep your little one from learning a bunch of 4 letter words.

Chris

Equipment dollies are nice. With my subframe backhoe, I get close enough to it to connect the hydraulics, then use the bucket, dipper arm and stabilizers to get it into position. If done patiently at a low idle, it works. Biggest challenge I have is getting the weight balance correct to remove/insert the subframes pins easily. Almost always takes a few hammer hits for those.
Dave.
 
   / At Home In The Woods #862  
Obed, lookin' good, real good!

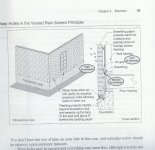
Rember to not cover the weep holes in the first course of brick when you do your finish grading, allowing the wall to breath properly is imperative to a proper functioning wall, as is the proper thru wall flashing.

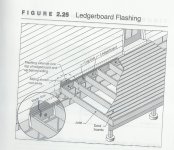
Also make sure flashing is corect at deck, these are areas that are often done incorrectly, and can cause major repairs years down the line.
 
   / At Home In The Woods #863  
What are some tips for keeping his future brickwork from getting mud stained during construction?
 
   / At Home In The Woods #864  
Dollies, we don't need no stinkin' dollies!
I suggest spending $20 apiece and buying premade 4 wheel dollies from H. Depot. They carry 1000lbs each and are cheaper than trying to buy the parts and build them your self.

And for termite protection at your foundation when you install your deck use this product:
York Shield 106 Copper wood frame flashing & TERMITE BARRIER. It is a 3oz./8"x20"
yorkmfg.com 800-551-2828

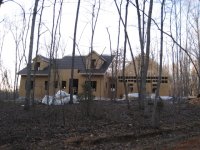
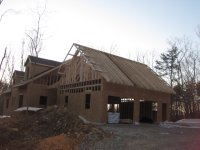
Oh, and while we're on the subject - your roof going slowly is not good. Your contractor should make it a top priority to get the roof completely sheathed at this point and sealed at the ridge too. Having felt paper on top of the sheathing as you currently have, without it covering the ridge is allowing water under the felt paper, and could be keeping the sheathing unnecessarily wet. Plus, it appears on the back side of the house they have covered part of the roof with sheathing, and some of it with felt paper!? That makes no sense. Finish sheathing the entire roof, then cover it with felt paper top to bottom and do the dormers too, with felt paper and Grace bithuthane (ice and water shield) in the valleys and the first few feet of the edge of the roof at the facia board area. The roof is NOT the place to economize on materials used and in the proper sequence. Go kick some contractor/roofer butt to get things moving in your best interest.
So see what you can do to move this up to top priority with your builder. The sooner you're closed in the better for all your structure below the roof as well as the roof itself. This is sort of a no-brainer that should be the contractor's top priority for you and any house being built by any contractor.
 
Last edited:
   / At Home In The Woods
  • Thread Starter
#865  
Obed, lookin' good, real good!

Rember to not cover the weep holes in the first course of brick when you do your finish grading, allowing the wall to breath properly is imperative to a proper functioning wall, as is the proper thru wall flashing.

Also make sure flashing is corect at deck, these are areas that are often done incorrectly, and can cause major repairs years down the line.
nhkabotab7800,
I have some questions.

1. Our house is on a slope like the majority of houses in our region (i.e. hilly). The brick ledges on our house are all below the final grade which means the 1st course of brick will be below grade. How should the weep holes be done in this case?

2. Also, could you explain what you mean by "thru wall flashing"?

3. What do you mean by "flashing at deck"?

Thanks for the comments.

Obed
 
   / At Home In The Woods
  • Thread Starter
#866  
Here's another question. We have some penetrations through through the poured concrete basement wall that are below grade for electrical, gas, and water. What needs to be done to prevent water from coming through these penetrations?

Thanks,
Obed
 
   / At Home In The Woods #867  
Where I had penetrations through the basement wall, when I backfilled I did it in layers and build up a "chimney" of pea gravel with layers of landscape fabric both around the chimney and covering it every 2 feet or so. That made sure that any water getting in there would drain down to the footer drains. The chimney stopped at the top penetration (lined them up vertically) and then put plastic over the top of the pea gravel.

The wall penetrations were PVC pipe put in with mortar (had pre-cast walls). Then coat with tar. Pipes and conduit came in, things were size so the gaps were small (.25 to .5"). Filled the gaps with spray foam, then capped both sides with RTV. So far, no leaks.

Pete
 
Last edited:
   / At Home In The Woods #868  
What are some tips for keeping his future brickwork from getting mud stained during construction?

straw or landscape fabric around the foundation.
 
   / At Home In The Woods #869  
Here's another question. We have some penetrations through through the poured concrete basement wall that are below grade for electrical, gas, and water. What needs to be done to prevent water from coming through these penetrations?

Thanks,
Obed

Hydraulic cement.

Use it to fill the voids around the pipes -- both inside and out. It expands as it drys. Mix only a little at a time, it sets up fast.
 
   / At Home In The Woods #870  
Hey Obed,

I attached a couple of pictures that I hope will better explain what I am talking about... you know a thousand words...

In your case I would expect to see a brick shelf cast in place in your foundation, I believe you said that that is what you have. Determin what the distance is from the top of the brick shelf to the top of the foundation where your wood walls are resting. This will determin how many courses you can have burried. Normally if the first course or so of bricks are going to be burried you move the flashing that goes between the bricks up so that the weeps are not below grade. You need weeps at the top of the wall as well! The thru wall flashing as the picture shows is to allow water that will get through your wall to escape. I like to see the thru wall flashing come thru below the bottom of the wood wall sill plate. This is so that in case there is a back up of water you are more likely to not get any inside the house. The thru wall flashing should extend out past the front face of the brick by about 1/4 top 1/2 inch. A good mason will fill in between the brick and the foundation with mortar to create a solid surface to support the thru wall flashing. another important piece is the mortar net used behind the first couple of courses of brick that are on top of the thru wall flashing. this is used to make sure the mortar that falls between the brick and the wall does not plug up the weep holes and trap the water.

The flashing at the deck is to protect the ledger board and I think with the picture is pretty easy to understand.

I hope that helps and does not confuse further. i'm happy to answer any other questions you might have to the best of my ability.

remember that water and wood are a bad combination pay special attention to roof flashing and wall flashing this is an area that is typically over looked by the different trades as it really is a responsibility of more than on trade and so each assumes the other will do it. just make sure one of them does it.

think like water, and remember that capilary action can cause water to go up hill as well.
 

Attachments

  • Scan0001.jpg
    Scan0001.jpg
    519 KB · Views: 277
  • deck flashing.jpg
    deck flashing.jpg
    262.9 KB · Views: 276

Tractor & Equipment Auctions

2018 INTERNATIONAL 4300 26FT BOX TRUCK (A51219)
2018 INTERNATIONAL...
72In FEL HD Round Back Bucket (A51039)
72In FEL HD Round...
2017 Ford Fusion Sedan (A50324)
2017 Ford Fusion...
1998 CATERPILLAR IT28G WHEEL LOADER (A51242)
1998 CATERPILLAR...
2021 CATERPILLAR 416 BACKHOE (A50458)
2021 CATERPILLAR...
7021 (A50322)
7021 (A50322)
 
Top