Hydraulic Auger Mount

   / Hydraulic Auger Mount
  • Thread Starter
#71  
Looks good, Brandi. I, too, tried to buy some hose protectors from
DHH, but it was back-ordered so I canceled and used plastic flex conduit.
Although they now use the small USPS prepaid boxes to ship, they still
charge $10 minimum shipping.

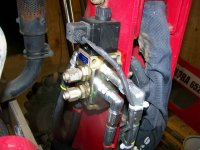
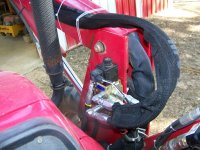
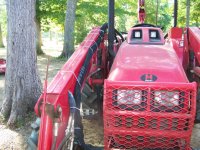
Just a suggestion, but if you install one male and one female QA fitting
on your bulkhead, you can not connect your PHD backwards. And you
can connect the fittings together on the PHD when it is off the FEL.

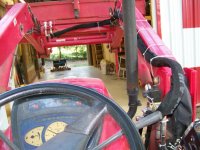
Thanks Dave! One male and one female is the way the grapple came. But five years ago, when I plumbed the auger into the backhoe's curl lines, I put both males on the same side. So the auger (PHD) is already plumbed with two females. I will plumb the grapple like wise. This will make it impossible to get a QD in the dirt, which happens with the auger's female dust cap covered fittings, when hooking up or dismounting. I plan on getting extra red and yellow tyraps for the added hyd. lines and the QDs, to ID which line goes where.
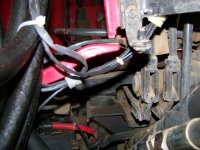
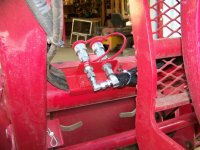
I saw today at TSC, a double QD bracket that is double half moon brackets for holding them tight. I was going to buy it, but the half moons are on 2.5 inch pitch. My QD mount is on 3 inch pitch. I might go ahead and buy it and remake my mount to use it. It clamps at right around the flats and makes the QDs vibration proof, or hardly any at all.
hugs, Brandi
 
   / Hydraulic Auger Mount
  • Thread Starter
#72  
I finished the diverter valve wiring today. It doesn't look like much, but it took a while. To remove the loader it will take dyking two tywraps and unscrewing the connector off of the valve.

I used surplus aircraft clamps to secure the wiring up the side of the instrument housing, attached to firewall bolts. Installing and wiring the relay would have been way more fun if the terminal ID numbers were larger. The hole for the instrument panel was immense. I could stick my arm up to my should inside. The panel came out after removing 4 screws and had enough wiring slack to flip it over and on the hyd. steering tank.

As you can see in the photo, I have the battery and the keyed switch wire reversed. The battery wire is the larger, 12 guage, black wire. I did not have an inline fuse on the battery wire, as the RS clerk sold me the wrong blade fuses. It takes mini blade fuses and he sold me regular blade fuses. Yes, I cranked it up and it took the 5 year old battery down to zip, nona, nothing. It only clinked after I removed the key switch wire. With that connected I got nothing.

I jumped the tractor off and all seems fine. After running the tractor for a while to charge the battery somewhat, I connected the wires correctly and no surprises. But I won't know if I fried the relay until I install a fuse and try the "button". I don't have lines to the QDs for the grapple and auger yet, so I hope to try it without cranking the tractor, after I get the correct sized fuse. That should put enough fluid into the grapple side of the valve (that is capped right now). If all works as designed, the capped valves will not be dry, and have residual fluid.

The inline fuse from the battery was located forward of the firewall and secure with tywraps to the fuse panel block.
hugs, Brandi
 

Attachments

  • 3-25-12 Valve Connector Wired.jpg
    3-25-12 Valve Connector Wired.jpg
    137.7 KB · Views: 266
  • 3-25-12 Wiring in Clamps.jpg
    3-25-12 Wiring in Clamps.jpg
    125.7 KB · Views: 287
  • 3-25-12 Relay on Firewall.jpg
    3-25-12 Relay on Firewall.jpg
    164.8 KB · Views: 301
  • 3-25-12 Inline Fuse.jpg
    3-25-12 Inline Fuse.jpg
    135.3 KB · Views: 277
   / Hydraulic Auger Mount
  • Thread Starter
#73  
I found a better wiring diagram to use instead of the one on back of the relay package from RS. I used this diagram Relay Wiring.
RS's diagram had me confused from what I remembered from aircraft relay diagrams. Now I get a nice quick click when I turn the key on and hit the button. To confirm valve workings, I removed the capped ports from the valve and had fluid. Now it is just wait until Wednesday when the lines and reusable fittings will get here.

I also sold the lite duty grapple I mistakenly bought at a RB Auction last month.
hugs, Brandi
 
   / Hydraulic Auger Mount
  • Thread Starter
#74  
After waiting weeks, I finally got my fittings installed on the hoses. I really like installing fittings myself. It reminded me of my general aviation days when we made up landing gear hydraulic lines. Not counting me not tightening up the QDs after I installed dust covers, I had no leaks. The QDs were just on hand tight and didn't leak much. I want to look into welding on hose clamp brackets, to get rid of the ugly tywraps. I will buy some black tywraps and install them until then.

I installed the hydraulic auger and dug some post holes. After using the auger on the backhoe, the front loader mount leaves me wanting. I can adjust left and right a little with moving the steering wheel, but can't really tell if the loader is ahead or behind of the auger bit shaft, as in 90 degree holes. On the backhoe I can see this all easily and move the boom and dipperstick as needed. Also, when the auger bit is full of sticky clay, I can swing the backhoe and scrap it all off. On the front loader I have to move the tractor to scrap the clay on the bit or let it fall back into the hole.

Over all I am leaning towards the auger on the backhoe. I will try both ways in the next couple of weeks as I put in 300 feet of fence.

My new 72 inch grapple should be here by the 30th. Yippee.:cool:
hugs, Brandi
 

Attachments

  • 5-26-12 Diverter & Lines from Driver's Seat.jpg
    5-26-12 Diverter & Lines from Driver's Seat.jpg
    151.1 KB · Views: 322
  • 5-26-12 Diverter Valve with Lines Attached.jpg
    5-26-12 Diverter Valve with Lines Attached.jpg
    163.5 KB · Views: 318
  • 5-26-12 Lines Attached to QDs.jpg
    5-26-12 Lines Attached to QDs.jpg
    138.4 KB · Views: 276
  • 5-26-12 Lines Running Up Loader Arm.jpg
    5-26-12 Lines Running Up Loader Arm.jpg
    163.6 KB · Views: 264
  • 5-26-12 Lines Ty Wrapped On.jpg
    5-26-12 Lines Ty Wrapped On.jpg
    198.4 KB · Views: 261
   / Hydraulic Auger Mount #75  
Is there room to route the new lines inside the loader boom with the other lines? Save welding on that nice paint.
 
   / Hydraulic Auger Mount
  • Thread Starter
#76  
Is there room to route the new lines inside the loader boom with the other lines? Save welding on that nice paint.
Zebrafive,
Negative. The exit hole at the cross tube is just big enough for the original 4 hoses.
hugs, Brandi
 
   / Hydraulic Auger Mount
  • Thread Starter
#78  
Looks like a pro did it! Keep up the great work! :thumbsup:

Artisan,
Thanks.:) After being an A&P Mechanic for 34 years, it should look like a pro did it.;)
hugs, Brandi
 
   / Hydraulic Auger Mount #79  
After waiting weeks, I finally got my fittings installed on the hoses. I really like installing fittings myself. It reminded me of my general aviation days when we made up landing gear hydraulic lines. Not counting me not tightening up the QDs after I installed dust covers, I had no leaks. The QDs were just on hand tight and didn't leak much. I want to look into welding on hose clamp brackets, to get rid of the ugly tywraps. I will buy some black tywraps and install them until then.

I installed the hydraulic auger and dug some post holes. After using the auger on the backhoe, the front loader mount leaves me wanting. I can adjust left and right a little with moving the steering wheel, but can't really tell if the loader is ahead or behind of the auger bit shaft, as in 90 degree holes. On the backhoe I can see this all easily and move the boom and dipperstick as needed. Also, when the auger bit is full of sticky clay, I can swing the backhoe and scrap it all off. On the front loader I have to move the tractor to scrap the clay on the bit or let it fall back into the hole.

Over all I am leaning towards the auger on the backhoe. I will try both ways in the next couple of weeks as I put in 300 feet of fence.

My new 72 inch grapple should be here by the 30th. Yippee.:cool:
hugs, Brandi

zip tie a rod and paint it yellow, to the auger motor. so the rod extends up above the bucket and you can see it.

zip tie a rod and paint it green, and fasten it to the bucket near the auger, between the 2 rods, you will see + or X or II pending on curl of bucket.

have no idea if above would work. but i know the feeling, of trying to use FEL bucket to push down steel T posts. and then using the backhoe bucket to push down steel T posts. backhoe bucket wins ever time. so much better clearance for better view of things. and ability to articulate the backhoe bucket, and keep the auger going straight down.

that is one of things i hate about 3PT hitch PHD diggers, not being able to adjust left to right angle. easily without repositioning tractor. only forward and back ward and that still means moving tractor. not to mention the old twisting body backwards to keep an eye on things.

=================
other thought, would it be worth putting an extension between bracket on bucket, and mount on the auger motor. so you would need to have entire bucket raised up higher above the ground. so you have better clearance for viewing things?

other thought, would it be worth while, to have pallet forks on. and mount PHD out on a fork? further out in front of tractor, = turn of front wheels = more angle you can place on the auger?
 
   / Hydraulic Auger Mount
  • Thread Starter
#80  
zip tie a rod and paint it yellow, to the auger motor. so the rod extends up above the bucket and you can see it.

zip tie a rod and paint it green, and fasten it to the bucket near the auger, between the 2 rods, you will see + or X or II pending on curl of bucket.

have no idea if above would work. but i know the feeling, of trying to use FEL bucket to push down steel T posts. and then using the backhoe bucket to push down steel T posts. backhoe bucket wins ever time. so much better clearance for better view of things. and ability to articulate the backhoe bucket, and keep the auger going straight down.

that is one of things i hate about 3PT hitch PHD diggers, not being able to adjust left to right angle. easily without repositioning tractor. only forward and back ward and that still means moving tractor. not to mention the old twisting body backwards to keep an eye on things.

=================
other thought, would it be worth putting an extension between bracket on bucket, and mount on the auger motor. so you would need to have entire bucket raised up higher above the ground. so you have better clearance for viewing things?

other thought, would it be worth while, to have pallet forks on. and mount PHD out on a fork? further out in front of tractor, = turn of front wheels = more angle you can place on the auger?

Boggen,
Thanks for the replies. Back towards the first of this thread I stated I can see the auger and bit easily from the seat and posted at least one photo of it from the seat. Can't see ty wrapping a rod to a round motor unit.:confused: Also, it is forward and aft that is hard to figure if it is square. The problem comes from being further away and a lower angle to the bit. On the backhoe I sit high and can move the boom and dipper stick forward or backward to adjust the angle to stay square. On the loader bucket, I have to move the tractor forward or backward as the auger starts and goes down and back up to keep the hole at 90 degrees.
Good forks have a large headache rack on them, which would be harder to see than off the end of a 7 foot wide bucket.
hugs, Brandi
 

Tractor & Equipment Auctions

2010 Ford Edge SE SUV (A51694)
2010 Ford Edge SE...
Erie Industries GF480 Rolling Seperator (A50121)
Erie Industries...
2016 Peterbilt 567 Tri-Axle Dump Truck (A50323)
2016 Peterbilt 567...
Honda ATV (A50121)
Honda ATV (A50121)
2016 John Deere Gator 825i 4x4 Utility Cart (A50322)
2016 John Deere...
2021 Isuzu NRR Heil 9Yd Mini Rear Loader Garbage Truck (A50323)
2021 Isuzu NRR...
 
Top