Couple of Harbor Freight QH questions

   / Couple of Harbor Freight QH questions #42  
The other two pictures are of the top mount area of another implement. I didn't play with it, just took the pictures. Any comments/thoughts about how this will work with the QH? It's a pretty common setup on implements so I expect some of you guys to have experience here.

We were / are in the same boat as you. Modern QH & Antique Implements. In the case(s) like the one you pictured here, we were lucky enough that the height of the bolt for the bracing was relatively similar across the implements so we moved the braces from inside to outside the upright links and added a wider spacer (cut piece of steel pipe) and new bolt as needed and use this bolt for the top link connection.

We had one implement that the braces were too heavy / thick to bend the small amount needed to relocate so we did end up notching & welding them in place.

It's near dark here now but if I can remember it I'll try to slip out tomorrow and get some quick shots of all the ones we converted.

To answer one of your earlier questions, if you can't get them converted then the adapter should work - just swap it for the top hook.

I bought the adapter just so we would have it but thus far we haven't had to use it yet.

Best of Luck & Merry Christmas.
 
   / Couple of Harbor Freight QH questions #43  
re the flexible top link re-configuration suggested by Bruce:

I had a few experiences where I skated downhill on the 2wd YM240 because going down terraces, the mower lifted the rear tires off the ground. Scary when I'm working right next to orchard trees. Also this has to stress the mower chassis way beyond design specs.

I need a lot more flex than what that bracket provides. My workaround was to use chain between the mower top link and the qhitch. The photo below illustrates the extreme range of flex possible with the tractor tires still on the ground. When its time to lift the implement, the chain serves for that. The qhitch is cranked all the way forward for this mowing so on level ground the chain spans a 4 inch gap.

Photo from this old thread.

163272d1272316489-mowing-big-twin-ym240-vs-p1350118rym186dmow5-jpg
 
   / Couple of Harbor Freight QH questions
  • Thread Starter
#44  
We were / are in the same boat as you. Modern QH & Antique Implements. In the case(s) like the one you pictured here, we were lucky enough that the height of the bolt for the bracing was relatively similar across the implements so we moved the braces from inside to outside the upright links and added a wider spacer (cut piece of steel pipe) and new bolt as needed and use this bolt for the top link connection.

We had one implement that the braces were too heavy / thick to bend the small amount needed to relocate so we did end up notching & welding them in place.

It's near dark here now but if I can remember it I'll try to slip out tomorrow and get some quick shots of all the ones we converted.

To answer one of your earlier questions, if you can't get them converted then the adapter should work - just swap it for the top hook.

I bought the adapter just so we would have it but thus far we haven't had to use it yet.

Best of Luck & Merry Christmas.

Thanks for the response Steve. Pictures would be much appreciated, you know, worth a thousand words.

Merry Christmas to you and all TBNers. The advice/information you guys supply is priceless.
 
   / Couple of Harbor Freight QH questions #45  
I just use a adapter, I have about half of my implements that will work with a quick hitch and about half that wouldn't. I have to get off to hook a pto shaft, hydraulic hoses, or raise a parking stand anyway so it's not that big of a issue.
 

Attachments

  • image-2225798040.jpg
    image-2225798040.jpg
    549.5 KB · Views: 200
   / Couple of Harbor Freight QH questions #46  
I reworked the "flex link" on my BushHog thusly. It required that I drill a new hole to relocate each of the two vertical side links at the correct QH spacing from the lift pins (I think I used 15").

IMG_0224 (1024x768).jpg

IMG_0225 (1024x768).jpg

IMG_0227 (768x1024).jpg

Also had to cut/grind down the bolt that connects the long "back links" so that it would pass between the verticals when necessary.
 
   / Couple of Harbor Freight QH questions #47  
Thanks for the response Steve. Pictures would be much appreciated, you know, worth a thousand words.

Merry Christmas to you and all TBNers. The advice/information you guys supply is priceless.

Hey Jerry,

I have not forgotten you. The "farm" is my parents place and due to various weather & "life happens" events I haven't made it back out there yet but planning on getting there today.

Thus far we have converted a Rotary Cutter, Disk Harrow, Box Blade, and an old 7 tine type plow that we always called a "tiller"

I'll try to get you shots of each to show the various challenge each one had.

Steve
 
   / Couple of Harbor Freight QH questions #48  
I just use a adapter, I have about half of my implements that will work with a quick hitch and about half that wouldn't. I have to get off to hook a pto shaft, hydraulic hoses, or raise a parking stand anyway so it's not that big of a issue.

Ah, I think this is what I need to make my HF QH work with my Land Pride rotary cutter. There is a thing on the mower that gets in the way of the top hook on the QH, but that adapter will fix it.
 
   / Couple of Harbor Freight QH questions
  • Thread Starter
#49  
Hey Jerry,

I have not forgotten you. The "farm" is my parents place and due to various weather & "life happens" events I haven't made it back out there yet but planning on getting there today.

Thus far we have converted a Rotary Cutter, Disk Harrow, Box Blade, and an old 7 tine type plow that we always called a "tiller"

I'll try to get you shots of each to show the various challenge each one had.

Steve
Thanks Steve. I think I understand the concept you described in your post, but the pictures would be helpful just to confirm I'm on the right track. No hurry, just when you get around to it.
 
   / Couple of Harbor Freight QH questions #50  
Ok pictures taken & uploaded. Not the best quality but I was being blown around by the high winds we're having & the sun was in my eyes. LOL

Disk Harrow
It's a small angle iron frame type. The supports running from the top link to the rear were inside the top link post with a narrow spacer, we just moved them to the outside and added a wider spacer & longer bolt.

IMG_20161229_130808.jpg


Rotary Cutter
Ours has the chain style support to the rear to let it float instead of the wobble link like yours but should be similar fix.
We moved the support from it's factory position up to the top link hole and then added a bushing & bolt thru the hole where the support went.

IMG_20161229_130915.jpg


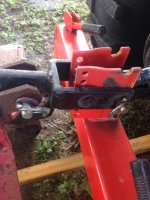
Spring Tine Cultivator (We always called it a Tiller)
Here's were welding started getting involved. This thing is pretty beefy (and it's kind of short which was lucky on the top link height)
Here the rear braces were inside the top link bars with a narrow spacer. It's hard to see in this picture but when we moved the braces to the outside of the supports the top edge canted outward. We don't have the tools/equipment to heat those braces enough to bend them back in alignment so we used a disk grinder to cut notches in the top link bars and these braces then used a large C clamp to pull them in flush and welded them.

IMG_20161229_130843.jpg


Box Blade
This one I wasn't involved in as much as the others. Dad & I consulted at the start and had a couple phone calls along the way but He did all the work on this one.
Here again the braces to the rear were just too beefy to bend so he just welded them in place and removed the bolt & spacer so the top hook could pass thru.
It was a tight fit so he spread them out and put a wider spacer in. For a lightweight BB it will do as is but I may go back and bevel the bottom edges of the supports to guide the hook to center and narrow up the spacer a bit (after Dad & Mom head south for the winter and I have the shop to myself ;) ).

(Apparently I caught a leaf going by on this one so my apologies for the blur in the corner)

IMG_20161229_130955.jpg


On all of these we were lucky that the new top link pin heights fell close enough that the Top Hook on the QH would catch them all and we didn't have to drill any new holes for the mounting pins.

It's not the best nor prettiest solutions but we're "hobby farmers" doing mostly land maintenance on our place so it works for us. If this was our living or we were clearing new ground I might have done some things different / better.

Best of luck with your project & I hope this helped you out some.

Happy New Year


Tractor & Equipment Auctions

2019 NEW HOLLAND TS6.130 TRACTOR (A51406)
2019 NEW HOLLAND...
2000 TRAILKING TK110HDG-513 LOWBOY TRAILER (A50459)
2000 TRAILKING...
2023 Case IH 4412F 12 Row 30 In. Row Spacing Folding Corn Head (A50657)
2023 Case IH 4412F...
Lift Station Pumps (A49461)
Lift Station Pumps...
2022 Case IH 8250 4WD Combine (A50657)
2022 Case IH 8250...
2015 Ottawa Yard Spotter Truck - Cummins Diesel, Allison 6-Speed, Hydraulic Air Fifth Wheel (A51039)
2015 Ottawa Yard...
 
Top