OP
You are using an out of date browser. It may not display this or other websites correctly.
You should upgrade or use an alternative browser.
You should upgrade or use an alternative browser.
Creating a Workshop & Home
- Thread starter EddieWalker
- Start date
- Views: 86538
More options
Who Replied?
/ Creating a Workshop & Home
#101

Nice work!
Side note on the saw, sounds like you should try a new repair shop... if it is a pro level Husqvarna it can be repaired (some of the cheaper saws are really Poulans and..).
beyond that running 2 year old fuel mix will kill any two stroke much less 4 year old...
Side note on the saw, sounds like you should try a new repair shop... if it is a pro level Husqvarna it can be repaired (some of the cheaper saws are really Poulans and..).
beyond that running 2 year old fuel mix will kill any two stroke much less 4 year old...
Eddie,
You have the world by the tail, and you pulled the teeth so it can not bite you back. Your work is fantastic. Getting done what you have is not easy, but I can tell you love doing it. Great work. As for the girlfriend, you best hold on to her real tight, she is a keeper.
You have the world by the tail, and you pulled the teeth so it can not bite you back. Your work is fantastic. Getting done what you have is not easy, but I can tell you love doing it. Great work. As for the girlfriend, you best hold on to her real tight, she is a keeper.
Kyle_in_Tex
Super Star Member
That's a neat low cost way to make a beam. I just want to know one thing. Where in the world can you get a straight board anymore like your 2 x 6? If I ever see an old house getting tore down, I'm going to beg for some "real" dimensional lumber pieces for some straight edges.
2 x 4's used to really be 2 x 4's....Kyle
2 x 4's used to really be 2 x 4's....Kyle
OP
EddieWalker
Epic Contributor
Thanks guys for the nice words.
Finding a straight board is allot easier then finding a "flat" one. The twisting and warping is really bad, even on grad 2 boards. Oh well, that's what my pipe wrench is for. LOL
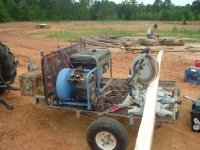
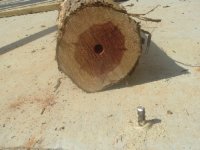
This pic shows a 3 inch by 3 inch piece of oak 16 feet long. Even with the straight edge and guide, it's very hard to keep the cut straight for very long.
Fortunately I'm cutting smaller pieces from it to create the rest of the truss.
Here's one for the math experts. My roof pitch is 4 in 12, so I looked real close and set my chop saw for 19 degrees. It seem to work, but who knows what the exact measurement in degrees is for that pitch?
Finding a straight board is allot easier then finding a "flat" one. The twisting and warping is really bad, even on grad 2 boards. Oh well, that's what my pipe wrench is for. LOL
This pic shows a 3 inch by 3 inch piece of oak 16 feet long. Even with the straight edge and guide, it's very hard to keep the cut straight for very long.
Fortunately I'm cutting smaller pieces from it to create the rest of the truss.
Here's one for the math experts. My roof pitch is 4 in 12, so I looked real close and set my chop saw for 19 degrees. It seem to work, but who knows what the exact measurement in degrees is for that pitch?
Attachments
OP
EddieWalker
Epic Contributor
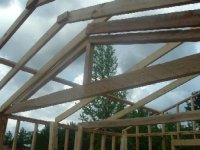
this is the back side of the finished truss. It's not structural, just ornamental. The 2x6's will support the roof and hold the insulation.
The oak truss's will be stained fairly dark to give it an older look. My goal is for them to look 200 years old.
The oak truss's will be stained fairly dark to give it an older look. My goal is for them to look 200 years old.
Attachments
johnday
Veteran Member
- Joined
- Nov 14, 2003
- Messages
- 1,400
- Location
- monroe michigan, barton city soon
- Tractor
- NH TC 35 had, now a TC35DA LS25 lawnmower
Eddie; It's 18 1/2 degrees, I think your close enough. Very interesting what your doing, and looks like great work! Keep the updates coming. /forums/images/graemlins/cool.gif /forums/images/graemlins/grin.gif
Nat
Platinum Member
Eddie, how long does a chain last before it needs sharpening? I have some eastern red cedar that I'm going to cut like that for the front steps of the house I'm building. I don't have a guide, but think I can keep it straight enough for 4 feet. I want to make some 4 x 10" strp treads, and the stringers will be less than 4"
OP
EddieWalker
Epic Contributor
Thanks John. Now that I know I'm a little over, I can fudge it down a bit.
Nat,
It took two chains to do those posts. The real killer is the long, deep cut you need in order to get to a flat surface.
The first blade had been on the saw a bit already, so it wan't sharp to begin with. The second blade was brand new and it lasted through everything else I did.
As for cutting without the guide, good luck. Non of my cuts are straight. Some are better then others, but that's the best I can say for my skills.
Short pieces might be easier, but keeping the blade horizontal will be as tough a job as cutting in a straight line.
I'd advise cutting it extra big so you can plane down the gouges.
I wanted gouges in my beams and was worried it would be too smooth. I was even working out ways to distress it when I finished cutting it because I expected it to be smooter. Fortunately it all worked out just like I wanted it.
ScottAR
Veteran Member
Nice work!!
You guys should go over to the Forestry Forum and have a look around. There are some fellas doing chainsaw milling. Everything from freehand slab cutting to specialized frames/jigs. HTH...
You guys should go over to the Forestry Forum and have a look around. There are some fellas doing chainsaw milling. Everything from freehand slab cutting to specialized frames/jigs. HTH...
jwnge
Gold Member
- Joined
- Nov 25, 2004
- Messages
- 323
- Location
- oak woods and rocks of Wi.
- Tractor
- Mahindra 2015 HST-- Snapper 1650, Snapper 1438
Right Triangle Angle And Side Calculator... type this in url and you can put your own values in and then calculate.. Gives all sides and angles..18.43 degrees is what you need..John J
OP
EddieWalker
Epic Contributor
Thanks for the info on the exact angle to get the cut. I've changed my settings to about 18 1/2 degrees. I can't hurt to be as accurate as possible.
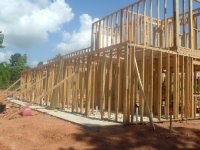
This pic is of the public side of the building. I will have tent campsites in this area with five public bathrooms available for guests plus one utility room. Each is 8 ft by 8ft, give or take a few inches.
The porch is 4 ft wide and runs the full length.
This pic is of the public side of the building. I will have tent campsites in this area with five public bathrooms available for guests plus one utility room. Each is 8 ft by 8ft, give or take a few inches.
The porch is 4 ft wide and runs the full length.
Attachments
OP
EddieWalker
Epic Contributor
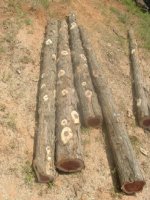
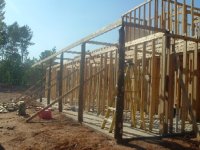
This whole building is an experiment with different ideas I have for the park. One of those ideas is to use cedar posts from the trees growing on my land.
These are cut to 97 inches and fairly close in size. They will be the posts for the porch on those bathrooms.
These are cut to 97 inches and fairly close in size. They will be the posts for the porch on those bathrooms.
Attachments
OP
EddieWalker
Epic Contributor
I've never done this before, so I'm sort of winging it.
To anchor the bottom, I'm relying on gravity to do most of the work, but need something to lock the post in place.
I decided to drill a three inch hole into the slab, then glue in a piece of rebar with one inch sticking up. I chose one inch to keep is low enough to allow me to replace the posts in the future without too much effort.
Then I drilled a hole in the center of the post, filled the hole with liquid nails, and put it in place.
Attachments
OP
EddieWalker
Epic Contributor
OP
EddieWalker
Epic Contributor

OP
EddieWalker
Epic Contributor
AntrimMan
Gold Member
Eddie,
are you the only nail banger on this project? Geez that's a whole lot of work accomplished so far. If those cedar posts don't see any wind loading then the rebar pegs are fine. In these parts you need a permit to break wind never mind wind loading, heck, you need a permit just to get a permit. I am coming up on full of having to be begging and paying for permission to legally improve and enjoy the land I pay taxes on just to pay more taxes. I'm glad to see America hasn't been governed to death just yet and a person can embark on a project as diversified as yours. You are a real pro Eddie.
Keep going, it looks just swell.
Martin
OP
EddieWalker
Epic Contributor
Martin,
Thanks for the kind words. Your right about the permits. Coming from California, I was amazed that you don't need a permit to build outside of city limits.
The wind load is a concern. The porch is only 4 feet to cut down on the overhang as much as possible. It's also less material I had to pay for. LOL
The ceiling will be flat with the rafters comeing up from the beams by a truss. This triangle should help anchor the posts, but when done, will also support itself if all the posts suddenly disapeared.
That's the plan anyway.
Eddie
TOMDUALLY
Silver Member
Hey Eddie, I know it will deminish the rustiic look, but if you peel the bark off your post they will last a lot longer. The bark loosens as the post dries out and makes a nice home for insects (ie termites) and also holds moisture.
LOOKS GOOD
PS could you send me some of your energy /forums/images/graemlins/tongue.gif /forums/images/graemlins/grin.gif /forums/images/graemlins/grin.gif
LOOKS GOOD
PS could you send me some of your energy /forums/images/graemlins/tongue.gif /forums/images/graemlins/grin.gif /forums/images/graemlins/grin.gif