whitedogone
Gold Member
Excellent, I think I would fall into the second catagory of inspector. 
BTW whitedogone, I caught a break this week with my foundation inspection. We have two building inspectors in our part of the county, one a twenty something that's known to be "a challenge" and the other a semi retired builder with 30 yrs experience. Luck of the draw I got the old man. Happy Days. He laid out the whole inspection cycle with milestones in a way I understood and can follow in 10 minutes.
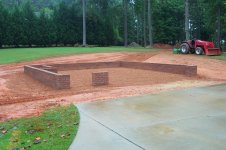
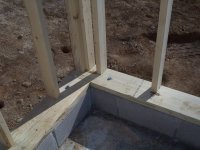
There will be an expansion joint attached to the foundation walls where the pad butts but no fixed anchors, so it's probably correct to say the pad floats inside the walls. Most garages here are monolitic slabs and they work fine, I decided to go with a separate foundation with knee walls because it's more forgiving to grade to on the side of this hill and it matches my existing garage. BTW Eddie, your observation on the entry door rattled in my head till, as you can see by the photo, I bumped it to a 3'0". I'll thank you many times in the days ahead, but right now I'm still muttering.
Pretty temperate here so no need to insulate under the slab. Plan to use a vapor barrier with wire, not much faith in fiber added to the mix. Many moons ago we used regular visqueen but time has proven that a poor choice. I plan to use a 10-15 mill product made for the task.


Builder - you need to come up this way and work, you would find tons of work after a year or two. They way you describe building things always sounds right to me.
As far as concrete in my building goes, the monkeys that did my slab in my pole building swore up and down that I didn't need control joints cut in my slab (28x40). I made them do it (I told them they didn't have to if they would sign an agreement to come back and fix all the cracks). I had slate fill, and had a 30 Ton roller compact it after the dozer had spread the fill and packed it, and it still settled some. I put 2b gravel over the slate fill and then had a concrete crew come in. My tractor with loader and whatever attachment park on it all the time. I have some cracks, but it still beats dirt.
Feels good to get a bone thrown to you once in a while. When I got my shop /garage built, I had the builder put in an additional 8" CMU block on the walls . The plans were for 9 foot walls, but with the blocks it gives me additional 8" ceiling heights. HE was using the CMU blocks for forming anyway so the additional block height was a low cost wall extension.
The interior walls and ceiling are insulated and finished with 3/8" plywood. The only downside, if you want to call it that, is there is a 3" ledge around the wall. I makes good storage area for small objects to set on rather than on the floor, like rakes, brooms small bottles etc. The CMU block allows me to hose out the floor without wetting my walls which was the original idea.
Rebar instead of wire is a thought. It'll add a little cost but could save a cracked floor. Think I'll try to find some performance data.
After I got done compacting my average thickness is closer to 5" than 4" at target height. I knew I was leaving it a little on the full side. Thought about adding more fill but decided to opt for 2 more yards of mud instead. The more the merrier.
Got a serious thunderstorm tonight, makes a mess in the red clay but sure helps settle the fill. I'll get back on it Wednesday running the perimeter with a full bucket. The center runs from 0 to +3" of fill over undisturbed red clay. R4's with a full bucket barely leaves a tread mark.
Semi confused about the vapor barrier now. Some say that here in the south if you're high and dry, the barrier does more harm than good by causing curing and finishing problems, but this is a concrete contractor that may not want to deal with the extended finishing time period a bottom sheet adds. I did not use crushed stone, rather a sandy clay and rock mix so I think I should use some form of barrier to control capilary action. Opinions from the learned please.
How deep does the saw cut need to be for an effective control joint?
I was a carpenter in a previous life. Sure will be glad to get past this brick and mud part.
My existing garage floor will sweat once or twice a year when the humidity and temp change sequence gets just right. I was not there the day it was poured but seriously doubt it has a VB.
The slit idea sounds like a good compromise.
I like the rebar suggestion vs. wire and agree I should rent a jumping jack. My pour schedule has been pushed back till next week so I'll have time to tamp it good this weekend. How is the rebar supported, is there a device made for this or do I just lay it on a a 1/3 brick standing up?
I am a bit confused about drilling in the rebar. In my 8" double brick filled wall which is basically a solid column, would the drilled in rebar defeat the purpose of the expansion joint? Will the pad never expand more than it's poured dimension, only contract and return?
BTW thanks for all the help guys.
More confusion. I got hold of what is said to be the best local concrete contractor in the area for commercial work who is also a licensed GC. I asked him about the rebar option and he advised against it, saying he has seen problems with this in 4" slabs, said it would telegraph through and checkboard and IHO should be used only in 6" or thicker. His advise was to use fiber or wire or both and strenghten the mix if still concerned. Said to use VB, finishing no problem if done correctly. Said two control joints each direction would be best but would put one ifI specified it that way. Seems to vary by region.
That's a good one. Just make sure your bar is 1/2 way or better below the top of slab.