John Deere 4300 complete rebuild

   / John Deere 4300 complete rebuild #221  
Those are glacier or INA bearings.
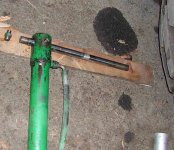
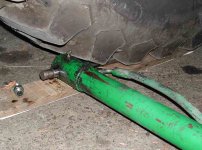
Metal-polymer, Solid Polymer, Reinforced Plastic Composite, Bronze, Bimetallic Bearings
Very inexpensive, readily available. Typically they have a steel shell with a lining made of a bronze teflon composite. There are fancier varieties, but those are used on more expensive equipment like inboad prop shafts on fancy boats.

You may need to make yourself a tool for fitting them, easy to do on a lathe. You may be surprised how cheap a set will run. They do have a thin wall, which is why you can't successfully whack them in with a hammer. They cope well with low lubrication conditions, typical of what you find on offroad equipment. Cheap to replace, which is a big deal for anything that requires servicing.
 
   / John Deere 4300 complete rebuild
  • Thread Starter
#222  
Those are glacier or INA bearings.

I did not know what they were called....I have seen similar bearings,
but much smaller.

Anyway, they seem to be only splash-lubricated and the rockshaft is not
too sloppy in the bore, so I don't see a major downside to not changing
them. I am replacing all four O-rings, however.
 
   / John Deere 4300 complete rebuild #223  
In Europe they have a lot of standardized mass produced components to choose from (cheap compared to making your own or custom). Includes tool steel bushings with grease passages etc. STRACK NORMA
 

Attachments

  • New Picture.jpg
    New Picture.jpg
    51.3 KB · Views: 259
   / John Deere 4300 complete rebuild #224  
Holy smoke I just started looking through this thread and the first thing that came to mind was WOW!

Hard to believe that someone could cause a tractor to have so much damage :eek: you've taken on a Hugh job there sir. I've got a half an idea what your going through and I tip my lid to you. Thanks Matt for the heads up on this. Very interesting indeed. I'll be watching this one from now on. Good luck but I'm sure you'll have one heck of a nice machine when your done. ;)
 
   / John Deere 4300 complete rebuild
  • Thread Starter
#225  
Since I am about to install the bellhousing over the HST, I thought
this was a good time to repair the loader support beams. As can be
seen in these pix, they are quite warn. One spot seems to be a full
millimeter in depth. Note that the feet of the loader mast is also
warn. You can see a bit of mushrooming at one of the contact points.
This part is cast, but probably only a bit harder than the mild steel of
the support beams. I have never had this type of loader before, but
I hear it gets quite sloppy with age and use.
 

Attachments

  • wear.JPG
    wear.JPG
    39.2 KB · Views: 498
  • wear2.JPG
    wear2.JPG
    55.4 KB · Views: 533
  • wear3.JPG
    wear3.JPG
    41.4 KB · Views: 467
   / John Deere 4300 complete rebuild #226  
I knew a guy who had one with the loader mount like you have. I agree that the loader becomes very sloppy after using it awhile. I was suprised at how lose the loader was on the square tubing. I feel they would have been better to have pinned the loader onto the square tubing instead of letting it rest on top of the tubing.
 
   / John Deere 4300 complete rebuild
  • Thread Starter
#227  
Here is how I repaired the FEL support beams.

First, I am doing this repair at this time in the Big Rebuild because the
beams are installed on the bellhousing....I saw no need to remove them
and they provide convenient support points for the tractor reassembly.

I decided to go with welding a bead or 2 in the areas of wear, then grinding
down to a planar surface a bit proud of the surrounding original material.

The official John Deere fix is to weld shims in all these areas. See this
thread for that procedure:
http://www.tractorbynet.com/forums/john-deere-owning-operating/152571-loose-430-loader-shim-fix.html
(good job, Chuck)

I am generally satisfied with my welds (stick and MIG), but I have much less
success with out-of-position (OP) welds, as in vertical or overhead. So,
I try to do all mine horizontally. I flipped the bell housing over for each weld.
You will have to remove the beams on an intact tractor to avoid OP welding.

For this job, I went with a 7014 rod and my Miller Thunderbolt DC welder.
For those not familiar with this rod, it is very low spatter and makes very
pretty beads on flat surfaces, such as butt welds. They work poorly (for me
anyway) at fillet welds. There is no hammering to remove flux....it just falls
off. In the 3rd photo, it came off all in one piece. Like the common 7018
rods, this rod is a 70,000 psi steel.
 

Attachments

  • weld.JPG
    weld.JPG
    43.9 KB · Views: 558
  • 7014.JPG
    7014.JPG
    33.8 KB · Views: 502
  • done.JPG
    done.JPG
    41.2 KB · Views: 489
   / John Deere 4300 complete rebuild #228  
My 4200 turned 500-hours this weekend. My 420 loader has been getting a bit sloppy the last 25-hours or so; but I'm not ready to do the shim/weld-bead repair just yet.

However the manual calls for a valve adjustment at 500-hours. The engine sounds and works fine; but I think I'll read the shop manual in greater detail to see if this is something I can tackle myself. I have a hunch the dealer will charge $500+ by the time they pick it up, do the work and return it to me. I have better things to do with the money; but will spend it if I don't feel I can do the job.
 
   / John Deere 4300 complete rebuild #229  
Here are the roll pins that Deere uses in some places. They are a double-
wound single piece of spring steel. I have shown the new one and the old
one. The latter gets dirt in the center, making it look solid. Add a bit of
rust and this baby is very tough to remove (and install). Some roll pins used
are the conventional type, like the one on the right.

Can anyone identify the other part in the photo? I found it in the bottom of
the final drive gearcase. It is a cylinder that is clearly punched out of a
plate of steel, then precision ground to be exactly 1/8" thick.


Those are spiral roll pins. SPIROL is one trade name. They're not as common as the other roll pins but are available. You can get them fr McMaster-Carr.


.
 
   / John Deere 4300 complete rebuild
  • Thread Starter
#230  
Here is the actual "rockshaft", as Deere calls it.

It is quite hefty, as is the push rod and arm. The push rod fits loosely
inside the bottom of the piston....that is why only the weight on the
three point keeps it from lifting.

Since the shaft's splines are exposed to the elements, you get a bit
of rust, which explains the resitance to removal. My retaining washers
are missing (this tractor was a spare parts donor), so I can't fully assemble
the rockshaft system until I buy (or make) replacements.
 

Attachments

  • rockshaft.JPG
    rockshaft.JPG
    43.3 KB · Views: 509
   / John Deere 4300 complete rebuild #231  
Come on now. You've got us addicted to watching and learning from your mechanical genius and now it has been almost two weeks since you have updated your progress. We are starving for the latest "fix".:D:D

Arkaybee
 
   / John Deere 4300 complete rebuild #232  
HELP!! got a 4400 john deere that i use for my landscaping business.
crew had it on job site and it started losing power and got a little
knock in bottom end. want to get open to look and see. is there a way
to get oil pan off without splitting and to do rebuild on it, do you have
to pull engine or can you just clear everything in front of engine, i.e. the
radiator, battery, etc. please someone let me know... post or email me
at robinmayall@yahoo.com. thanks in advance........
 
   / John Deere 4300 complete rebuild
  • Thread Starter
#233  
....do you have
to pull engine or can you just clear everything in front of engine......

Welcome to TBN, ROBIN. Sorry to hear of your problem with your 4400.
As you may know, it is identical to the 4300.

In a word, no, you can not access the lower end on your engine without
removing it from the front subframe. The subframe which holds the front
axle and differential is mounted to the oil pan, which is a massive steel
casting. See photo. It is a big job.

(BTW, RKB, I am in the midst of assembly now and just got my front suframe
mounted to my rebuilt engine. Pix coming soon!)
 

Attachments

  • eng_2.JPG
    eng_2.JPG
    69.1 KB · Views: 587
   / John Deere 4300 complete rebuild
  • Thread Starter
#234  
OK, it has been a while since I posted. I am in the assembly process, mostly,
and I am juggling this project with others, including a new all-steel carport
structure (tractorport?).

So these posts are almost in real time. I revisited my FEL cylinders just a
couple days ago. Recall that I have at least one bent rod to deal with.
Remember the first photo below?

These JD cyls only have 25mm rods, so they are easy to bend. They also use
wire-retained cylinder glands. I guess both are cost-cutting measures. I
much prefer screw-in glands. This rod has apparently been replaced once
already.

In the 2nd photo, I show how to remove the gland. I do not recommend
using a pipe wrench unless you do not care about the marks it leaves in the
steel, or you have no other way to get a grip. Mine were already marked
up with pipe wrench marks, so a few more won't hurt. I also recommend that
you leave the cyl on the loader as a good way to hold it while you turn the
gland. If you look closely, you can see the wire retainer as it comes out of
the hole in the cylinder as I turn the gland.

If your cyls are off the loader, you need some way to keep them from turning.
Photos 3 and 4 show how I do that. This is how I hold the rod to remove
the piston nut, too. Since there are zerks on both sides of the cylinder, I
also needed to use a piece of wood with a hole to protect one zerk from
being damaged.
 

Attachments

  • bent_rod_a.jpg
    bent_rod_a.jpg
    45.5 KB · Views: 498
  • FEL2.JPG
    FEL2.JPG
    37.7 KB · Views: 561
  • FEL3.JPG
    FEL3.JPG
    70.1 KB · Views: 524
  • FEL4.JPG
    FEL4.JPG
    61.5 KB · Views: 507
   / John Deere 4300 complete rebuild
  • Thread Starter
#235  
And here is my bent rod. It looks like I may be able to straighten it well
enough to be able to reuse it. I did have to pull hard with my tractor to
pull the rod and gland out. If you look closely at the aluminum piston, you
can see it is pretty scored up from all the side pressure it received from the
bent rod. Repairs will be posted soon.
 

Attachments

  • FEL6.JPG
    FEL6.JPG
    72.1 KB · Views: 566
  • FEL5.JPG
    FEL5.JPG
    36.6 KB · Views: 528
   / John Deere 4300 complete rebuild
  • Thread Starter
#236  
And here is the rod, good as new. Well, almost anyway. I used my
hyd press, and I smoothed up a couple of small nicks with a diamond
file. I will reuse the seals.
 

Attachments

  • FEL_rod.JPG
    FEL_rod.JPG
    34.8 KB · Views: 474
   / John Deere 4300 complete rebuild
  • Thread Starter
#237  
However the manual calls for a valve adjustment at 500-hours. The engine sounds and works fine; but I think I'll read the shop manual in greater detail to see if this is something I can tackle myself.

I am putting my tractor back together in a somewhat different order than
the disassembly. One thing is the engine. If you remove the muffler and/or
the exhaust manifold, you may not have to remove the fuel tank to get
at the valve cover. See photo.
 

Attachments

  • engine_8.jpg
    engine_8.jpg
    81.5 KB · Views: 686
   / John Deere 4300 complete rebuild #238  
On the bucket and lift cylinders of my 420 loader, they include a little orange ring in the "kit" package that slides down the shaft and lays in the groove after you push the rod guide bushing back inside. Then you give it a yank, and it generally destroys the orange thingy, but it fills the gap while the expansion ring passes over it. FWIW.
 
   / John Deere 4300 complete rebuild
  • Thread Starter
#239  
On the bucket and lift cylinders of my 420 loader, they include a little orange ring in the "kit" package that slides down the shaft and lays in the groove after you push the rod guide bushing back inside. Then you give it a yank, and it generally destroys the orange thingy, but it fills the gap while the expansion ring passes over it.

Have you used the JD kit, FIT? That is good experience. My earlier JD
cyls used glands that were retained by inside snap rings and the JD kit
was over $40. Lots of "extras" in the kit, too. I don't buy the factory
kits anymore....I would rather order from a place like Hercules.
 
   / John Deere 4300 complete rebuild #240  
I am putting my tractor back together in a somewhat different order than
the disassembly. One thing is the engine. If you remove the muffler and/or
the exhaust manifold, you may not have to remove the fuel tank to get
at the valve cover. See photo.

Thanks for the tip as removing the muffler looks a lot easier than getting the fuel tank out of there.
 

Marketplace Items

2019 BOBCAT T450 SKID STEER (A60429)
2019 BOBCAT T450...
2016 PALADIN 22197MM SWEEPSTER 97" HYD BROOM (A60429)
2016 PALADIN...
2020 INTERNATIONAL TANDEM AXLE SLEEPER (A58017)
2020 INTERNATIONAL...
2023 VIRNIG RBV50-72" HYD ROTARY BRUSH (A60429)
2023 VIRNIG...
208316 (A58375)
208316 (A58375)
UNUSED FUTURE FT-RR78 - 78" HYD ROCK RAKE (A52706)
UNUSED FUTURE...
 
Top