Naked 430

/ Naked 430 #1  

BravoXray

Elite Member
Joined
Dec 17, 2019
Messages
3,490
Location
Nothern Indiana
Tractor
Kubota BX2230, John Deere 430 Diesel
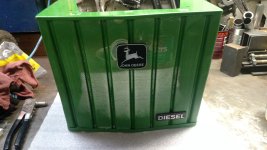
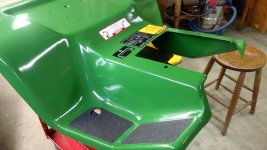
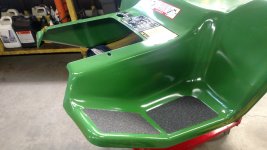
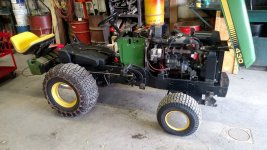
My 430 of 1991 vintage was getting a lot of rust on the seat pan, especially where the cab is mounted, so as I am also refurbishing the snow blower, I decided to pull it off and get it sand blasted and powder coated. I'm also going to have the grille and side panels done while I'm at it. Since the hood is glass reinforced plastic, I'm going to have to paint that. I think I'll wait until the powder coated parts are done, and have paint mixed to match.
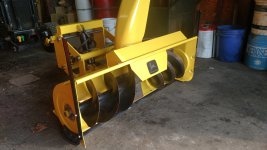
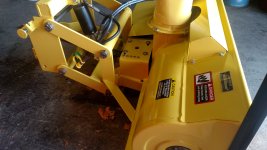
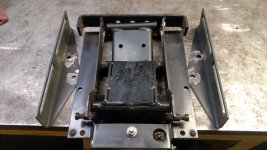
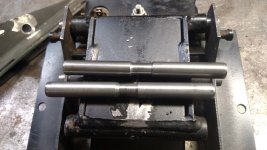
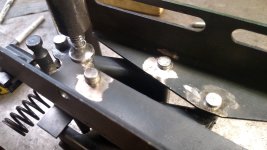
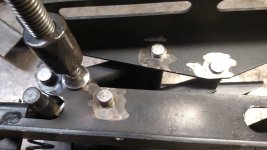
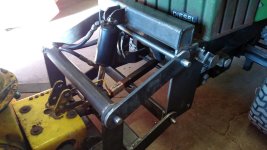
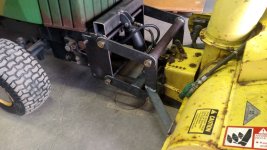
This all started when I decided to modify the mount for the 47" snow blower. The blower was not designed for the 430, so I had a local Amish welding shop modify it to mount to the front of the 430. It mostly worked okay, but the mount they made pivoted when raised up and down instead of raising more or less straight up and down like the factory mount does with a parallelogram type mount. When I would raise it up, it would put the u-joint at the gear box in a bind and every couple of years I would have to replace it. So I took it all apart and after some cutting and a lot of fabricating and welding came up with a really nice parallelogram type mount that keeps the drive shaft aligned properly and running very smoothly now.

The blower was looking pretty shabby with lots of rust starting to show, so I pulled it all apart and am having it blasted and powder coated too.

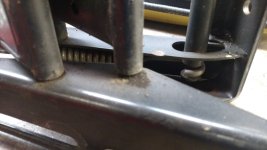
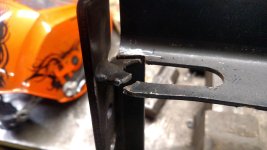
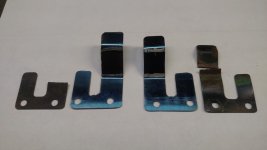
Also, on the grille, at the bottom rear there is a spring clip[ that snaps into a slot in the sode pane to help hold it in position. Those clips, part numbers M88068 and M88069 are not available any more, so I bought a piece of .020" X 1.5" wide spring steel from McMaster-Carr and fabricated a couple of replacements. Not all that hard, used a die grinder with an cut-off disk to shape them, bent them on the corner of a 2" steel tubing so as not to make too sharp of a bend radius and used a 3/16" cobalt bit to drill the holes to mount them to the grille. I think they will work just fine.

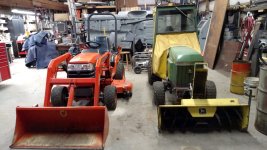
The 430 is relegated to snow removal only now, after 27 years of switching between the snow blower in the winter and the mower deck in the spring, I said enough and bought a (GASP) 2005 Kubota BX2230 for mowing and landscaping work with it's FEL. They reside next to each other in my shop and get along just fine.
 

Attachments

  • IMG_20171202_143026632 (Custom).jpg
    IMG_20171202_143026632 (Custom).jpg
    411.9 KB · Views: 349
  • IMG_20200918_180041812 (Custom).jpg
    IMG_20200918_180041812 (Custom).jpg
    359.1 KB · Views: 282
  • IMG_20200916_193032095 (Custom).jpg
    IMG_20200916_193032095 (Custom).jpg
    371 KB · Views: 293
  • IMG_20201010_164935514 (Custom).jpg
    IMG_20201010_164935514 (Custom).jpg
    422.8 KB · Views: 357
  • M88068-9 Replacement Grille Clips #3 (Custom).jpg
    M88068-9 Replacement Grille Clips #3 (Custom).jpg
    230.5 KB · Views: 272
  • IMG_20181125_174758773 (Custom).jpg
    IMG_20181125_174758773 (Custom).jpg
    409.2 KB · Views: 355
/ Naked 430 #2  
What is the vehicle body in the background? Are you restoring it?

Nice job on the lift.

Richard
 
/ Naked 430
  • Thread Starter
#3  
The body is a 1970 Nova SS, 350 SB 300hp, Muncie 4 speed, all numbers matching. Bought it 10 years ago, drove it for three years and poor body work from one of the previous owners started showing, badly. Tore it apart, took the body to an excellent body man and he had it for three years. The rust was worse than it appeared at first, and he ended up replacing both rear quarters, entire floor, firewall, part of the dash cowl area, most of the trunk floor, tail light panel, and the filler between the trunk lid and rear window. The left front A-pillar and the roof above it was repaired with new metal also. In addition, the right door was pretty bad and I was able to find a NOS door shell to replace it. And last but not least, both front fenders were off a '68 or '69 that had the more square side marker lights in addition to rust issues, so I bout a pair of AMD fenders to replace them.
I could have bought another Nova for what it cost to fix it, but it's 100% solid now. It's on my schedule to get started on painting and reassembly in the spring now that I'm retired.
 
/ Naked 430
  • Thread Starter
#4  
A couple more pictures. Took the hood off and am removing the decals on the sides, and sanding it down so a friend can paint it for me. Went to the local JD dealer and bought a quart of JD green so it should match the powder coat.

IMG_20201022_130313992.jpg

IMG_20201022_130323196.jpg
 
/ Naked 430
  • Thread Starter
#5  
Got all the snow blower parts back from the powder coater. The only real problem I had was that I left the spring loaded pins that lock the mount to the tractor frame on when it was coated. Not sure if they apply a primer coat before they apply the color coat, but holy crap I had fun getting them loosened up to where I could drive the retainer spring pins out and then drive out the mounting pins. I wire brushed the coating off and cleaned out the holes with a round file, put it back together and it worked fine now. I had to use the file on all the other holes for the pivot pins and lift cylinder mounting pins so the pins would fit in the holes properly.
I also removed the hydraulic lines for the chute rotator, they have always been too long. While they had reusable ends, the hose was made in 1986, so I thought it might be better to get new hoses made. A trip to the local hydraulic shop and $76 and I have a nice new pair of hoses.
Then I put the warning decals on, don't want any unfortunate accidents because there was no placard warning not to stick your hand in the spinning auger. :duh:
So, once I get the tractor parts back and get them installed, I'll be ready for the snow to fall.
Probably won't see more than a few flakes this winter.
 

Attachments

  • IMG_20201022_174701109.jpg
    IMG_20201022_174701109.jpg
    4.6 MB · Views: 231
  • IMG_20201022_174709299.jpg
    IMG_20201022_174709299.jpg
    4.4 MB · Views: 227
/ Naked 430 #6  
Yeah, you brought snow insurance. By the way do you have the item/stock number for the spring steel from McMaster-Carr?
 
Last edited:
/ Naked 430
  • Thread Starter
#7  
Yeah, you brought snow insurance. By the way do you have the item/stock number for the spring steel from McMaster-Carr?

The stock number is 9075K237. That is for a 15 foot length and is $33.81.
If you need just a short length, let me know with a PM, and I will send you some, I only used about a foot of it. I'll never use all of what I have left.
 
/ Naked 430 #8  
The stock number is 9075K237. That is for a 15 foot length and is $33.81.
If you need just a short length, let me know with a PM, and I will send you some, I only used about a foot of it. I'll never use all of what I have left.

Yeah, I sure know that. I still have a couple 4" rolls of it different thicknesses. Makes great shim stock too. I even kept a few broken pull-start springs for small clips and antique door handle springs. Not to mention motor and generator brush springs. I used to do auto restorations. Now, I have time to do my own--If I hurry. I just turned 70 today! :dance1:
 
/ Naked 430
  • Thread Starter
#9  
Yeah, I sure know that. I still have a couple 4" rolls of it different thicknesses. Makes great shim stock too. I even kept a few broken pull-start springs for small clips and antique door handle springs. Not to mention motor and generator brush springs. I used to do auto restorations. Now, I have time to do my own--If I hurry. I just turned 70 today! :dance1:

Congrats!
I turned 70 in July, and retired from the trucking business just over a year ago. I don't miss the whiney drivers, inexperienced brokers that were in high school a month before they got the dispatching job, and shippers and consignees that could care less when they loaded or unloaded my trucks.
Nope, don't miss it a bit.
I have lots of projects and hobbies to keep me busy, and family members and friends that think I can fix anything.
I'm sure you know what I'm talking about.
Drink one for me.
 
/ Naked 430 #10  
The stock number is 9075K237. That is for a 15 foot length and is $33.81.
If you need just a short length, let me know with a PM, and I will send you some, I only used about a foot of it. I'll never use all of what I have left.

PM sent and Thank you for the kindness and generous act.
 
/ Naked 430
  • Thread Starter
#11  
Yesterday I took a look at the seat suspension off the 430. It's gotten progressively looser over the years, until now it's just plain sloppy. The seat will move side to side a couple of inches, and rock back and forth three of four inches. Looking at the pivot points, all the bushings were worn out, and a couple of the bushings were worn completely through and the shafts were wearing into the tubes holding the bushings. Of course, it was welded together. So, I fired up the grinder with a cutoff disk and ground through a couple of the shafts that had enough side clearance so as not to grind up the tubes or the mounts. Then I ground the welds that held the pins in the mounts flush and was able to drive the stubs out with a BFH and a punch. The two other shafts didn't give me enough room get in and cut them with out buggering up the tubes and mounts, so I ground those welds down flat and was able to drive the pins out.
In addition, the piece at the front of the top part of the mount where the tension adjusting bolt goes through was broken loose on both sides and twisted from the force exerted to tension the rather stout springs used in the suspension. Some hammering, twisting and bending got it back close to the proper position, and I MIG welded it up so it's usable again.
Some searching on the web led me to this company, who makes complete suspension units and pin and bushing sets to repair them,
Seat Suspension Bushings & Rods for John Deere 318 322 332 4
I'm not sure whether I'm going to get one of the kits, or drill the holes in the brackets out and weld in 1/2" pins, as the tubes for the bushings are very close to 1/2" ID. That would give a lot more bearing surface, be it steel on steel, than the 3/8" pins and bronze bushings. Either way, I'm also going to add grease zerks so they can be lubricated. I'm sure that no more than I use the 430, the 1/2" pins would last a long time, especially with proper lubrication.
While I'm at it, I think I'm going to replace the seat with a more comfortable seat like I put on my Kubota BX2230 a while back. After I bought the one for the BX, Rural King had an online sale on the same seat that sold in the store for $200, for $50, SHIPPED. I immediately ordered one just in case I needed one for some other project. I just have to make sure it will fit inside the cab that goes on the 430.

Also, I had noticed that sometimes when I filled the fuel tank all the way up, I would see a little leakage coming off the font of the fuel tank under the seat pan. The fuel line fittings for the supply and return lines press into rubber grommets pushed into holes in the top of the plastic fuel tank. With the seat pan off, I could see that fuel was seeping out around both of the grommets and running down the front of the tank. I bought two of the grommets and pulled both fuel fittings out to replace them. The return line fitting has two wires, one going into it that goes to a low fuel switch that hangs down into the tank. The other one goes to the fitting itself. The wire to the sensor could be slid in and out of the fitting quite easily, so I knew it would let fuel leak by it, so after I put the new grommet in and pushed the fitting into it, I cleaned it thoroughly and sealed it up with some RTV.
The supply line fitting apparently is supposed to have a short tube with a pickup screen extending into the tank, but it was broken off, so I drained the tank and fished it out. I put on a new piece of tubing and the screen and installed it into the tank. So, I shouldn't have a fuel leakage in the future.
 

Attachments

  • IMG_20201025_111324881.jpg
    IMG_20201025_111324881.jpg
    3.8 MB · Views: 144
  • IMG_20201026_160550429.jpg
    IMG_20201026_160550429.jpg
    4.1 MB · Views: 134
  • IMG_20201026_165248804.jpg
    IMG_20201026_165248804.jpg
    4.3 MB · Views: 152
  • IMG_20201025_155106722.jpg
    IMG_20201025_155106722.jpg
    4.4 MB · Views: 143
  • IMG_20201025_152229026.jpg
    IMG_20201025_152229026.jpg
    4.2 MB · Views: 139
/ Naked 430 #12  
I don't know if RTV is diesel/gas resistant/proof, let me know if it works, my fittings were covered and the fuel still leaked out, change the grommets and cleaned up the fittings and top of tank and it still leaks diesel fuel.
 
/ Naked 430
  • Thread Starter
#13  
Yeah, it's a pretty bad design to put them below the fuel level when the tank is full.
 
/ Naked 430
  • Thread Starter
#14  
So I decided to modify the seat suspension and replace the 3/8" pins with some cold rolled 1/2" bar stock. I enlarged the holes in the base rails and in the seat mount to 1/2" with a step drill, and ran a 1/2" cobalt drill bit through the tube in the links. After I cut the new pins to length and removed the mill scale, they still didn't fit the tubes freely. They measured pretty close to ,500", so I ran a big rat tail file that just happened to be 1/2" in diameter at the largest point through the tubes using a drill I chucked to the small end. That removed the rest of the rust and scale inside the tubes, and now the pins fit properly with just a couple of thousandths of clearance.
I decided to add grease zerks to each tube so they can be lubed, so I drilled and tapped each one 1/4"-28 to take the zerks. Since the tube walls are only about .080" thick, when the zerks are screwed in tight they hit the pins. Hmmmm. So I marked each pin with a Sharpie through the zerk hole, then turned each one down about .050" in that area with my lathe. Now I can assemble the pins to the links and then install the zerks. Problem solved.
I had to trim the length of the two lower pins so they will fit between the mounting rails when the suspension is compressed, but I have everything assembled and it looks like it will work just fine. So, tomorrow I'll weld everything up and it should be nice and solid and function properly.
Now, I have to decide what to do about the seat, keep the old one or install the new comfortable one.

Hmmm, decisions, decisions.
 

Attachments

  • IMG_20201027_174838572.jpg
    IMG_20201027_174838572.jpg
    4.3 MB · Views: 130
  • IMG_20201027_173551585.jpg
    IMG_20201027_173551585.jpg
    3.9 MB · Views: 127
  • IMG_20201027_173540763.jpg
    IMG_20201027_173540763.jpg
    2.7 MB · Views: 125
/ Naked 430 #15  
So before you put the seat pan and seat back on, are you planning a fuel tank leak test following your repair?
 
/ Naked 430
  • Thread Starter
#16  
So before you put the seat pan and seat back on, are you planning a fuel tank leak test following your repair?

I filled it up to the bottom of the filler neck, so the grommets are a couple of inches below the level of the fuel, and I see no leakage so far. You can see that in picture #5 in post #11.
 
/ Naked 430 #17  
I filled it up to the bottom of the filler neck, so the grommets are a couple of inches below the level of the fuel, and I see no leakage so far. You can see that in picture #5 in post #11.

Great! you give me hope as I attempt a 2nd repair of mine in the future!
 
/ Naked 430
  • Thread Starter
#18  
I got the seat pan, side panels and grille back from the powder coater today. They look really good.
On the side panels, I put the foam strips that seal around the sides of the radiator on them, then installed the panels.

I installed the new spring clips I made that go at the bottom of the sides of the grille and snap into the slots in the side panels. Then I pop riveted the clips at the top of the grille that slide over the hood support plate in place, then installed the Diesel and running deer emblems. I also put some UHDP tape on the bottom of the grille where it sets on the front of the frame, so it doesn't wear the paint off of either surface and start it rusting like it did before. The grille slid into place just like it should, and will stay in place since now the retainer clips are on it.

I installed all the warning and info decals on the seat pan, including the non-slip tread pieces where your feet rest. I had forgotten to blast and paint the tail light retainer pieces, so I blasted them and painted them with Eastwood black frame paint. I left them to dry, and will put the tail lights in tomorrow, and have a friend help me set the pan back in place on the tractor.
I'm going to put the original seat back on, but do some measuring to see of the new high back seat I have will fit. It looks like maybe the front of the seat will set too far forward, as it's seat is five or six inches longer than the original JD seat, and I can't move it back due to hitting the rear wall of the cab when it's reinstalled. The rear wall slants in four inches or so to clear the fuel tank filler, but after looking at it, I might be able to cut it out and move it out to be flush with the rest of the back of the cab, and then put in a door to get to the fuel filler. We'll have to see about that.

I have to check with a friend that's painting the hood to see if he's got it done yet, as he's had it for a couple of weeks.

Once I get the tractor all assembled, I'm going to have to do some cleaning, blasting and painting on some of the cab components that are getting pretty rusty.

I'm also going to have to come up with some material to put between the cab mounts and the seat pan so as to not damage the new powder coating. Some strips of a rubber truck mudflap might work, I have a couple of those laying around.

At least it looks like I'll have it ready by the time we get any appreciable snow fall here. Weather looks pretty good for the next couple of weeks.
 

Attachments

  • IMG_20201102_144227517.jpg
    IMG_20201102_144227517.jpg
    5.1 MB · Views: 131
  • IMG_20201102_145448184.jpg
    IMG_20201102_145448184.jpg
    5.4 MB · Views: 126
  • IMG_20201102_145559920.jpg
    IMG_20201102_145559920.jpg
    4.3 MB · Views: 126
  • IMG_20201102_161828866.jpg
    IMG_20201102_161828866.jpg
    4.5 MB · Views: 137
  • IMG_20201102_161841596.jpg
    IMG_20201102_161841596.jpg
    4.4 MB · Views: 127
/ Naked 430
  • Thread Starter
#20  
Thanks, like most mechanical things, it just take time, money and perseverance.

Yeah, when I get it done, I won't want to take it out and get it dirty.
Maybe we'll only have nice dry, fluffy snow this winter.
 

Marketplace Items

Unused 2025 CFG Industrial H15R Mini Excavator (A59228)
Unused 2025 CFG...
Ford F450 Bucket Truck with Altec AT200A Boom (A56435)
Ford F450 Bucket...
Caterpillar 24in Digging Tooth Bucket Excavator Attachment (A59228)
Caterpillar 24in...
2013 Audi A4 Sedan (A55853)
2013 Audi A4 Sedan...
CAT CB34 (A60462)
CAT CB34 (A60462)
2013 Ford F-150 Crew Cab Pickup Truck (A59230)
2013 Ford F-150...
 
Top