Need Advice Ford 1700 Upper Radiator Hose Burst

   / Need Advice Ford 1700 Upper Radiator Hose Burst #41  
I just meant put a plastic bag over the hydraulic fitting to keep everything clean. It sounds like you figured things out. Nice progress.
 
   / Need Advice Ford 1700 Upper Radiator Hose Burst
  • Thread Starter
#42  
I just meant put a plastic bag over the hydraulic fitting to keep everything clean. It sounds like you figured things out. Nice progress.

Thank you Airbiscuit!!
 
   / Need Advice Ford 1700 Upper Radiator Hose Burst
  • Thread Starter
#43  
Update! We're getting closer

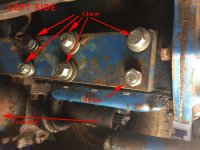
As of tomorrow, Left side will have all six holes bolted! I have what looks like six bolts but the 12mm needs to be replaced with a longer bolt and washers between the bent arm and engine block. I'm using two different bolts only because the silver ones I got from Ace Hardware and the darker bolts I got a Parkrose Hardware. All are rated 10.9. If I did it again, I would've gotten all the bolts at Parkrose because of their selection, but didn't know about the store until a couple of days ago!
LEFT-SIDE-6-bolts.jpg

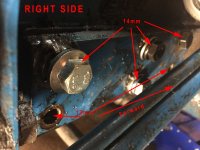
The right side is a little tricky. I've got 4 bolts somewhat lined up, but need to start the tractor and wiggle the hydraulics a little more to get it precise. I loosened the lines as recommended and only lost about a 1/4 cup of fluid.
RIGHT-SIDE-4bolts.jpg


Interesting to find that two holes on the right and one on the left are 12mm. I would've thought they were all the same. Also interesting is that if you look closely, someone did weld the washers and lock washers to the assembly.

I have not added Locktight and won't until I have everything secured and lined up.

Tomorrow I'll get the bolts that I need, install them add Locktight to all fittings. I'll try fitting the hood back on tomorrow also.

Next project - fixing the front drivetrain.

Thanks again!
 
   / Need Advice Ford 1700 Upper Radiator Hose Burst #44  
I'd like to know how it got in that condition, and how it didn't simply collapse. That thing was hanging together by a thread.
 
   / Need Advice Ford 1700 Upper Radiator Hose Burst #45  
Left side looks good. Right side needs more help. Once you got things lined up as good as you can then take one bolt at a time criss cross, tighten but don't torque. Tighten all the rest in the same way and then torque. Like I said, this just did not happen out of the blue, you see tell tale sign of abuse and willful intent. I am still surprised this tractor is not busted in half @ the clutch housing. Hope you can line up the drive shaft without putting it in a bind. if you end up stripping a thread during the torquing then welding would very last resort as much as I hate it.

JC,
 
Last edited:
   / Need Advice Ford 1700 Upper Radiator Hose Burst
  • Thread Starter
#46  
I'd like to know how it got in that condition, and how it didn't simply collapse. That thing was hanging together by a thread.

Hi Air, I covered that in an earlier post and it's a mystery that will probably never be solved. I would love to know the answer!

Thanks!
 
   / Need Advice Ford 1700 Upper Radiator Hose Burst
  • Thread Starter
#47  
Next Steps Complete!

I would say I'm about 70% of the 90% I'm striving for. I'll never have it at 100%!!

Right Side:
I was able to work some of the other bolts in. I have them tight, but not torqued down or with locktight. Right side 5 of 6 are in. They all need to be readdressed. #2 I'll try and get something in there, but very little to work with in the engine block hole. Looks like they may have tried to weld the bolt in.
#3 is a weird situation. The bolt hole on the block is about 1/8th of an inch too forward. I have a 12mm bolt in there and it tightens, but it probably should be a 14mm. #5 is rather difficult to get to, but I need a longer bolt to be able to add lock washer and washer to it.
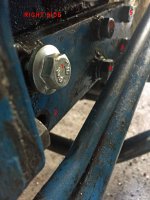
RIGHT-5-BOLTS.jpg


Left Side:
All are fairly snug. #2 is barely hanging on. It's 12mm and not much to thread into.
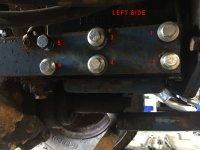
LEFT-6-BOLTS.jpg

Got them all tightened and decided to do a test that would lead to my next thing on today's list - The HOOD!


Loader up! And once back down on the ground all bolts were in place and tight and no slippage of the assembly
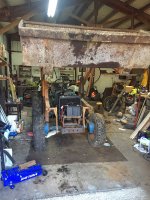
LOADER-UP.jpg

Radiator in right place
RADIATOR.jpg

Hood Attaches Correctly!!
HOOD-ATTACHED.jpgHOOD-IN-RIGHT-SPOT.jpgHOOD-FROM-DRIVER.jpg

I'll make some minor adjustments to the bolts, place locktight and talk to the welder. Other than that, we're looking good!

Except for this!
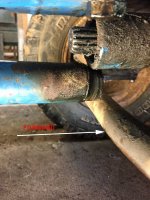
FRONT-DRIVE-TRAIN.jpg

If you all think it's best that I make a separate thread for dealing with this, I'll gladly do it. Looking forward to your feedback!

Thanks!!
 
Last edited:
   / Need Advice Ford 1700 Upper Radiator Hose Burst #48  
Next Steps Complete!

I would say I'm about 70% of the 90% I'm striving for. I'll never have it at 100%!!

Right Side:
I was able to work some of the other bolts in. I have them tight, but not torqued down or with locktight. Right side 5 of 6 are in. They all need to be readdressed. #2 I'll try and get something in there, but very little to work with in the engine block hole. Looks like they may have tried to weld the bolt in.
#3 is a weird situation. The bolt hole on the block is about 1/8th of an inch too forward. I have a 12mm bolt in there and it tightens, but it probably should be a 14mm. #5 is rather difficult to get to, but I need a longer bolt to be able to add lock washer and washer to it.

View attachment 688206

Ok. what I know , the holes on the block and the matching holes on the chassis frame will not move no matter how much stress it is on them. The only likely cause would be shearing off the bolt in that hole position. In a case like that removing the broken/sheared off bolt can be extremely difficult( not impossible). May be then they drilled new holes in the chassis frame and then in the block. They might have tried to tap the new holes. All of this so crazy but don't know how to interpret differently if holes don't line up and chassis frame is not badly mangled up.
On #2 can you widen the hole using dremmel tool and a stone just enough to allow a bolt to match up the hole?

Left Side:
All are fairly snug. #2 is barely hanging on. It's 12mm and not much to thread into.
View attachment 688209
on #2 , do you think part of the old bolt sheared off in the hole? How many turns can you rotate the bolt before it bottoms out? can you use washers on the bolt to make it tight?
Got them all tightened and decided to do a test that would lead to my next thing on today's list - The HOOD!


Loader up! And once back down on the ground all bolts were in place and tight and no slippage of the assembly
View attachment 688212

Radiator in right place
View attachment 688213
They both looks good considering all the work you have done. it is good that you can move the loader up and down without binding and none of the loose bolts are coming off.
Hood Attaches Correctly!!
View attachment 688216View attachment 688215View attachment 688214

I'll make some minor adjustments to the bolts, place locktight and talk to the welder. Other than that, we're looking good!
I agree, Looks a heck of lot better from a where you were thinking just the upper radiator hose not lining up. Like I said the cost of what you have done would have been certainly much more the market value of this tractor. That required a competent shop and their willingness to take on this job. I don't think yo can find many shop to take on this job with any warranty at all. I think you have done well so far.

Except for this!
Let me just research it a bit. I know if you try to line this guy up, you might have to move frame and chassis and then not to be where you are right now. I don't have a FWA, will look at the NH site later today. I have seen a transfer case right on the bottom of the transmission. A drive shaft from there goes to front differential. I think I have seen on some pictures that transfer case is bolted on with 2 bolt to transmission, may be you have to drop the transfer case inset the splinted drive shaft and then raise the transfer case and line up and bolt the transfer case to the transmission. If I were you I would jack the back and front of the tractor and securely raise all four wheels off of the ground. I would then turn the tractor on , engage the FWA lever and put the tractor in 1st gear and low RPM. See if the dive shaft inside of the outer shaft rotates. I really think you need to suck all things up back together and torque/loctite and then try to attempt the FWA. You might end up doing some welding but I try to avoid it and use it as a last resort. You can make a thread for the FWA but if a person did not know the history from only " upper radiator issue" to this then his opinion might not be completely right. Like they say " you don't know what you don't know":unsure: and that makes it difficult for a an accurate opinion.
If you all think it's best that I make a separate thread for dealing with this, I'll gladly do it. Looking forward to your feedback!

Thanks!!
 
Last edited:
   / Need Advice Ford 1700 Upper Radiator Hose Burst #49  
Jutsadude,

Checked with CNH. website. I have two PDFs attached here that show innards of FWA and also transmission with FWA option. Like I said before , I knew there is a transfer case involved. It does take more than 2 bolts to attach it to the bottom side of the transmission. There are sliding coupling to assist mating up the splined shafts, one on front differential and one on input shaft coming from transmission. I still think that not bad idea to see if that shaft rotates with the procedure I explained in previous thread. I hope you do not have previous damage to transder case or sheard off the input shaft. I really think you need to put all back together and torque it all up. Once you are satisfied then tackle the FWA input shaft.

JC,
 

Attachments

  • Ford 1700 FWA-transfer case.pdf
    137.7 KB · Views: 151
  • Ford 1700 FWA- front axle.pdf
    98.3 KB · Views: 148
   / Need Advice Ford 1700 Upper Radiator Hose Burst
  • Thread Starter
#50  
Jutsadude,

Checked with CNH. website. I have two PDFs attached here that show innards of FWA and also transmission with FWA option. Like I said before , I knew there is a transfer case involved. It does take more than 2 bolts to attach it to the bottom side of the transmission. There are sliding coupling to assist mating up the splined shafts, one on front differential and one on input shaft coming from transmission. I still think that not bad idea to see if that shaft rotates with the procedure I explained in previous thread. I hope you do not have previous damage to transder case or sheard off the input shaft. I really think you need to put all back together and torque it all up. Once you are satisfied then tackle the FWA input shaft.

JC,
Agreed with all and THANK YOU! The diagrams answer a question that I have had - What size are the original bolts that hold the assembly to the block. Answer - 12mm x 35mm. I got this from searching the part number and there is was, New Holland Bolt M12 x 35 Part # SBA011511235 - New Holland Rochester

New Holland Bolt M12 x 35 Part # SBA011511235​

So at some point, most of the holes were drilled and threaded for 14mm. Maybe they sheared , maybe it happened before my father-in-law bought the tractor from the original owner, or maybe he did it.

As for the forward drive shaft, here's a photo of the rear portion.
REAR-DRIVE.jpg

I'm hoping the front portion can slide back into place somehow.
 

Tractor & Equipment Auctions

Quick Attach Skid Steer Plate (A51573)
Quick Attach Skid...
Year: 2012 Make: Ford Model: Fusion Vehicle Type: Passenger Car Mileage: 61,276 Plate: Body Type: 4 (A50324)
Year: 2012 Make...
2008 Chevrolet Suburban SUV (A51694)
2008 Chevrolet...
CONTACT INFO LOT NUMBER 6 (A53084)
CONTACT INFO LOT...
(10) Replacement Thumb Cylinders (A51573)
(10) Replacement...
2022 MGT CM11CUFT S/A Towable Concrete Mixer (A51691)
2022 MGT CM11CUFT...
 
Top