Only in Texas, Don and Harv doing

   / Only in Texas, Don and Harv doing
  • Thread Starter
#61  
One of the things I like to do is have a shelf for the sheet metal. This helps prevent water coming through the wall during a heavy storm. It also makes it easier to block off insect access.

This is one of the doorways to a stall. As you can see the shelf ends where the doorway will start. I use the regular bracket for attaching the door jam to the concrete. I just use a powder actuated fastener, here, three powder accuated fasteners.
 

Attachments

  • 878996-DSC02661.JPG
    878996-DSC02661.JPG
    75.9 KB · Views: 480
   / Only in Texas, Don and Harv doing
  • Thread Starter
#62  
Here's what it looks like from inside the doorway.
 

Attachments

  • 878999-DSC02662.JPG
    878999-DSC02662.JPG
    76.9 KB · Views: 403
   / Only in Texas, Don and Harv doing
  • Thread Starter
#63  
This is the way a three way connection looks. Say like when Don's interior wall attaches to the side walls.
 

Attachments

  • 879002-DSC02679.JPG
    879002-DSC02679.JPG
    83.4 KB · Views: 437
   / Only in Texas, Don and Harv doing
  • Thread Starter
#64  
There will be only one door to the tack room. Here's the framing for it.
 

Attachments

  • 879003-DSC02666.JPG
    879003-DSC02666.JPG
    80.7 KB · Views: 359
   / Only in Texas, Don and Harv doing
  • Thread Starter
#65  
I don't like chop saws. I don't like the sparks nor I do I appreciate the noise. But on a job like this it's the best tool for cutting the framing quickly and easily.

Those rollers are tek screwed to the purlin to hold them in place.

It's a pretty good system.
 

Attachments

  • 879006-DSC02667.JPG
    879006-DSC02667.JPG
    93.5 KB · Views: 428
   / Only in Texas, Don and Harv doing
  • Thread Starter
#66  
I hope these pictures help Don as he tries to vizualize what's coming.

Tomorrow if the weather cooperates I'll start building the trusses in place.

This morning they got a ton of rain. Every step that wasn't on the slab was excerise, mostly of patience. I'd like to have a nickel for everytime today I said, "if my ship comes in there won't be a blackland port!"

Then this evening when I put all the tools in the wheelbarrow and headed for the other barn the clay got even for the cussing. About halfway there the wheel plugged up with mud.

/forums/images/graemlins/blush.gif /forums/images/graemlins/tongue.gif
 
   / Only in Texas, Don and Harv doing #67  
</font><font color="blue" class="small">( This morning they got a ton of rain )</font>

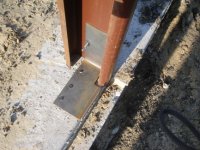
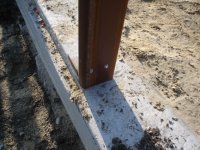
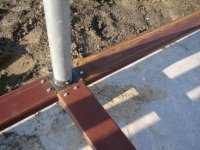
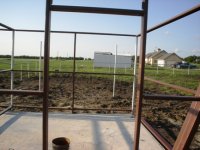
I got an inch and three-quarters, the yard already needed mowing, and we may get more rain tonight. And Harv, you'd love the fence job I've been working on lately; just in the evenings when the neighbor behind me gets home from work. The old 6' wood fence around his backyard (one side being across the back of my back yard) is supposedly 15 years old and we're in the process of replacing it. He went and bought those 8' ready made cedar panels from Lowe's, which isn't the way I would have done it, but I guess it'll be OK. Now this wood fence has the two and three-eighths OD steel posts, set in concrete, nice and straight for both height and line and all in good shape. The spacing, though, is another matter. Some actually are 96", some as little as 91", and at least one almost 10'. /forums/images/graemlins/crazy.gif I can't imagine what the original fence builder was thinking when he built it. But instead of moving any posts, or splicing the wood (as he did), we've just put in a couple more posts.

Now, instead of letting it weather and turn gray, as they usually do, he wants to spray it with Thompson's Water Seal in the Honey Gold color or something to keep the original "new" look, and I'm amenable to that. The problem is deciding which one to use. They have the Waterproofer Plus Clear Wood Protector, the Waterproofer Plus Tinted Wood Protector, the Advanced Natural Wood Protector, and the Advanced Tinted Wood Protector. The "Advanced" is considerably more expensive and supposed to last longer, but I don't know enough about Thompson's to know whether the Advanced is worth the extra cost.
 
   / Only in Texas, Don and Harv doing #68  
Harvey, when using the powder nailer on the door brackets did you drill holes in the bracket or shoot through the bracket? Also what loads and lengh of nails did you use?

Thanks
James
 
   / Only in Texas, Don and Harv doing #69  
</font><font color="blue" class="small">( After the posts are set I go in and shoot a baseline. The only thing about this baseline I care about is it's on a level line across all the posts.

I can then decide where I want grade to be, where my height will end up and have a place to measure from for all my horizontal rails. )</font>

Harvey,

That makes perfect sense and it's what I do also. Once you have a line that is exactly level on every post, you can go up or down that line the exact same distance on each post and every one will be the same.

What I'm more concerned about is where the tops should be cut at and doing so before the floor is poured and the roof line is determined.

Don doesn't even have a level pad yet. It will be allot more work for him to cut the tops all off, then build up his pad, pour his concrete and get it done to the exact height after the tops of his posts are cut.

If it was me, go ahead and use the lazor and get a base line. Make it about waist to chest high so it's easy to see. Like you said, the placement isn't important of this line, just that it's exact for each post and that you can find it easily. At the bottom it might get covered and up high it means raising your armes to measure it every time.

Next he needs to get his pad in to pour concrete and find out were that's gonna be.

After it's done, he can measure for the height of his walls. I don't remember if he said what that is going to be or what type of siding is he using. Don???

If he's using 4x8 sheets than it makes sense to have the top of the walls at 8 feet. If it's metal siding, than he can get it cut to any length and it's not an issue.

I like the ease and simplicity of your building technique, but think Don made a mistake on not getting his pad level first. Now with the poles in the ground, he has to do this without disturbing them, which is just more effort on his part.

Eddie
 
   / Only in Texas, Don and Harv doing
  • Thread Starter
#70  
I used a single shot Remington. I don't use them enough to need a fancy one like a Hilti or Ramset.

I used the green load and one inch concrete or steel nails.

I pre-drilled the plates. I tried it without pre-drilling and I'd have needed a stronger load to get a good seat. I didn't feel like walking back to the truck. /forums/images/graemlins/blush.gif

One of the more interesting experiences I've had with the powder actuated anchors involved trying to attach eighth of an inch thick aluminum sheeting to a half inch thick steel lintel. I couldn't get a good anchor in until I pre-drilled the aluminum. Then I got perfect penetration into the steel.

I guess the soft aluminum absorbed enough of the energy from the charge that it sabotaged the penetration of the steel.

Sometimes powder actuated fastening is the best way to go, only way to go. Attaching aluminum to steel where drilling and conventional fasteners aren't applicable is one classic example. Even though a lot of people only think about using powder actuated fasteners when it comes to attaching wood or metal to concrete.
 

Tractor & Equipment Auctions

2015 FREIGHTLINER CASCADIA DAY CAB (A51219)
2015 FREIGHTLINER...
2005 MACK GRANITE GU713 DAY CAB (A51222)
2005 MACK GRANITE...
JOHN DEERE 524L LOADER (A51242)
JOHN DEERE 524L...
Unused Delta Crash Attenuators (A49461)
Unused Delta Crash...
2004 INTERNATIONAL 4300 BOX TRUCK (A51222)
2004 INTERNATIONAL...
2012 John Deere 7280R MFWD Tractor (A52128)
2012 John Deere...
 
Top