Photos of Third Function Valve Project

   / Photos of Third Function Valve Project #1  

Gordon Gould

Super Member
Joined
Apr 1, 2007
Messages
6,719
Location
NorthEastern, VT
Tractor
Kubota L3010DT, Kubota M5640SUD, Dresser TD7G Dozer
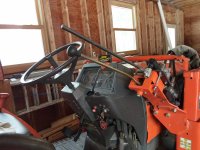
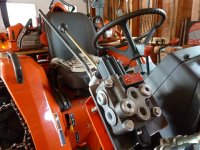
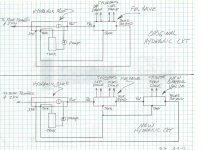
I wanted to install a new valve to control my grapple and get it off of the rear remotes so I can use them for TNT. I wanted the valve control to be near my FEL lever. Last Nov teg posted a very nice discription of a similar project he did. I stole alot of his ideas. THANKS teg. This is a link to his post

http://www.tractorbynet.com/forums/...7948-instructions-add-extra-spools-l2800.html

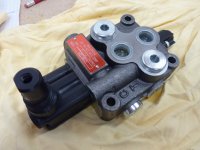
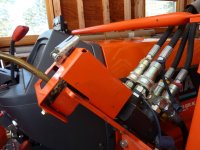
I started by buying a single spool DA 8 gpm Prince valve fropm Surplus Center.
Prince # MB11B5C1 DA.
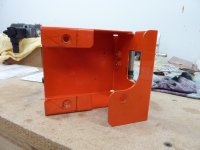
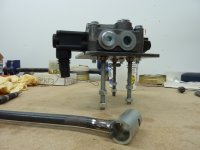
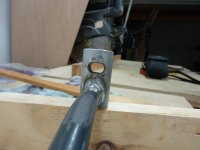
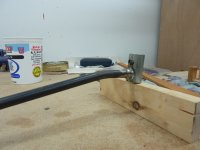
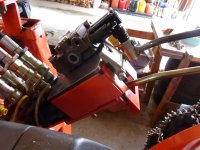
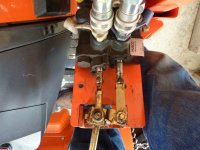
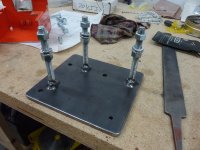
I built a mounting plate for the valve from a piece of 5 1/2" X 6" 1/4" plate.
I drilled and tapped 3 holes for 3 3/8" mounting studs. Jam nutted and welded them.
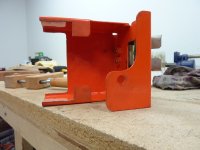
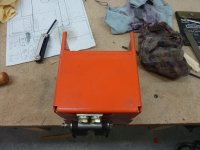
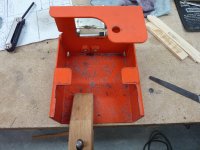
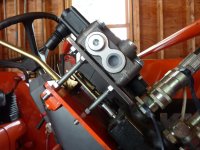
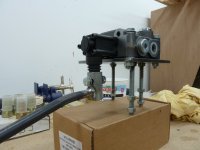
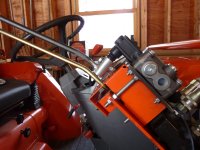
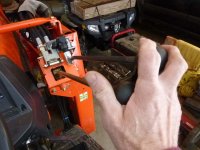
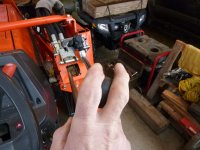
Drilled 3 5/16" holes to mount the valve, and one hole in the corner for a heavy sheet metal screw to attach to the orange cover. I am going to mount the valve and plate on the FEL linkage cover. Photos: Linkage Cover, Cover Removed, Base Plate.
 

Attachments

  • Cover_On.JPG
    Cover_On.JPG
    460.2 KB · Views: 1,216
  • Cover_Removed.JPG
    Cover_Removed.JPG
    455.9 KB · Views: 1,070
  • BasePlate.JPG
    BasePlate.JPG
    424.6 KB · Views: 959
Last edited:
   / Photos of Third Function Valve Project
  • Thread Starter
#2  
I wanted to be able to remove the linkage cover when I was done in case I had to get in there. So I cut off the two rear mounting tabs and cut a chunk out of the top. I used the two rear cover mounting screw holes in the FEL bracket for 2 of the the 3/8" studs. The bottom cover screw is still used from under neath.
Photos: Cover Cuts.
 

Attachments

  • Cover_Cut_5.JPG
    Cover_Cut_5.JPG
    344.3 KB · Views: 414
  • Cover_Cut_3.JPG
    Cover_Cut_3.JPG
    427.8 KB · Views: 378
  • Cover_Cut_2.JPG
    Cover_Cut_2.JPG
    458.1 KB · Views: 394
  • Cover_Cut_4.JPG
    Cover_Cut_4.JPG
    350.2 KB · Views: 416
Last edited:
   / Photos of Third Function Valve Project
  • Thread Starter
#3  
I turned the handle housing on the valve around 180 degrees so that it was pointing downward. Mounted the valve on the base then put the assembly on the tractor. Two of the studs go into the rear cover holes, the third goes into a hole I drilled in the outside corner of the FEL bracket. Photos: Valve, Housing 180, Valve & Plate, On Tractor
 

Attachments

  • Valve.JPG
    Valve.JPG
    398.7 KB · Views: 525
  • ValveHandleHousing180.JPG
    ValveHandleHousing180.JPG
    427.9 KB · Views: 442
  • ValveOnBase.JPG
    ValveOnBase.JPG
    438.4 KB · Views: 517
  • ValveOnTractor.JPG
    ValveOnTractor.JPG
    411.2 KB · Views: 757
Last edited:
   / Photos of Third Function Valve Project
  • Thread Starter
#4  
I made a lever arm from a 3/4" X 1" bushing and a 18" length of 1/2" rod. I put an oblong hole in the bushing to allow side motion to the lever. This way it can move left and right to follow the FEL lever when I curl and dump. I bent the rod to match the angle of the FEL lever arm.
 

Attachments

  • LeverArm_3.JPG
    LeverArm_3.JPG
    338.5 KB · Views: 655
  • LeverArm_2.JPG
    LeverArm_2.JPG
    320.5 KB · Views: 455
  • LeverArm_1.JPG
    LeverArm_1.JPG
    461.3 KB · Views: 417
Last edited:
   / Photos of Third Function Valve Project
  • Thread Starter
#5  
I put the whole thing together on the tractor. One note: In order to slide the orange cover under the valve mounting plate you have to remove the valve handle housing ( 4 cap screws ). Next I need to cut off the lever arm when I receive the knob I have on order from Missicks. Then I need to take it all apart for painting and reassemble using locking hardware. Then I get to do the plumbing and figure out the mystical maze of hydraulic couplings. That empty hole in the corner will have a 1/4" sheet metal screw down into the cover. Here is what it looks like so far.
 

Attachments

  • PrePaint_1.JPG
    PrePaint_1.JPG
    443.3 KB · Views: 654
  • PrePaint_2.JPG
    PrePaint_2.JPG
    432.1 KB · Views: 574
  • PrePaint_3.JPG
    PrePaint_3.JPG
    394.3 KB · Views: 528
  • PrePaint_4.JPG
    PrePaint_4.JPG
    387.8 KB · Views: 808
Last edited:
   / Photos of Third Function Valve Project
  • Thread Starter
#6  
Here is my hydraulics diagram. I am going to steal what I can from teg's parts list that he was nice enough to give us. It will be a while before I am done. I would like nice weather for the plumbing.
 

Attachments

  • HydraulicCkt.jpg
    HydraulicCkt.jpg
    200.1 KB · Views: 818
Last edited:
   / Photos of Third Function Valve Project #7  
Cool!!! One thing I wish I did before connecting everything is PAINT the valve... I need to update my post, just have to find some time.

Another thing I did was SHORTEN my kubota loader handle (vs. you making the new one longer) I always like getting on and off the tractor either side, this made it easier.
 
   / Photos of Third Function Valve Project #8  
How do you like the 'Wolverine' series valves?
I have several of them.
 

Attachments

  • valve.JPG
    valve.JPG
    84.4 KB · Views: 778
   / Photos of Third Function Valve Project #9  
Nice job...But why post it here rather than in the Hydraulics forum? You should ask a Moderator to move it.
 
   / Photos of Third Function Valve Project
  • Thread Starter
#10  
Nice job...But why post it here rather than in the Hydraulics forum? You should ask a Moderator to move it.

Thanks.
That makes sense but I have no clue how to contact a moderator :confused:
The info must be here somewhere but I haven't found it yet.
gg
 
   / Photos of Third Function Valve Project #11  
Thanks.
That makes sense but I have no clue how to contact a moderator :confused:
The info must be here somewhere but I haven't found it yet.
gg
Click the red triangle that is under your username...
 
   / Photos of Third Function Valve Project #12  
I don't know... it is both hydraulics and you are building it yourself. We can move it for you if you like, or leave it here. Just let us know by pushing the little report post button again and dropping us another note. Your choice. ;)

Nice job, by the way. :thumbsup:
 
   / Photos of Third Function Valve Project #13  
There you go. :thumbsup:

I moved it to hydraulics per your request and left a redirect in the original forum that will expire in a month. That way anyone that was following the thread will be able to find it for the next 30 days. ;)
 
   / Photos of Third Function Valve Project #14  
Teg, I have a question regarding your well detailed valve install. Could your 3 spool install be reconfigured with a elec/hyd valve for grapple? I would love to match your design.Just change to, TnT for the back and switch on joystick for front??? maybe a layout of (lever-elec- lever) stack on top of housing like yours

Neal
 
   / Photos of Third Function Valve Project #15  
Teg, I have a question regarding your well detailed valve install. Could your 3 spool install be reconfigured with a elec/hyd valve for grapple?...
Neal, yes (if I understand correctly) you can. The only reason I did not use the elec./hyd valve was cost for just one valve... I don't have a problem using the grapple as it is setup now. ...and I can't see a need for the elec./hyd switch (i.e. what does it do better???)

I would not buy the Needle Valve, while the are nice, I can feather the valve easy enough.

Trim the apple trees, cleanup was quick and easy. My "birds nest"... you can see I cut 8.25" off my FEL joystick... makes it extremely responsive (I'm still trying to figure out if that's a good thing or not...)
 
   / Photos of Third Function Valve Project #16  
Thanks Teg. I will rethink the elec/hyd. I guess its bells and whistles when it comes down to it. After all, how many times do you actually open and close the grapple while moving curl/raise all at once? Could you give more info on what and where on the grapple purchase??? Also $. Thanks
Sorry for stealing the thread. BTW, thank you Gordon for your nice write up on your project. Very helpful for me as I have the same set up (orange metal cover) you do.

Neal
 
   / Photos of Third Function Valve Project #17  
Teg, forgot to ask; is the set up under your step with the filter factory? I would like to put a filter on mine as it only has the strainer. Also is that block where you get power beyond or at valve? I have PB from loader valve to BH now. Sorry, didnt go back through all your photos.
 
   / Photos of Third Function Valve Project #18  
...After all, how many times do you actually open and close the grapple while moving curl/raise all at once?

Could you give more info on what and where on the grapple purchase???
I'm not in a rush to get things done so doing one thing at a time isn't a problem. I take small bites and make a larger pile than take a bite into the large pile... usually getting most of it.

I bought the grapple used from TBN member Westbrooklawn for $350 - I always liked the style of the WR Long grapple vs. the Thumb (or the like). It comes with the reinforced top bar that bolts to the sides of the bucket.

I didn't make any changes under the step area, it's factory. Power Beyond is part of the valve, in both the FEL and my added spools.

Now back to Gordon Gould's thread :D ;)
 
   / Photos of Third Function Valve Project
  • Thread Starter
#19  
teg I like your cut off FEL lever. Puts everything close.
I like the idea of a fully hydraulic control to give you a better "feel" and feathering ability. In real life I don't know how important that actually is, but I like it. Also the fully hydraulic control was simpler and cheaper for me to install.
I finished my lever arm. The grapple control is always within reach now. It moves left to right with my FEL lever as I dump and curl. It is much better than where it was down by my rear end on the rear remote control.
 

Attachments

  • P1030208(1).JPG
    P1030208(1).JPG
    157.3 KB · Views: 409
  • P1030211(1).JPG
    P1030211(1).JPG
    127.8 KB · Views: 393
  • P1030214(1).JPG
    P1030214(1).JPG
    121.8 KB · Views: 334
   / Photos of Third Function Valve Project
  • Thread Starter
#20  
We had some lousy weather so I sat down and figured out what I needed for hydraulic fittings. I used #8 (1/2") fittings and QDs with 3/8" hose to be consistant with the original equipment. I ordered them from DiscountHydraulicHose.com.

It looks like my total cost for the Third Function Valve installation will be just under $250. Here is how it breaks down.


Parts S/H
------ ------
Single Spool Valve Surplus Center $89.95 $12.98

5 1/2" X 6" X 1/4" Plate Walbridge Welding $5.00
Includes welding nuts

18" length 1/2" rod Walbridge Welding $6.00
Includes welding bushing

Knob for lever arm Messicks $15.37 $13.61

Fittings Discount Hydraulic Hose $55.77 $16.09

3 short 3/8" hoses w/ jic 8F NAPA $30.00 (est.)
--------- ---------
$202.09 $42.68


I hope someone finds some of this info useful.

gg
 

Attachments

  • FittingDiagram.jpg
    FittingDiagram.jpg
    216.7 KB · Views: 404
  • FittingOrder.jpg
    FittingOrder.jpg
    76.3 KB · Views: 316

Tractor & Equipment Auctions

(APPROX. 25) 4' X 8' X 3/4" OSB SHEETS (A52706)
(APPROX. 25) 4' X...
2020 PETERBILT 567 (A58214)
2020 PETERBILT 567...
Freighliner Tender Truck (A56438)
Freighliner Tender...
2019 CHEVROLET SILVERADO 1500 CREW CAB TRUCK (A59823)
2019 CHEVROLET...
10222 (A56858)
10222 (A56858)
2004 CATERPILLAR 320C L EXCAVATOR (A60429)
2004 CATERPILLAR...
 
Top