Question on JCB swing cylinders

   / Question on JCB swing cylinders #21  
Oops, just re-read your last - you're right, leaving the cylinder BODIES in place and pulling the guts MIGHT be easier - it kinda depends on how hard those glands (end caps) are to get out. If THAT part is doable, I certainly would NOT take the entire assembly (cylinders, lower plate, etc) apart. Not only would it be a major PITA, putting it all BACK could be even more fun (got a couple EXTRA arms to hold everything lined up while you wrestle 300 pounds of parts back in line with 4 studs and 4 trunnion sockets??!?)

Good to know what your options are though, not to mention the fact that learning new stuff is almost always good... Steve
 
   / Question on JCB swing cylinders #22  
Until getting the proper gland wrench I've taken them apart with a pipe wrench, or 2 punches in the holes and a bar to turn with very awkward but yours looks like it has a nut on it I've seen where shops have taken them off with a hammer and cold chisel but I wouldn't recommend it. One seal requires patience you have to turn it like a butter fly to get it on. As far as the backing seals for the O rings go I never replace them ( and have never had a leak) . Once the piston is off you can slip the rod out and replace the seal and wiper on the gland end. For reassembly you have to disconnect the hydraulic hose on the back end of the gland grease or oil everything up take your time and it will go back in without a lot of effort. Once together you hook it up and can use the hydraulics to center the I for getting the pin back in or just leave the hose of and use a lining bar . Best of luck and have fun.
 
   / Question on JCB swing cylinders
  • Thread Starter
#23  
The floor jack is mine. Don't have a transmission jack. Called the local hydro shop....she said if I pulled the guts and brought them in, they'd do it for me and hand the guts back.

Now, all I need to do is figure out how to get them out. I don't see myself paying $800 for that fancy wrench. I could probably call the dealer and have them come to my home, remove them.....and come back after they've been fixed to replace them for that much cash!
 
   / Question on JCB swing cylinders
  • Thread Starter
#24  
I like all the encouragement on having fun.

Why do I fear when the channel changes over to watching me actually in process of doing this, I'll be making every sailor around blush with my language?

Everyone agree that a huge pipe wrench might be my best bet? (that and perhaps a cheater bar slipped onto its end)

If it doesn't rain, I'll try to pressure wash the parts this weekend to at least get that part out of the way. (supposed to rain tonight and for a day or so)
 
   / Question on JCB swing cylinders #25  
The two cylinders and bottom plate probably weigh around 80 to 90 pounds, I don't see a problem for the weight that your worried about.
Usually on JCB's, there is an allen key screw in there somewhere, so keep an eye out for this if you tackle it yourself.
If your that worried about the weight or braking a finger nail, :p call in a mechanic.;)
 
   / Question on JCB swing cylinders #26  
So you can't pull the plate separately? Floor jack will be fine with some guidance.

I'd pull the pins on the boom, disconnect the hydraulic hoses (label and diagram to make it easier) and drop the whole show. Then separate each cylinder from the plate and send them to a hydraulic shop to be rebuilt.

If removing the cylinders are a task for you (as the would be for any home mechanic) then rebuilding them will be much more difficult. We rebuilt the dump cylinders on our CAT IT12 and without some expert help, would have never got them right. Special wrenches, heating seals with boiling water, timing, placement and brute force were all needed. I supplied the brute force and willingness to learn.
 
   / Question on JCB swing cylinders
  • Thread Starter
#27  
I'll be doing this fix "in the field". Meaning, my driveway is gravel. I don't want the oil (which is sure to be spilled to some degree) in the driveway. Coming off the driveway is a dirt area (on a mild slope) where I park the machine.

I anticipate doing the work in this dirt area. Regardless of where I do anythying, I just see issues with whatever I do. It looks like if I remove the cylinders, they both come down at once. That strikes me as the easy part.

Getting them balanced and somewhat level so they can be lifted back up, while I'm using a 2 1/2 ton floor jack in the dirt, on a slope (in between tread marks in the dirt, making the dirt itself uneven).... I just see putting it back together as a real PITA. So, if I can simply pull the guts out, although that might also be a PITA, it might be less of one.

I'm thinking if I can pull the guts out, it will be an interesting experience. Perhaps one I later on, never want to repeat!!

Just yesterday, I bought a huge pipe wrench to see if it will work. If not, I've talked to a machine shop who will make a 3/4" thick wrench to fit the gland nuts for something like $175. I figure one of those two & a breaker bar should keep me in the fight towards success.

to clarify one of your second points... I don't personally plan to rebuild the ram (or whatever the guts are called)

Although I'm 100% confident in my abilities.... I'd rather just drop it off to someone who does that for a living and let them do it so I know it's done right from the git-go. (I'd prefer to take them the whole cylinder to be honest)
 
   / Question on JCB swing cylinders #28  
Some thoughts, mostly based on experience -

"a dirt area (on a mild slope)" - when you're dealing with heavy and/or awkward things on dirt, there's no such thing as a "mild" slope :confused: - BTDT - I would find/get a piece of scrap plywood at least 3/4" thick and a few 2x4's and make a LEVEL "runway" for your floor jack if at all possible.

"they both come down at once." - True - sometimes gravity CAN be useful :laughing:

" I just see putting it back together as a real PITA. " - Maybe, but if the trunnions/sockets on your cylinders are like mine, it might be easier than you think. It's possible that the sockets on that bottom plate are deep enough to keep both cyl's fairly well aligned while you jack the plate/cyl's back up into position, with just some minor guiding to line up bolt holes and upper trunnion sockets.

"I'd rather just drop it off to someone who does that for a living" - If you're going that route, I would DEFINITELY recommend dropping the whole shebang, taking the ENTIRE cylinders in, and having them REASSEMBLE for you. I can tell you firsthand, that even with the necessity of a come-along and a good external anchor point, those "guts" will come OUT much easier than they will go back IN :confused: - It's not a lot different than trying to install new pistons and rings in a newly bored out engine WITHOUT a real ring compresser and some experience...

Also - looking at your earlier pic, it appears that if the cyl's were resting on the plate with their LOWER trunnions sitting in the lower sockets, then the 4 studs that bottom plate attaches with, look to be long enough to start them into the holes in the plate BEFORE the upper trunnions would need to line up with their (upper) sockets -

If so, I would take the (rebuilt) cylinders (separately) and BALANCE them (by pushing the rod in a little bit at a time) til they will balance ON THEIR OWN on their lower trunnion - that way, you should be able to set them in their respective sockets (on the lower plate) - then, pick up that plate/cyl's and balance the ENTIRE thing on your floor jack (better if the jack can be raised just enough so it doesn't tilt the "load" by interfering with the jack's frame) - By balancing each cylinder FIRST, you will probably generate less "blue air" putting things back together since you'll have fewer things fighting you...

Next, (assuming you are working on your LEVEL scrap plywood) you should be able to roll the whole thing under the hoe and start lining up studs to holes - once it's raised just high enough to start into the stud holes, you can hopefully align the upper trunnions with their respective sockets - I've been known to hold two things in place while laying on my side and using my FEET to operate the floor jack, sounds like that might work for you unless you can conscript a HELPER :D

If you measure everything before you start, you may find that it's necessary to raise the hoe on the stabilizers and block it in place SOLIDLY - otherwise you may not have enough vertical room to manipulate the jack, plate, and cylinders without hitting the studs - (another comment from "blue air country" :D )

That's about all I have - hopefully a couple of these points will help the job go smoother for you - Oh, and you also might be able to get your money back on that pipe wrench :thumbsup: ...Steve
 
   / Question on JCB swing cylinders
  • Thread Starter
#29  
Finally able to speak with a JCB service guy today. He said they use a transmission type jack to raise/lower the cylinders. Said to be careful about the hoses...blah blah blah.... (get it)

He went on to say that the entire assembly would come down. I would not be able to loosen the bolts and slide the cylinders out of their mounts. Went on to say that in his opinion, the most simple way to do this without a proper shop setup would be to indeed, pull the guts out of the cylinders and leave the cylinders mounted.

He started giving me some tips on the actual rebuild.... I said no need. I didn't really want to do that part. I'll just get them to a shop. He gave a last tip about (what I think he called a key) under the first or second gasket on the piston. I think this key or pin is to keep the end nut locked (but am unsure until I see it)

I wouldn't have thought to look under a seal for something to release the end nut.

He said I might....or might not need a breaker bar on the wrench I have (24" pipe wrench). He felt the pipe wrench itself would be up to the job.

I went by a pawn shop yesterday looking. Found an old made in USA 24" for $20 out the door. Something handy to have around the house once in a blue moon so even if it doesn't work, I didn't really lose anything.
 
   / Question on JCB swing cylinders #30  
Can't tell a lot til I see it minus the crud, but it still looks to me like the lower plate comes off, probably with the cylinders but NOT including the upper trunnion sockets - so I'm not sure what he meant by the "whole thing" -

Problem with pulling the guts and just taking those in, is in putting them back. The piston with NEW seals is gonna be larger in diameter, the threads at the opening of the cylinder itself will have a tendency to either abrade the new seals or try to roll them out of the piston, and you're NOT gonna push the rod in by hand unless you're the Hulk's big brother -

I did that on my Case (rebuilt in place), ended up wrapping the newly ringed piston with .005" shim stock (wrapped slightly conical, with smaller end toward the hole) in order to get it past the threads - You definitely want the new piston/rings wetted with hydraulic oil - I then pulled the shim stock out as soon as all the rings were started into the actual bore - then with not too much effort (4 lb. dead blow hammer) I got the piston in far enough to START the threaded end cap (gland nut) - Screwing the gland nut back in will move the rod a bit further.

After doing this with BOTH cylinders I ran some tygon tubing down to the rear ports and refilled both back sides of the cyl's, then replaced all hyd. lines, tightened everything, started the engine and hit the swing pedals back and forth til most of the air was out (maybe 20-25 times)

All that with the rod pins NOT in place - you do NOT want to mess around with disposable body parts near hydraulics with air in the lines, they're too unpredictable since air compresses (so cylinders move unexpectedly) and (mostly) oil does NOT compress.

Once I had things bled, I stuck a large pin thru each cylinder rod in turn, and while SLOWLY actuating the cylinder I rotated the end til the pin in the hole was vertical, then moved the swing control til the pin holes lined up and replaced those pins and retaining rings.

I can't help you on the mysterious cap locking system, maybe if you could find an exploded view? Case (mine, anyway) just drills a small hole centered on the crack between gland and cylinder body, and drives a 6-32 screw in there.

Note - it actually sounds to me like the JCB guy was talking about the piston end of the rod - maybe a square key in a broached slot in piston and rod. I would think that would prevent the 400+ foot pound piston nut from wanting to loosen as easily.

If you can, post pix after it's clean, might shed some light on something new... Steve
 
   / Question on JCB swing cylinders #31  
Oh, and if you're gonna do very much work on that hoe, one of the best things you can do for yourself is get one of these

Air Impact Hammer Kit

And, if necessary, a compressor to run it - I took the LEAST useful chisel with mine, used a thin cutoff disk on a side grinder, and cut the end off square - (or you can buy mushroom head bits too) - almost all the pins on my hoe are 1.5 to 2 inch diameter - I take off the snap ring, hold that air chisel up to the end of the pin and pull the trigger til it falls out. (watch for zerks in the end tho, might need to work around that.)

They're also great for rattling some of the rust out of big bolts, etc, so they'll turn again... Steve
 
   / Question on JCB swing cylinders
  • Thread Starter
#32  
Yep, got one of those when I bought my (first) compressor. I'm on my second compressor now and bought an oiled verses oil-less.

Aside from that.... I found a service manual. Big help. I think this answers most of the questions regarding the trunnions! (had I only seen this earlier)
 

Attachments

  • Cylinder.jpg
    Cylinder.jpg
    145.1 KB · Views: 153
   / Question on JCB swing cylinders
  • Thread Starter
#33  
I found this. Looks like you take it to the mark with the engine cold.

Interesting thing for me is, my dipstick isn't a traditional dipstick.... it's more like a coiled spring (think of a sink snake) Hard to describe. I have never ever seen a mark on the stick to get a reference point.
 

Attachments

  • Transmission.jpg
    Transmission.jpg
    187.9 KB · Views: 141
   / Question on JCB swing cylinders #34  
Looks like your piston threads onto the rod and is held from coming off by a snap ring - has a spring plunger "shock absorber for end of travel. Also, it appears your gland is two piece, should make it easier to get those inner seals in place.

Didja find any directions yet about dropping those cylinders? I'm curious what your JCB guy was talking about "dropping the whole thing" - still looks to me like the upper trunnion plate is part of a REALLY heavy piece, that comment still makes no sense to me.

Sooo, now does my suggestion about balancing the cylinders before you set them into their sockets on the lower plate make more sense? Although if those trunnions really are that deep, it might not matter as much -

I was hoping you already had a compressor, good deal - I have one of the airless ones for portability, my genny will run it anywhere - but it's too loud to use if you don't have to, about 5 years ago I replaced my 2 horse 20 gallon with an industrial 5 horse (real horsepower) 80 gallon 175 psi unit - wife and I agree that if EITHER one of us AND the compressor dies on the same day, there's no question which one'll get planted and which one'll get replaced :D

Dunno what to tell you on the dipstick, never saw a roto-rooter version. Have fun with the manual, it's usually good to be fore-warned... Steve
 
   / Question on JCB swing cylinders #35  
He gave a last tip about (what I think he called a key) under the first or second gasket on the piston. I think this key or pin is to keep the end nut locked (but am unsure until I see it)
Yes, I told you about this "allen key" in post #25, but if your sending out the cylinders for rebuild, you won't need to worry about it, but inform "the shop" about it if its not a JCB shop, just in case.
A one foot piece of plywood on top of your jack should help to lower that plate for balance.
 
   / Question on JCB swing cylinders
  • Thread Starter
#36  
Just had a light-bulb go off:

What if I detach the hoses. Leave the ram ends pinned to the hoe. Maybe set a vertical support on the opposite end of the ram. Remove the bottom plate, leaving the cylinders 'hanging' in mid air with their main attachment point being the attachment to the hoe itself (with again, maybe another support on the opposite side.

This will allow the plate to be removed without everything crashing down on my head.

Pull one cylinder out at a time.

When reinstalling, take one cylinder at a time, pin it to the backhoe (leaving the body of it 'hanging' in the air again)

Main issue with this is how to then align the cylinders forward/backward so they'll align with the bottom plate at the same time.

This might be the easiest way to deal with this (other than the alignment at the end of the process)

One reason I'm cautious about dropping these at once is health. About 15 months ago, I weighed 185 pounds. About six months ago, I weighed 128 pounds. Today, I'm back to 150 but still don't have all my strength back. (gotta love doctors when they see you as a walking dead and bring you back to life!! Go Vanderbilt Medical Center!)

I'm thinking that I'm most comfortable with this idea.

I kind of hate that this thread has carried on and on......but at the same time, I greatly appreciate the different input and thoughts.
 
   / Question on JCB swing cylinders #37  
Richard, if it gets you going without anything going wrong, then everybody wins - no problem :thumbsup:

Skyhook, good call on the piece of plywood - most jacks these days have such wimpy little platforms - I have an old Walker 1-1/2 ton that's spoiled me for most of the newer stuff - platform is just over 7" square, I used to balance VW engines on it while R&R them, never dropped one :thumbsup:

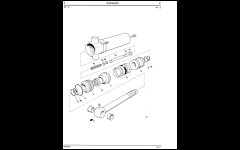
I bet I've looked at that exploded view at least 20 times, never did see any little un-numbered blobs anywhere - sure would have been nice if that allen screw were documented anywhere but the grapevine :rolleyes:

Richard, sorry to hear about your health problems - guess I'm blessed, I'll be 70 this month and so far the only major hiccup has been major rotator cuff repair/complete biceps re-attachment (plus 3 little pins for anchor points - took me out of most of the fun activites for a year, but now it's good as new :thumbsup:

The problem(s) I foresee with your new removal plan -

(1)it doesn't look like you would have enough "slop" in the rod end pins to allow the cylinder body to drop down far enough to clear the upper trunnion joints - plus, unless you can drop both ends evenly, something would likely bind up -

(2) On mine, the boom needs to be centered in order to allow both rod ends to swing away from the boom far enough to clear -

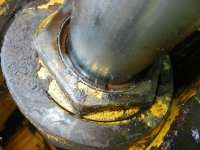
(3) usually those pins are hard enough to get out WITHOUT having a bind on them -

(4) I had my full strengh when I did mine, and it was still really hard to move rods in and out without hoses hooked back up and pump running.

You did get me thinking about options though - you might be able to get away with your method if there is something directly above the REAR of each cylinder -
(0) - Boom centered, bucket on the ground
1 - ratchet strap around rear of each cylinder individually, holding that end UP, hoses off.
2 - Drop the lower plate (only)
3 - Floor jack centered under one trunnion - this may work better if you take a piece of scrap wood as thick as the depth of the trunnion, hole saw the center to slip fit the trunnion, trim the board to "snuggle" down into the jack platform - this should improve control while removing
4 - Support the cylinder on its lower trunnion, with jack and "snuggle board" -
5 - NOW, remove the pin from the rod end, swing rod end clear of swing tower and drop that cylinder straight down (gently)
6 - Repeat for the other side.

Re-installing - Ask your rebuilder to COLLAPSE both cylinders so the rod ends don't stick out enough to interfere with the swing tower - looks like there may not be enough room to "splay" the cylinder bodies enough to clear the swing tower on both sides - then...

1 - using your "snuggle jack", raise each cylinder up into its upper trunnion socket and leave maybe 1/8" of play or less (not too tight to swing the cylinder)

2 - Again, support the rear of the cylinder with a ratchet strap so the lower trunnion is clear, and lower the jack

3 - Repeat for the other side

4 - Now, with just some minor wiggling, you should be able to jack up the lower plate and get it lined up with both lower trunnions and the 4 studs - run all four nuts up snug for now.

5 - hook up all hoses - remember there will be AIR in the system, so be VERY sure you don't get any body parts near any "pinch points" - from hear on, unless you're "super-McGuyver", you'll probably need a helper -

6 - Now that you have both cylinders trapped you can remove the ratchet straps - run a short length of rope thru one of the rod end eyes (better to get that ROPE in the wrong place than your fingers)

7 - Pull sideways on the rope just enough so the rod end clears the tower, and "feather" the swing control back and forth til you get the eye lined up with the pin hole. You may need to go back and forth several times til most of the air gets out of the system - both cylinders will try to move, one in and the other out. Watch for any interference with the one you're NOT trying to pin. That other one will probably NOT have enough space to splay wide enough to just STAY out of your way. Once you get some extension on the cylinder, you can move the rope to the shaft so it's out of the way of the pin hole. This will continue to keep your fingers out of the way.

You will also need to rotate the rod end with a lever (through the pin hole) til it will slide into the pin slot on the swing tower.

8 - The second cylinder should cooperate more than the first, since you won't need to worry much about the other side once it's pinned.

If you haven't already, finish tightening the nuts holding the lower plate. At this time I'd put 4 MORE nuts on to protect those threads.

Once again, be VERY careful where you put your body parts during this, especially when the pump is running - I had two of my millwrights injured in the last few years from NOT paying close enough attention during similar operations. I've been doing this kind of stuff in heavy industry for the last 35 years and running a full maintenance crew for the last 10, seen more crap than I ever wanted to...

Hope that helps you work out a method - gotta quit for now, for some reason Firefox seems to be hogging memory and it took me over an HOUR to get this much written - :thumbdown: ...Steve
 
Last edited:
   / Question on JCB swing cylinders #38  
heres a pic of mine (#5), yours "may" not have one but usually JCB's have them.

2v9ox90.jpg
 
   / Question on JCB swing cylinders
  • Thread Starter
#39  
I'm not going to doubt it and, thanks for the picture....I'll print it and take it to the shop.

that said, I started getting things organized yesterday. Tried to break some crud off with the pressure sprayer.... tough going! I think I'm going to remove the cylinders and then spray them again.

I did find what I believe to be the source of my drip....


Preparations: Cut field yesterday. Did initial pressure wash of back end of machine (went over a lot of the machine)

Got three of the four bolts loosened that hold the plate under the cylinder. Last nut is TOUGH!

Hoses off....draining some of the fluid into a container.

Straps holding the 'hose' end of cylinders up so when the plate is removed, the back side will be supported along with the ram being supported in the hoe.

Floor jack is out there & waiting. Getting ready to eat breakfast and then get dirty. :)
 

Attachments

  • Leak.jpg
    Leak.jpg
    411.7 KB · Views: 143
   / Question on JCB swing cylinders #40  
Richard, best of luck - that last nut is doing what I expected ALL of them to do - being at the bottom of the hoe I'm surprised ALL the threads aren't damaged, that's why I suggested the extra nuts to keep those last few threads from damage.

Skyhook, thanks for the diagram of your cylinder - two quite different designs, yours uses that allen in the groove at the inner end of the rod to keep the piston from backing off - looks like Richard's uses a snap ring of some sort. As you said, since it's going to a rebuilder it doesn't matter... Steve
 

Marketplace Items

2014 CATERPILLAR 930K WHEEL LOADER (A60429)
2014 CATERPILLAR...
Informational Lot - Financing (A61307)
Informational Lot...
2018 Chevy Traverse 3rd Row Seating (A61306)
2018 Chevy...
2343 (A60432)
2343 (A60432)
KUBOTA X1140 CREW RTV (A52706)
KUBOTA X1140 CREW...
Jaw Crusher (A59228)
 
Top