'Real Farming' with a CUT

   / 'Real Farming' with a CUT #12  
Thanks for the pics, really like your pan shot. When I started looking at the photos of the shiny new equipment, I had my doubts, "is this guy gonna make a farmer?", then I saw the pic of the disc and saw the balin' ware (that's the way to spell it) and then I knew you are one.:D :D I know hayin' is a busy time, but keep the pics coming.
 
   / 'Real Farming' with a CUT
  • Thread Starter
#13  
Tedding....

Basically, this fluffs-up the hay, inverts some of it and un-bunches it so that it can dry more uniformly. All the research I've read says it actually does not make the hay dry faster, but it does help it dry uniformly. Regardless, after you have mowed, the grass is in long parallel lines in the direction you cut. Once you have tedded, it's horizontal to the way you've mowed.

It's really hard to see in the photo, but I'll give it a try.

One other note, always ted in the morning while dew is still on the hay, or after dusk. Doing it during the heat of the day will break leaves off clovers, reducing the forgage's nutrition.
 

Attachments

  • tedded.jpg
    tedded.jpg
    151.4 KB · Views: 473
   / 'Real Farming' with a CUT
  • Thread Starter
#14  
Basic instructions on raker / tedders...

Many rakes today both windrow and tedd. This is how mine adjusts.

The picture shows the diagram on the rake along with the top adjustment, which raises & lowers the wheels in relation to the rake. As it raises and lowers, it also tilts the rotating rakes more or less horizontal. You also need to adjust your top link so that the tines run about 1" above the ground (or just above the stubble). The top adjustment is in the tedding position in the photo.

The tines along the rake adjust as well, depending on your mode. The first shows the tedding mode, the second the raking (windrowing) mode. The tines just pull out and snap back into the different hole.
 

Attachments

  • adjustment.jpg
    adjustment.jpg
    99 KB · Views: 404
  • tedder mode.jpg
    tedder mode.jpg
    198.7 KB · Views: 388
  • rake mode.jpg
    rake mode.jpg
    160.2 KB · Views: 387
   / 'Real Farming' with a CUT
  • Thread Starter
#15  
Finally, the baler has arrived. I drug it home from Salem on the back of my Toyota Tacoma (V6 power, baby). It took a long long time to get home....

Oh and regarding discs... a neighbor has let me 'borrow' his 10' wide offset discs, because there was no way in **** he thought my tractor would pull them. It turns out, I can pull them with no problem. I may get a free set of discs out of this if I keep shaming him over it.
 

Attachments

  • baler.jpg
    baler.jpg
    134.1 KB · Views: 500
  • baler back view.jpg
    baler back view.jpg
    113.1 KB · Views: 427
   / 'Real Farming' with a CUT #16  
Sharp lookin baler, how'd it go?
 
   / 'Real Farming' with a CUT #17  
I'm glad to see your land is flat, that is a lot of baler for a little tractor. The rake tedder you have is based on the decades old PZ-Haybob design. Very solid and reliable but uses a lot of teeth compared to other designs. I didn't notice on yours but some of the new teeth for haybobs have a tie to hold them in place after they break so they don't get left in the field.

Those disc mowers are reliable things and do a great job in tough mowing conditions. With more hp you could probably mow at 10 mph.

Have fun and make sure your hay is dry before baling if you are storing inside!
 
   / 'Real Farming' with a CUT
  • Thread Starter
#18  
Thanks for the tips!

Now, we had a bit of rain last night after I had winrowed and was waiting for just the right dry conditions. So, this morning I "rolled" the windrows, which means I shifted them over one position, inverting the piles. Heading out now to check since it looked good earlier today, which has turned out windy and warm. I'll be doing my first bale shortly, then having a neighbor down with his moisture probe to make sure everything's OK. It's really hard to type that sentence with out smirking....
 
   / 'Real Farming' with a CUT #19  
Greyfields said:
I'll be doing my first bale shortly, then having a neighbor down with his moisture probe to make sure everything's OK. It's really hard to type that sentence with out smirking....

Yeah, I'm surprised it didn't get censored!

BTW there is a technique for checking hay moisture content with just a scale and a microwave oven. It's outlined in a seed catalog I have from Forage First. Chances are it's also on three dozen websites. Not as convenient as an electronic probe, but just FYI if you want to do it yourself without buying more stuff.
 
   / 'Real Farming' with a CUT
  • Thread Starter
#20  
I have turned grass into cylinders!!!

:D

:D

I will get the photos up in the morning. Here are my initial comments:

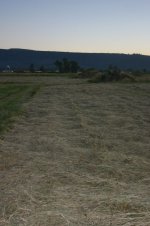
1) Making round bales takes some finesse! My first one was a cone, much larger diameter on one side than the other. I had a few awkward ones, which won't be in the photographs, but mostly I got the hang for it. You move your baler from side to side on the windrow so that the core forms evenly, then you can pretty much follow the windrow centered.

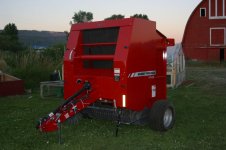
2) My concerns of pulling a 3700 lb baler + bale with a 3700 lb tractor was a non-issue. It pulls it without a struggle. When the bale gets larger diameter and you hit a mound to go over, I was having to give it some throttle. But, I kept the RPM's around the 1800 range most the time. It didn't feel like I was pushing the envelope on the tractor one bit.

3) A made 30", 3', 4' and 5' diameter bales. After some discussion and head scratching, we decided that the 4' would be best for half our hay and the 30" for the other half. Two people can lift the 30" diameter (the lenght is 46") without too terrible a struggle and they will fit in my front loader. I was thinking of using these for goats, sheep, and other animals who won't eat the big bales quickly like cows would. 48" was really manageable on the tractor, it didn't bog the PTO down; whereas going from 48" out to 60" I had to throttle up a bit to keep things running smoothly.

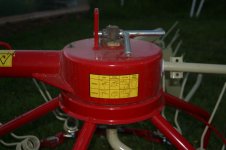
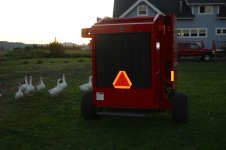
4) There was one problem with my plans. The 30" bales were not quite heavy enough to always activate the ramp and roll out. So, I either looked at the shadow to verify it rolled out, or I backed the tractor up 5' then reversed it forward and I could feel it roll out. As a last resort, the gate obviously won't close if the bale hasn't ejected, so always check your control box for the green light.

5) Mine does not have the auto-tie option installed. It wasn't hard on me or my neck to look back and manually set the tie points. However, I could see how you would want auto-tie if you were doing over 10 acres per day.

That's about all I can think to say right now, except I'm utterly thrilled that this 'project' has come to fruition. Yes, you CAN bale with CUT's; but remember to be safe and don't run machines out of specs or guidelines. Consider also that the John Deere 4x20 series really blurs the line between a CUT and a standard utility tractor. It's just a monster and I love all I can do with it.

[edit] one more thing, I still somewhat wish I had got the 1740 because the 39" bale length by a 30" diameter would have been really manageable with bale hooks to move around. that gives me options to use small amounts of hay without having to hook-up the spear. But, I think I should regret things less, and be less of an engineer and just keep trucking and make better bales each day!
 
 
Top