Rear Hydraulics

   / Rear Hydraulics
  • Thread Starter
#21  
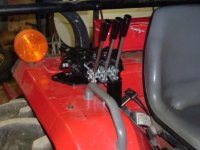
</font><font color="blue" class="small">( On the first picture, where are the two lines going?)</font>

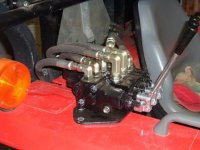
Those lines go to my tractor mounted valve; in the second photo you can see one coming in the lower left hand side and you can just barely make out the second one near the top of the valve.

My dealer had told me to take the front line from that sump manifold, disconnect it from the tractor mounted valve and run it to my new aux. valve. Then he told me to take the return line from the new valve and connect it to the tractor mounted valve where I removed the front line. Does that make sense? /forums/images/graemlins/confused.gif
 
   / Rear Hydraulics #22  
Your dealer is right on this. That is the way the picture that I posted has it. I know this is kind of confusing. The biggest problem here and in most threads like this, is that there are several different names for the same item. These different names are not always wrong, just different words used by different manufactures. BTW The T2 is a call return.
 
   / Rear Hydraulics
  • Thread Starter
#23  
My valve and cylinder came in from Surplus Center last week. I am in the process of designing a bracket to mount the valve. My nephew came over this weekend to check everything out and order the fittings and hose I'll need. I'll post a few pictures when I'm finished. Thanks again for all the help.
 
   / Rear Hydraulics
  • Thread Starter
#25  
I finally have my auxiliary hydraulic valve painted and mounted up. I’m just waiting for the fittings and lines. It’s a 3-spool Prince stack valve. I assembled it with the middle spool having a float option. I’m going to run two sets of lines to the rear (one of them being the float) and the last set of lines will run to the front.
 

Attachments

  • 683002-auxvalve1.JPG
    683002-auxvalve1.JPG
    23.9 KB · Views: 299
   / Rear Hydraulics
  • Thread Starter
#26  
Here’s a side view. I used existing holes on the fender for my bracket. The position appears to be pretty convenient for operation. The brass acorn nuts were added as the ends of the connecting rods stuck out beyond the nuts and I was afraid I’d be raking my arm on the threads when I rest my hand on the 3-point control. Hopefully we’ll be able to route the lines so it’ll look clean and still be out of the way.
 

Attachments

  • 683003-auxvalve2.JPG
    683003-auxvalve2.JPG
    24.4 KB · Views: 271
   / Rear Hydraulics #27  
Looking good so far. Did you make the bracket?
 
   / Rear Hydraulics
  • Thread Starter
#28  
</font><font color="blue" class="small">( Looking good so far. Did you make the bracket? )</font>

Yes I did. The plate on the fender is aluminum and the bracket going down to the angled part of the fender is some angle iron I had kicking around. I mocked up the plate out of 3/8" plywood first which helped me to fabricate the angle iron bracket. Then I transferred my plywood "pattern" onto the aluminum.
 
   / Rear Hydraulics
  • Thread Starter
#30  
Well it poured all day Friday so work on my wall project stopped. My nephew came over and we got the valve plumbed.
 

Attachments

  • 691346-rearhyd_rs.jpg
    691346-rearhyd_rs.jpg
    23.6 KB · Views: 259

Tractor & Equipment Auctions

2006 Audi A6 AWD Sedan (A50324)
2006 Audi A6 AWD...
2016 FORD INTERCEPTOR (A51406)
2016 FORD...
2017 JLG 1932R 19FT Electric Scissor Lift (A50322)
2017 JLG 1932R...
New Bobcat 18" Bucket (A50774)
New Bobcat 18"...
CFG Industrial QK20R (A50121)
CFG Industrial...
2019 Energreen EVO 40 Robotic Tracked Flail Mower (A52748)
2019 Energreen EVO...
 
Top