You are using an out of date browser. It may not display this or other websites correctly.
You should upgrade or use an alternative browser.
You should upgrade or use an alternative browser.
Subsoiler adventure
- Thread starter daugen
- Start date
- Views: 26376
More options
Who Replied?
/ Subsoiler adventure
#21

cttractor
Silver Member
That is almost identical to what I was describing that I used to lay cable. Great find!
jnjpream
Gold Member
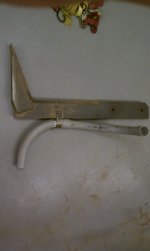
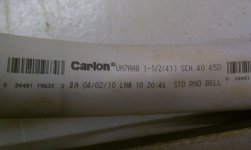
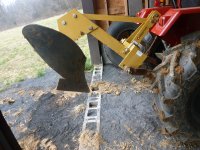
The pipe laying attachment they show in the video is just like what I did with $10 at HD. For laying 1" poly pipe you can get 1 1/2" plastic conduit (Sch 40 PVC) from the electrical isle. A long sweeping 90 elbow and a couple 45s to get the depth. I welded a strap to the back of my subsoiler, slid the conduit through the strap until the flared end hit the strap and put a hose clamp on the pipe just below the strap.. That allowed the conduit to turn and follow me through turns, and the top 45's allowed me to just lay the pipe out along side where I wanted it so it would feed nicely. Sure beats battling a trencher from the rental shop then having to back fill.
Ran out to the garage and got a picture..
Ran out to the garage and got a picture..
Attachments

Last edited:
jnjpream
Gold Member
Oh and for getting the pipe started I drilled a hole in a 1" poly pipe plug and put a 1/2" eyelet through it. Then I drove a piece of rebar through the eyelet into the ground to anchor it. If you don't have enough room to get the pipe to depth while moving, you can just dig a hole at depth then anchor the pipe in the hole and start pulling from there. I dug a hole for a valve box and anchored/pulled from there.
D7E
Veteran Member
- Joined
- May 10, 2006
- Messages
- 2,267
- Location
- manitoba
- Tractor
- Versatile 895 Versatile 876 Ford TW20 Ford TW5 MF 3505 FWA MF 390 FWA Ford 7600 Fiat 766 FWA JD 2030 MF 165 MF 35 Fordson major x 3 CAT 416 b Backhoe Case 580 b backhoe MF
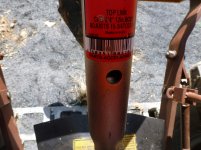
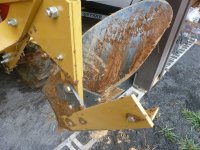
I think I may have the piece with the mfg name on it upside down, now that I look at the pics. Not sure it makes a difference though. If it does, I hope someone chimes in.
That piece is a very strange design !
Baby Grand
Elite Member
- Joined
- Nov 12, 2007
- Messages
- 4,663
- Location
- Windsor, CT.
- Tractor
- Kubotas: L3240GST B2320HST B5100D & G5200H
That piece is a very strange design !
I think that piece works like a lever on the shear bolt, magnifying the force if an immovable object is struck and keeping the top link from bending.
OP
daugen
Epic Contributor
these pictures and diagrams are super, thank you. I know what to do, and since I don't know how to weld, yet..., I'll get out my biggest drill and put a hole in the subsoiler to attach the conduit pipe. not sure I'd leave it on all the time, looks like a rock might figure out how to rip it off, but boy this looks almost easy once the set up is done.
As an overall sanity check, if laying pipe/cable in rocky ground, this method inserts the the cable on top of/around any rocks. Over time that probably won't do the cable/pipe any good. I understand the ditchwitch method where you dig a big trench, and back fill it with diminishing size gravel/fill, so at least no big stones are initially pressing up against anything. This is much, much easier, but is there a long term compromise with this method? Compromise is ok, just want to know if anyone has had the pipe/cable break in what they thought was too short a time. Thanks. The benefit of experience here is wonderful. Drew
As an overall sanity check, if laying pipe/cable in rocky ground, this method inserts the the cable on top of/around any rocks. Over time that probably won't do the cable/pipe any good. I understand the ditchwitch method where you dig a big trench, and back fill it with diminishing size gravel/fill, so at least no big stones are initially pressing up against anything. This is much, much easier, but is there a long term compromise with this method? Compromise is ok, just want to know if anyone has had the pipe/cable break in what they thought was too short a time. Thanks. The benefit of experience here is wonderful. Drew
cttractor
Silver Member
My power cables have been underground for over 20 years with no problems. I haven't buried any pipes yet, so I can't comment of that.
OP
daugen
Epic Contributor
I think that piece works like a lever on the shear bolt, magnifying the force if an immovable object is struck and keeping the top link from bending.
I think so also. One of the bolts is smaller, not grade, and looks like it would provide shear protection if the main piece pivoted. btw, the other bolts don't have hash marks on them, but rather just numbers, which I don't remember.
The bolts are pretty heavy, no complaints, but just wondering why grade 5 or 8 bolts weren't used. Is there another way of designating grade bolts by a numbering system?
When I unpacked the box, out fluttered a one inch square Made in China, 10 pcs. piece of paper. So my Kentucky plow has Chinese bolts? Groan.
jnjpream
Gold Member
As for rocks, the ploy pipe is fairly forgiving but not bomb proof. With this setup if you have to lay another pipe to replace a broken one it doesn't leave much of a mark on the lawn. Just drive over the slit to push it back down and in a week you won't know it was there.
I typically make one pass w/o the pipe to clear the path of big rocks etc and to ease the next pass when I actually put the pipe in the ground.
I typically make one pass w/o the pipe to clear the path of big rocks etc and to ease the next pass when I actually put the pipe in the ground.
GPintheMitten
Elite Member
- Joined
- Sep 8, 2009
- Messages
- 3,331
- Location
- Flushing, Michigan
- Tractor
- Kubota B2620 with BH65 backhoe, Ford 2N
jnjpream said:As for rocks, the ploy pipe is fairly forgiving but not bomb proof. With this setup if you have to lay another pipe to replace a broken one it doesn't leave much of a mark on the lawn. Just drive over the slit to push it back down and in a week you won't know it was there.
I typically make one pass w/o the pipe to clear the path of big rocks etc and to ease the next pass when I actually put the pipe in the ground.
Ahh, good idea.
OP
daugen
Epic Contributor
I thought so too, get the surprises out of the way.
Subsoiler adventures part two today...
Took off the Fred Crain subsoiler and put on the TSC middle buster potato plow. Angle of the plow was way off, almost flat on the ground. Tried to adjust the top link that was given to me and it froze solid after about half an inch of travel. Grrrr. Off to the local dealer and back with a very nicely made toplink, heavy and nicely finished, made in India. Adjusted to its shortest position, it put the middle buster back in the game, with a nice downward slant. Ready to bite and dig in.
But it didn't. No way Jose. PA field grass 6, middle buster 0.
That plow refused to bite in, skidded all the way down the garden. Like a cheap anchor on a rocky bottom. Even when I intentionally buried it in a plowed hole to force it under, it popped back up in a foot or two. I had no expectations here, this is clearly way too light a plow with a cutting edge and point unsuited to piercing sod. I have a friend with a farm in NJ who will probably find it works super in that sandy soil. And it will probably work just fine once the bed is prepared. Decent construction for a lightweight plow, but pretty nasty welding, lots of spatter. Sticker says it's powdercoated and the paint job was fine.
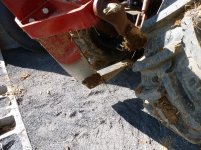
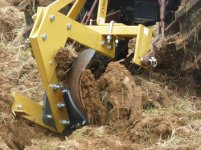
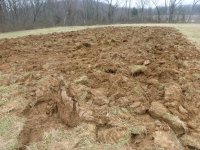
So I put the subsoiler back on and ran that another couple hours, plowing with world's smallest plow... With the new angle on the subsoiler, it bit it for all it was worth, and I was constantly getting stuck and needing the diff lock to get out. And sometimes just raise the implement and try again. I took pics of the subsoiler after using it with a poorly adjusted top link and then when I was done today. Didn't see a huge difference, but I sure felt it.
Still had to undo the top link and let it hang free underneath to clear the sill to the barn. That subsoiler isn't too selective what it tries to plow... But it looks like a bungee cord would do just fine.
Tomorrow I buy a "real" one bottom plow with a coulter, which is what I should have used today. Once again the fred cain subsoiler just shrugged off anything my little tractor could throw at it.
Subsoiler adventures part two today...
Took off the Fred Crain subsoiler and put on the TSC middle buster potato plow. Angle of the plow was way off, almost flat on the ground. Tried to adjust the top link that was given to me and it froze solid after about half an inch of travel. Grrrr. Off to the local dealer and back with a very nicely made toplink, heavy and nicely finished, made in India. Adjusted to its shortest position, it put the middle buster back in the game, with a nice downward slant. Ready to bite and dig in.
But it didn't. No way Jose. PA field grass 6, middle buster 0.
That plow refused to bite in, skidded all the way down the garden. Like a cheap anchor on a rocky bottom. Even when I intentionally buried it in a plowed hole to force it under, it popped back up in a foot or two. I had no expectations here, this is clearly way too light a plow with a cutting edge and point unsuited to piercing sod. I have a friend with a farm in NJ who will probably find it works super in that sandy soil. And it will probably work just fine once the bed is prepared. Decent construction for a lightweight plow, but pretty nasty welding, lots of spatter. Sticker says it's powdercoated and the paint job was fine.
So I put the subsoiler back on and ran that another couple hours, plowing with world's smallest plow... With the new angle on the subsoiler, it bit it for all it was worth, and I was constantly getting stuck and needing the diff lock to get out. And sometimes just raise the implement and try again. I took pics of the subsoiler after using it with a poorly adjusted top link and then when I was done today. Didn't see a huge difference, but I sure felt it.
Still had to undo the top link and let it hang free underneath to clear the sill to the barn. That subsoiler isn't too selective what it tries to plow... But it looks like a bungee cord would do just fine.
Tomorrow I buy a "real" one bottom plow with a coulter, which is what I should have used today. Once again the fred cain subsoiler just shrugged off anything my little tractor could throw at it.
Attachments

dkizerian
Bronze Member
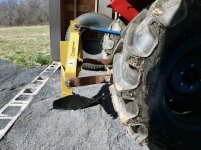
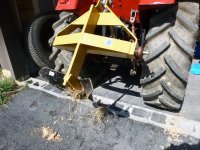
Any pics of the middlebuster/potato plow on the ground with the new top link??
This picture makes it look like it still might not be pointed down enough to really suck down into hard ground... but raised is always a little deceiving.

This picture makes it look like it still might not be pointed down enough to really suck down into hard ground... but raised is always a little deceiving.
cttractor
Silver Member
Yeah, I thought the same thing as Dkizerian when I saw that photo. The angle of the buster when the 3PH is up looks like it would be level or even pointing up a tad once the 3PH is down. You need the tip of it pointed down when it is in the ground.
Also, the shank on that middle buster looks a little short. That will have the effect of pointing the tip up as you lower it. Shorten that top link more if you can; replace it with a shorter link if the current top link doesn't get short enough. That should make this buster work properly.
Also, the shank on that middle buster looks a little short. That will have the effect of pointing the tip up as you lower it. Shorten that top link more if you can; replace it with a shorter link if the current top link doesn't get short enough. That should make this buster work properly.
OP
daugen
Epic Contributor
no pics, sorry, only me driving, though I watched it skid along, on modest downward angle. But you're right, not a big angle, but not flat like it was.
Only way to get that top link shorter is to buy a shorter one...it's all the way tight and on the lowest hole, furthest away. I'm starting to think that a hydraulic top link might not be such a luxury any more with all this fiddling and adjusting from one implement to another. This plow seems pretty short too.
I really think it will make a great furrower and potato harvester, but even when I jammed the point in a hole and pulled it unwillingly under, it popped out again. Something is still way off so time for plan C. I'm trying to push a square plow into a round field here in the larger picture, so I'm not going to fuss with this much more. A coulter and plowshare are called for. And lots of rock picking.
If I had a big heavy disc harrow, I could probably skip the plow, but anything that fits my tractor isn't likely to be heavy enough for this bumpy mess.
Attachments

Last edited:
OP
daugen
Epic Contributor
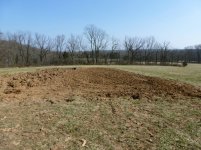
Update: County Line single bottom plow worked very well, cut through the sod and clay easily, though the tractor had nowhere enough traction for this. Sure now understand the benefits of MFWD. I spent half my time with the diff lock pushed down, and I wondered if constant use of that, not slipping it, but fully engaged, heats up anything. Boy did it work. Had to do much of the deep plowing going downhill since uphill was just too hard on me and the tractor due to lack of grip. Even with my big ag tires, I've only got 2000 pounds to work with.
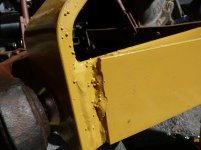
Nice plow, a friend picked it up for me because he was closer to TSC, and they took fifty bucks off because it had been sitting out awhile, and had some rust spots on it. Ok, that's fair. Built very strong, my 25hp tractor isn't going to stress it, but I noticed the whole apparatus was cockeyed when I put the tractor away. The links weren't that out of wack before, maybe something moved. Very pleased with the plow's performance even when I'm sure I didn't have it adjusted very well. Did the job, turned everything over and I'm ready for the rototiller. I suppose I could disc it, but because the soil is still moist and sure clayey, I think the less I drive on it with the tractor the better, and will use the much lighter garden tractor from now on.
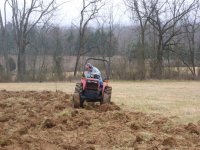
p.s the head on shot of my 255 shows some messed up steering angles...headed to the repair shop for some new knuckles, I could see something moving that sure shouldn't have been, plus the one tire turned in significantly more than the other. Likely PO ran into something and bent the steering rod, but maybe enough adjustment in there to help plus a few parts. The turf tires are worse than useless in wet clay, geez slid all over the place once they became solid mudballs, and the lack of weight on the front made steering almost impossible at times. Kept veering off to the right, and being a boater, I know my rudder was pushing me that way... I have a 300 pound custom weight box I built for my Gravely; don't know if 300-400 pounds would help over the front tires, but since it steers so easily, I'm going to find out. I had to use the diff lock, i had to use the brakes for steering, I was pumping away on whatever worked. And boy am I sore now. Good sore.
Nice plow, a friend picked it up for me because he was closer to TSC, and they took fifty bucks off because it had been sitting out awhile, and had some rust spots on it. Ok, that's fair. Built very strong, my 25hp tractor isn't going to stress it, but I noticed the whole apparatus was cockeyed when I put the tractor away. The links weren't that out of wack before, maybe something moved. Very pleased with the plow's performance even when I'm sure I didn't have it adjusted very well. Did the job, turned everything over and I'm ready for the rototiller. I suppose I could disc it, but because the soil is still moist and sure clayey, I think the less I drive on it with the tractor the better, and will use the much lighter garden tractor from now on.
p.s the head on shot of my 255 shows some messed up steering angles...headed to the repair shop for some new knuckles, I could see something moving that sure shouldn't have been, plus the one tire turned in significantly more than the other. Likely PO ran into something and bent the steering rod, but maybe enough adjustment in there to help plus a few parts. The turf tires are worse than useless in wet clay, geez slid all over the place once they became solid mudballs, and the lack of weight on the front made steering almost impossible at times. Kept veering off to the right, and being a boater, I know my rudder was pushing me that way... I have a 300 pound custom weight box I built for my Gravely; don't know if 300-400 pounds would help over the front tires, but since it steers so easily, I'm going to find out. I had to use the diff lock, i had to use the brakes for steering, I was pumping away on whatever worked. And boy am I sore now. Good sore.
Attachments

Baby Grand
Elite Member
- Joined
- Nov 12, 2007
- Messages
- 4,663
- Location
- Windsor, CT.
- Tractor
- Kubotas: L3240GST B2320HST B5100D & G5200H
The head shot with the wonky toe-in definitely shows some adjustment needed. The front tires are fighting each other over which one determines your course. When you get them set right I think you will see a noticeable improvement in your traction situation.
Are your rears loaded? With 2wd you may want to consider that option.
Are your rears loaded? With 2wd you may want to consider that option.
cttractor
Silver Member
Update: County Line single bottom plow worked very well....
That plow actually looks a little big for your tractor. With smaller machines like the ones we have, matching the proper size to the machine for ground engagement tools is very important because we don't really have much traction and power to spare. As the machines gets bigger and heavier, my experience has been that it's less of an issue. It certainly looks like you did a good job with what you had!
OP
daugen
Epic Contributor
Thanks. I got that field ripped up pretty well, and it was a real treat going over the big lumps with the Gravely and the DR rototiller today. I felt like I was out in the dinghy going through three foot seas. Only high centered it once, and pulled it out easy. Took little bites and amazingly never broke a pin today, so I continue to be impressed with the DR tiller. It's an Agrifab in fancy drag, but it sure works. I stalled it a bunch of times, getting into wet clay when I took too wide a bite. We aren't due for a lot of rain soon, so I hope the field can dry out a little. I filled one garden cart up with rocks today, and I've got about another four cart loads to go. Rototill, pick up rocks, repeat.
So that's the end of my plowing adventures. I may use the middle buster properly this time and do some furrowing once the bed is prepared. Except for a crummy paint job originally, the Fred Cain subsoiler gets an A. Clearly made to handle more horsepower than I have and it really did a nice job. The County Line one bottom is also nicely made, had some paint issues from being outside, but altogether exceeded expectations. That tough soil turned right over.
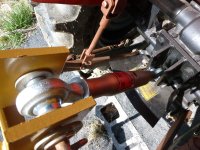
My local dealer could get me a Ringo plow made up in Quakertown, PA, not far from me, and also A&B plows from down South. But I didn't want to wait until next week, the sun was shining... I'm amazed how many small implement manufacturers there are, but at a net 450 bucks after they took off 50 bucks for bad paint, the plow at TSC was the least expensive. That usually makes me not want to buy it, because of quality concerns, but in this case, very good value. 256 pounds, took two of us and a small shop crane to get it on. We tied a heavy duty strap around the middle, just guessing where the weight center was. We picked it up and it went up dead level. We looked at each other and just laughed, pure luck. But now I remember where to put the strap which is good.
So that's the end of my plowing adventures. I may use the middle buster properly this time and do some furrowing once the bed is prepared. Except for a crummy paint job originally, the Fred Cain subsoiler gets an A. Clearly made to handle more horsepower than I have and it really did a nice job. The County Line one bottom is also nicely made, had some paint issues from being outside, but altogether exceeded expectations. That tough soil turned right over.
My local dealer could get me a Ringo plow made up in Quakertown, PA, not far from me, and also A&B plows from down South. But I didn't want to wait until next week, the sun was shining... I'm amazed how many small implement manufacturers there are, but at a net 450 bucks after they took off 50 bucks for bad paint, the plow at TSC was the least expensive. That usually makes me not want to buy it, because of quality concerns, but in this case, very good value. 256 pounds, took two of us and a small shop crane to get it on. We tied a heavy duty strap around the middle, just guessing where the weight center was. We picked it up and it went up dead level. We looked at each other and just laughed, pure luck. But now I remember where to put the strap which is good.
Attachments
Here are some similar links:
- Replies
- 109
- Views
- 15K