Sweepster Rotary Broom - rebuild and modification

   / Sweepster Rotary Broom - rebuild and modification
  • Thread Starter
#41  
Thanks guys. I'm glad some people are finding some value/entertainment in this thread...

Got the tank parts Fri and started using that to sort out how this all goes together.

An overview of getting started:
Tank layout (1) (Large).jpg


Looking at the back side of the tank. I had the shop laser cut and bend 2 "U" shaped pieces into this parallelogram so it would match the angle of the SSQA plate and fit the space/volume in much better. This shape also helps minimize interfering with the broom as it is angled. I had them cut the hole for the in-tank filter you see here and above as it was large and needed to be fairly precise. So I still need to bore holes for ports for a drain, pump supply and relief return and add a baffle inside and then I can TIG weld up the tank and see if I can pass a leak test!

Tank layout (4) (Large).jpg


I already moved the pressure relief valves mounting holes as i drilled them wrong (had it flipped over) and then in looking at the front view, the fitting on the angle cylinder looked like it was going to be way too close or crash into the relief valve fittings, so I moved it again. Or you might say I now have 3 options to mount it! Yeah, that's the ticket! 😁 And you can see I was starting to sort out the upper central brace and where to mount the diverter.

Tank layout (7) (Large).jpg


After trying a few things I think I settled on this with a bit of heavy angle iron to back up the C-channel. The channel will get cut shorter so it doesn't stick out much past the diverter once I am ready:

Tankd and diverter mount (3) (Large).jpg


Now I need the new angle cylinder to show up before I am going to weld anything as it will be far easier to make changes before that happens. Hopefully that shows up this week. I will get most things ground out and ready to weld, but that is about all I can do until that cylinder shows up.
 
   / Sweepster Rotary Broom - rebuild and modification
  • Thread Starter
#42  
Angle cylinder and broom sections showed up and picked up on Wed, so time to move this forward!

More progress...started on the tank. The tank is 11 ga (~1/8" CRS) and I picked up some extra 1/8" to make a baffle but it was hot rolled. No biggie, just need to grind some mill scale. Basically the return is via the in-tank filter you saw in the previous post into the large hole in the top. Got 3 holes cut for the various NPT bungs - a 3/4" for a drain plug in the bottom, 3/4" for the pressure relief return to tank next to the return filter, and a 1" for the supply feed to the pump down on the side near the bottom (oppostie end from the return filter).

I milled some slots around the edges of the baffle to allow fluid to pass to some degree, and to let it all get to the drain port for fluid changes, but the main flow between the inlet/outlet sides will be up over the top as the baffle has a 5" gap to the tank top inside.

The first bung was the drain in the bottom (practice where nobody can see it...) and I was TIGing along fine and suddenly it started spitting and popping at me. Some contamination issue. I had to grind and reweld a couple times plus some acetone wash to finally get it right but it warped the bottom from all that extra heat. I'll even it out and make it work, but you can see it in the photos below. But after that it went fine. You can see the warp here in the bottom.

Tank welding internals (2) (Large).jpg


Tank welding internals (4) (Large).jpg


The 1.25" pipe you see above is the intake port that supplies the pump welded over the 1" bung. I wanted it elevated slightly so it doesn't suck in any crud from the bottom, and the angled cut is to reduce the intake velocity so it doesn't channel flow as much, which is also why it is pointed towards the outside wall. I may still support the free end of it with a piece of angle or flat stock just to make sure vibration doesn't crack off the welds over time.

So here is an outside look at it, and with the other half sort of in place.

Tank welding internals (3) (Large).jpg


Tank welding internals (5) (Large).jpg


And this is the point I looked at it and kicked myself. No fill port! Totally spaced that out. So now I have a combo fill/breather/dip stick port thingy coming from Surplus Center to add to this. Glad I saw it now while I can still get the top onto the mill, but it is going to be a little more challenging with the baffle in place. I can manage for one hole...

I am going to weld a couple tabs inside near the top to capture the free edge of the baffle. The bottom is welded along with the other wall, so it should only need to be grabbed near the top to keep from vibrating too much. It will slide over it as the 2 halves come together. Still need to come up with and weld on mounting tabs too.

I'll probably finish up the tank so I can stay in TIG mode for now, and then convert the welder back to wire feed for the heavy structural stuff. I'm sure I'll still need to swap back and forth some.
 
   / Sweepster Rotary Broom - rebuild and modification
  • Thread Starter
#43  
A little more progress. The fill port/dip tube showed up so I drilled a 2" hole on the mill with a hole saw for that. It had a bolt circle around it for 6 mounting bolts, so I got to use the Bolt Circle function on the old Sony DRO for the first time. No way to figure that out without the manual in hand... Pretty slick how it worked. Then a quick 10-32 tap and good to go.

Tsnk fill port (1).jpg


Tsnk fill port (2).jpg
 
   / Sweepster Rotary Broom - rebuild and modification
  • Thread Starter
#44  
More progress. Welded in the support for the intake tube.

Tank intake tube support (Large).jpg


Made a guide to catch the top edge of the baffle inside out of 2 small pieces of angle that I bent slightly to make a V. It slides over the baffle at the free corner at the top to catch it and keep it from vibrating too much. You can see it on the mating tank section here and then from the inside below.

Tank baffle support (Large).jpg


You can see half of it here, top dead center thru the filter opening. The other piece is behind the baffle, naturally.
Tank baffle support inside (Large).jpg


Next up will be welding out the tank, and I will pressure test it with air first (momma didn't raise no fools...except for my brother 😁 ) but to do that I need to plug the fill port and the large filter port. Used the Bolt Circle function on the mill again to make cover plates from the leftover cutoff from the baffle. I have a gasket for the fill port but will need some rubber or something for the filter port. But next up is a whole buncha welding tank seams!

Here's the cover plates

Tank port covers (Large).jpg
 
   / Sweepster Rotary Broom - rebuild and modification
  • Thread Starter
#45  
Got sidelined by our deep freeze freezer that decided to stop working. Ruined a ton of food. Dang thing is only lke 5 yrs old too. Grrrrr.

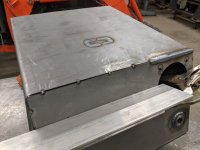
But I did manage to get the tank fully tacked up and got it over half welded. Had a lot of goofy clamping to pull walls into alignment as I went but it came out pretty good. Some photos below - tacked, during welding and end of day. Had a few areas where there was some contamination that caused issues, so I am going to hose things down with acetone before I weld again.
Tank tacked (Large).jpgTank start weld (Large).jpg

Tank welding (2) (Large).jpgTank welding (1) (Large).jpg
 
   / Sweepster Rotary Broom - rebuild and modification
  • Thread Starter
#46  
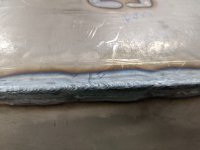
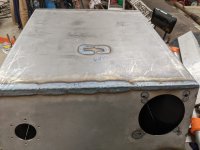
Got the tank done. I was trying to finish it last night but was running into huge contamination issues for the final 2-3" of weld on the very last seam. I was getting low on Argon and I suspect that caused the issue somehow. When I finally gave up after grinding it back out and trying again for like the 4th time, the tank was reading maybe 100 psi. New tank of Ar today and it went fine but not until I fully ground it out leaving a huge chasm I had to fill with multiple passes. But at that point, it welded up just fine. I just had to wait for it to cool down a bit a couple times.

So I was worried about being able to run a smooth pass as it was kind of standing up in the air quite a bit, and I knew this had to be good to seal properly, so I built a little prop fixture from some 3/4", 2 pipe flanges and a pair of Tees that are 3/4" on the Tee side but 1" on the thru sides so it slipped over the 3/4" pipe. Drilled and tapped for a 3/8" bolt as seen and viola! Instant fully adjustable prop stand/wrist rest!

tank welding support (1).jpg
tank welding support (2).jpg


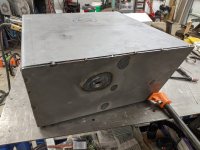
And after finally finishing the tank tonight I capped off all the holes and pressurized it up to 10 psi and it seemed to be holding well. I left it for overnight to check tomorrow and see what happens. It isn't designed for pressuriziation and the ports on top you see plated/gasketed probably aren't really stiff enough to hold much pressure, but if I don't see any notable leaks, then it should be good. I may try some soapy water on seams if it loses all pressure overnight, but it looked pretty good for 15 min... Doesn't really matter if the top face of the tank doesn't hold pressure and that's where all the big ports are (shown)

Tank pressurized.jpg


Next up will be nailing down the mount frame/SSQA plate and starting to tack that all up and fit the tank on there. The tank will need mounting tabs made and welded on, too.
 
   / Sweepster Rotary Broom - rebuild and modification
  • Thread Starter
#47  
Well it didn't hold pressure overnight, not that I was really surprised. So I pumped it back up and grabbed the bottle of Snoop leak detector (aka soapy water). The weld seams were all fine. The only leaks were from my temporary plugs to allow me to pressurize it so we are good to go! might not get much done this weekend as I am helping a friend change out a bunch of windows in his house, but I started moving on to the mounting frame at least a little too. No pics yet.
 
   / Sweepster Rotary Broom - rebuild and modification
  • Thread Starter
#48  
Got the spacer tubes welded to the SSQA plate tonight. I can still lift it, though it is hard, and about to get much worse once I weld the frame to the other sides of the tubes. No way I will be able to lift it then. I might be able to with the tractor but it is not very maneuverable. I also need to grab some longer clamps

Pics and even shots of the welds. These look half respectable. The first couple runs seemed a bit cold so I turned it up more and went slower to burn it in better.

SSQA plate and tubes (Large).jpg


SSQA tube welds (2) (Large).jpg
SSQA tube welds (1).jpg
 
   / Sweepster Rotary Broom - rebuild and modification #49  
Pics and even shots of the welds. These look half respectable. The first couple runs seemed a bit cold so I turned it up more and went slower to burn it in better.

looking good, if I could weld that nice my grinders would be out of work!

Mike
 
   / Sweepster Rotary Broom - rebuild and modification
  • Thread Starter
#50  
Thanks, but before you go singing my praises, those are all flat position welds. I have gotten "OK" enough to do those decently most of the time, but here is what a mess vertical looks like when I try it with MIG.LOL

Frame vertical weld (Large).jpg


No matter what I try I get the puddle dripping pretty quick, so the only way I can ever make it work is to what amounts to a series of heavy tacks working my way up, and even then I often get drips. Have never been able to figure it out and no clue what I am doing wrong... I have better luck with TIG there but this is way too heavy for my TIG setup.

But the main frame is now welded to the tubes, as best I can, and the rear angle pivot pin/plate is welded in place.

Frame mostly done (Large).jpg
Frame with pivot (1) (Large).jpg
Frame with pivot (2) (Large).jpg


I put the new cylinder on there after tacking the pivot pin/plate to verify it worked OK and good thing I did as I tacked it on backwards the first time. DOH! 🤫 The swing is good. It goes a touch farther to the left than the right, but close enough to be fine, I think, so I welded it out.

Still have to do the top support, the diverter mounting bracket, and figure out how to mount the tank and make and weld on brackets for that. Could be done with all the main fab this weekend, and then maybe get it into powder coat next week. After that is final assembly so I can sort out hose lengths, fittings and anything else that needs doing.
 
 
Top