Big Barn
Super Member
- Joined
- Aug 20, 2013
- Messages
- 7,047
- Location
- Victoria, B C
- Tractor
- More than 40 over the years. Ten at any one time. Mostly Ford and New Holland
Duplicate post
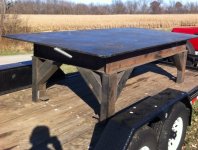
Got this table a few weeks ago at an industrial contractor going out of business auction. It's REAL sturdy to say the least. Lol <img src="http://www.tractorbynet.com/forums/files/welding/405055-welding-table-build-image-3917438099-jpg"/>
Very nice! I wonder what that weighs? I would love to come across a find like that!Got this table a few weeks ago at an industrial contractor going out of business auction. It's REAL sturdy to say the least. Lol
View attachment 405055
Wow two responses in 1 min! I didn't mean to post it here but guess it doesn't matter. Lots of interest. It's around 3,000 lbs to 4,000 lbs I think. My Kubota can barely pick up one end. 12" or 14" I beams.Very nice! I wonder what that weighs? I would love to come across a find like that!
I would try warming up the same spots only over a slightly larger area.
If that doesn't work you should have done it the other way.
Terry
Without being there it's hard to walk you through this.
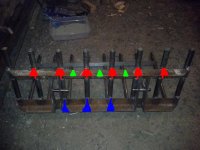
Try this, heat the red areas first. Start in the center, heat the wedge. Top side and bottom on the leg, then heat a line down the other leg of the angle. Take a spray bottle of water to cool, or your garden hose. Cool the first area stone cold to the naked hand. Then move to the next wedge, and do the same thing. Each time cool that area stone cold to the naked hand.
If you still don't get the results you want heat the green areas next, doing it the same way. If this doesn't fix it. Heat the blue areas next, the same way.
If this doesn't fix it, you'll have to live with it!
You want to heat quick and cool quick use a rosebud if possible and garden hose.
Ya, would have done that already had it not have been for learning of flame straightening here. I've only got a couple hundred bucks into it so far so not the end of the world to sell it and start over. I'm sure there will be someone locally that will be happy enough just having one and willing to accept the weld-induced twist