Woodsplitter build #2

   / Woodsplitter build #2
  • Thread Starter
#61  
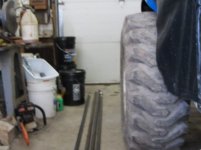
Now I know my double 55 gal drum stove will heat my shop at 15d F outside.
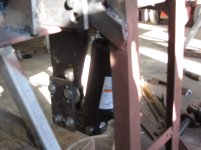
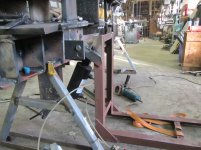
Burns a lot of wood though. Good thing the top of the box wedge splits off big pieces. I don't usually work out there from Dec 15 to March 1 but this year is different. I know you guys want progress. While waiting for plumbing , due tomorrow the last hoses and the relief valve, I have been scrounging around my scrap pile looking for pieces for the log lift cylinder anchor. I want to bolt it on using the same bolts that hold the hinge bracket , Hinge bracket on the near side and anchor on the far side. It is a lot easier to take the one step back with bolts than welds.
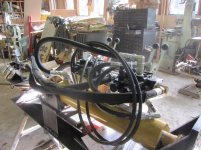
Here is todays story. I needed to extend the cylinder for the lifter to see where it sort of wanted to go. Since putting oil in it at this point would be very messy I decided air would be good. I have a 4way air valve and started plumbing. First thing , since the cylinder is surplus I guess it was used. The teflon tape boogy man was present in the threads. I stopped and picked them all out. There was a lot. It's good there are a lot of comments here about teflon tape in the threads being the issue. So fired up the compressor and flipped the valve. Nothing. Eventually I realized the whole thing ,lifter and cylinder was still hooked to the overhead hoist and I was either trying to raise the building or pull it down. I forget which. After I got that straightened out the cylinder extended very nicely. More sawing and tacking and drilling.
I think I am done with 1" diameter holes. Actually 1 1/32 is what I use for 1" pins. I bought a special drill for that. My drill press does not like anything over 3/4 so all those big holes have to go on the mill. Sometimes the vise and sometimes clamped to the table. It's a bigger deal than just jumping on the drill press. So 4 hours today. I have more time in the lifter than I have in the beam and ram. Feels like it anyway. I was tacking and something got around the hood and around my safety glasses and hit the corner of my eye. Never had that happen before. If I tell my wife she will make me go to the eye DR. Not yet it's way off in the corner , I will see what it's like tomorrow. Besides I still got the drops from the last time I got something in my eye, which was the end of the bottle of eye drops. go figure. I will try for pictures tomorrow.
 
Last edited:
   / Woodsplitter build #2 #62  
Too bad about the eye. Happens to me alot. So much i can actually touch my eyeball now with my finger without flinching.

Try a cuetip. pull out your eyelid and look north, south, east and west and see if you can see the culprit. If you do, grab it with the cuetip. Polysporin drops will prevent infection.
 
   / Woodsplitter build #2
  • Thread Starter
#63  
Thanks Seems to be ok now lots of eye drops and a hot shower.
 
   / Woodsplitter build #2
  • Thread Starter
#64  
pictures today maybe 4 steps forward and 1 step back. Soon I will own stock in DHH.
First picture all the hoses on the beam. the 1/4 are just folded over. They go to the lifter. The main cylinder hoses are probably 6 " to short . IF they leak I will get ones 12" longer.
Second picture relief valve for the power supply. This was an engineering change so of course I am placing the 3rd fitting order .
3rd picture The space I cannot spin the valve in. I guess I could have taken the cartridge out of the housing but then I would have to put a perfectly good valve back together. I always make this mistake, think I am going to get exactly the fittings need, then get fed up and get extra, then trip over the extra , they are never right for the next job anyway, then I get extra again. Most of the time to get to DHH $20 min.
4th picture Finally found the right spot for the cylinder anchor. lifter down
last picture lifter up.
Lot of give in the cylinder anchor with 80psi on the 3.5 " diam cylinder . Used up an inch of travel before the lifter started to move. Of coarse it is clamped mostly. I still want to bolt it in and it is pretty impossible to drill any more holes in the beam now. Well not impossible but ugly. I could weld clips to the beam and bolt to them. I sort of have that started but I don't like it. I need a rest. Tomorrow is an all day volunteer job. Handrail posts on an Appalacian trail boardwalk. last last picture
 

Attachments

  • IMG_0133.jpg
    IMG_0133.jpg
    819 KB · Views: 402
  • IMG_0136.jpg
    IMG_0136.jpg
    696.4 KB · Views: 361
  • IMG_0135.jpg
    IMG_0135.jpg
    776.8 KB · Views: 346
  • IMG_0142.jpg
    IMG_0142.jpg
    753.3 KB · Views: 381
  • IMG_0143.jpg
    IMG_0143.jpg
    817 KB · Views: 436
  • IMG_0117.jpg
    IMG_0117.jpg
    999.4 KB · Views: 392
   / Woodsplitter build #2 #65  
Looks good Bob. Close now. Must be getting excited.

I know all about plumbing/engineering changes.. i had a few too :D 
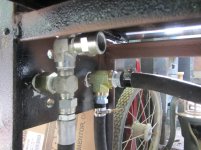
It Gets expensive at $10 a fitting :laughing:
 
   / Woodsplitter build #2
  • Thread Starter
#66  
Starting to think about 15 gal of hydraulic oil. The anchor for the lift cylinder is not clean. I have to think about it for a bit yet. Then there is the out rack, but that should be easy, just work. Lots of welding yet. I used up 7# of 5/32 6011 rod. I have a lot of 1/8 well 8# . The lifter and outrack I can probably do with 1/8 and I still have some 5/32 6013 to finish up the wedge and it's anchor. Way over budget on this puppy but way way under $13k.
 
   / Woodsplitter build #2 #67  
Bob are you using any more amps to weld with than the standard recommendations for the rod size? Also, I've found I tore up any log tables I made if they did not protrude far enough into the beam area. Short of getting in the way of any log lifts, (although your set up is non conventional so you probably wouldn't have that problem) I had more success when the table protrudes almost half way down the beam and notched to clear any log over hangs.

Lou
 
   / Woodsplitter build #2
  • Thread Starter
#68  
Bob are you using any more amps to weld with than the standard recommendations for the rod size?

Lou

No 90A for 1/8 and 145A for 5/32
My welder is a 40 year old Lincoln tombstone AC only it has a fixed rotary amp selector. Looks like I bought it yesterday. Paid $100 for it new.
 
   / Woodsplitter build #2
  • Thread Starter
#69  
Big step forward yesterday. The log lifter works with air. I took a movie. Lets see if I can load it. My Son in law did the last one. While I am trying to figure that out 15 gal of hydraulic fluid and 40ft of 3/4 pipe for the out rack. Got 10ft a week ago. Finally changed the blade on my bandsaw. I have never had a pile of metal chips this big. Second photo is the cylinder mount for the log lift.
I finally sat down and made drawings of each part. I put the pieces in the mill and put the 1/2 bolt holes in on a grid. So I could move the pieces around to make adjustments and have all the bolt holes line up. Took a couple of hours and it was worth it. I moved them twice to get it where it is in the movie. You can see that I have way more lift than I need so I am going move the cylinder back 1 hole so it will not go so high. OF course it will go lower then but I can put a collar stop on the shaft. I also want to get the hose fittings on the back side. That may require some rework in some of the plates or maybe just 1 plate. The main vertical is just tacked in .
Sorry about the focus. New camera it wants 1/2 down on the shutter button for , I guess 1/2 second before pushing all the way down.
Log Lifter - YouTube
 

Attachments

  • IMG_0148.jpg
    IMG_0148.jpg
    723.7 KB · Views: 329
  • IMG_0149.jpg
    IMG_0149.jpg
    576.4 KB · Views: 390
   / Woodsplitter build #2 #70  
Lifter looks good. I think you may have a bit more travel than you need however. I go just to slightly above the horizontal with mine. If you move the base of the cylinder more horizontal, not only will you reduce the vertical travel, but you'll gain some leverage for the lift. Its going to be quite a push as its set up now.

For layout, i do all my designs in Solidworks. It sure helps getting angles and positions right. You can simulate all the range of motion.

If you might want to give 3d modeling a try, have a look at Sketchup. Its free.
 
   / Woodsplitter build #2
  • Thread Starter
#71  
It's hard to see but the pivot attachment for the end of the cylinder on the lift frame is above the bottom of the main beam. It was difficult to figure out the most efficient location of the pivots with out a cad program. With that pivot where it is , there is a limit as to how horizontal the cylinder can be. I can move the base back a little but that's all. With out taking it all apart and making major changes. I don't want to do that. I was very concerned about the 4" stroke and running out of stroke. The cylinder is 3.5 diameter. Plenty of force .
I worked with a crew using solidworks for 3 years. Pretty nice program but pricey for home use. I have never been able to get sketchup to do what I want. Other people have said the same thing.
 
   / Woodsplitter build #2 #72  
yeah i can see your kinda stuck with your system barring a major redesign. I just didnt want you to be finished and find you cant lift a full load on your lifter. I can load mine right up with lots of rounds before i lift it up.

No question SW isnt cheap. Im lucky to have it. And honestly i cant get Sketchup to work for me either. It doesnt work the way i "think".
 
   / Woodsplitter build #2
  • Thread Starter
#73  
I think as long as the cylinder motion does not jam in it's travel , which it does not, then the load should not be a problem. It's all inch-pounds.
If the load is 300# at 24 inches then the load is 7400 inch #.
IF the hydraulic cylinder push point is 1.5 inches off the pivot then the load on the cylinder is 7400/1.5 is 4933 #
The cylinder is 3.5" diam Area is 9.6 sq in. At 2000 psi 19200 #
Pretty much 4x I could put 600# on the loader and still be 2x to the good.
I think I have to worry more about welds ripping apart and members bending than not enough force. I guess if that happens I will be in redesign anyway.
First I have to remember to finish welding everything that is tacked.
 
   / Woodsplitter build #2
  • Thread Starter
#74  
I bit the bullet and ground out the tacks on the vertical member of the lift cylinder anchor. Moved it back around 3 inches. Moved the bolted sections around a bit and I think it's fine now. Just above horizontal on lift and about an inch of travel left on the cylinder when down. A little more horizontal element to the cylinder. I think there is plenty of room for the cylinder fittings on the back side. I also finished the plumbing on the pump unit. Relief valve is installed.
I have a gage port on the pressure line out of the pump. I do not plan on leaving the gage installed there. I have one permanently installed on the beam. I do not plan on a valve or QD when I disconnect the gage on the pump unit. It is a 3/8 jic fitting with a plug when the gage is not there.
Question IF the pump unit is stand alone that is the hoses are not hooked up to the beam and the pump is running, gage in place, and oil is returning to the tank over the relief valve. If I shut it down and disconnect the gage, is there pressure in the line? The pump is a 2 stage pump , does it have a check valve that would maintain pressure against the relief valve and or do the gears allow pressure to bleed off if the pump is not turning?
Pictures tomorrow.

This is not air and the pump is not turning. Oil is not compressible. The only pressure that could be there is from hoses returning to nominal. Crack the fitting with a rag over it and it is gone. I must have had air on my brain.
 
Last edited:
   / Woodsplitter build #2 #75  
i think you did the right thing by moving the cyl. Its probably going to work better in the end.

If the hoses are disconnected and your bypassing through your "safety" bypass, then you'll still have pressure in the upstream side of the bypass (at the instant of shutdown). The downstream (after) the bypass should have no pressure as it dumps to tank.
 
   / Woodsplitter build #2
  • Thread Starter
#76  
yeah I was worried about disconnecting the gage. But if the pump is not running there cannot be much there.
 
   / Woodsplitter build #2
  • Thread Starter
#77  
Pictures See those logs Oak and Maple and those are the small ones.
See the little log splitter Thats why I need a bigger one.
Relief valve installed Funny thing about plumbing fittings. Turn them until they point the way you want and then worry about another 360d or will they leak.
I could put oil in the thing now but I am nervous. Think I will wait till I do a little more work on it. Electrial stuff and casters . Casters cause I have them and then can push the power supply outside and leak there instead of inside on the floor.
On the lifter I had something crooked and I could not stand it. It was one of the tiebars at 45d between the pivot and the log holder. Had to cut it out and tack it back in. Of course it changed the stroke positions on the cylinder AGAIN.
UP is now just horizontal and down can go a little more into the dirt. Will make the lifter flush at ground level.. I have adjustment up if I want to go that way. I think it's done. Next nice day I will take it outside and weld away.
 

Attachments

  • 001.jpg
    001.jpg
    1.1 MB · Views: 343
  • 004.jpg
    004.jpg
    1.1 MB · Views: 342
  • 009.jpg
    009.jpg
    911.7 KB · Views: 437
  • 007.jpg
    007.jpg
    991.2 KB · Views: 388
  • 005.jpg
    005.jpg
    1 MB · Views: 527
   / Woodsplitter build #2 #78  
yeah I was worried about disconnecting the gage. But if the pump is not running there cannot be much there.

Why do you want to disconnect the gauge? Id leave it there full time, they arent that expensive.

There will be pressure there until it bleeds down. The relief will close at its set pressure, disconnecting the tank. The only way it can bleed down will be back through the pump, which could be a slow process. Of course when the splitter is hooked up, and the machine s turned off, you'll have an open path back to tank, so no buildup.

This pressure buildup can happen on equipment. Hoses can be next to impossible to plug / unplug with pressurized fluid in them. You may have to go and manually push the disconnect in to bleed off the pressure.
 
   / Woodsplitter build #2
  • Thread Starter
#79  
I have a gage permanently installed out on the beam. I only need a gage on pump line to set the relief valve. But you are right, they are cheap. In fact I have an old one around here that the fluid turned yellow in but it still can be read. I should just install that one and leave it in.
I have a diverter valve on the FEL for a grapple jaw and plow angle.. Those fittings are set up to plug into each other when disconnected. I still have to release pressure most of the time when hooking them up.
Jason you have helpful comments, Thanks.
 
   / Woodsplitter build #2
  • Thread Starter
#80  
I Slow progress Cold out If I don't get the woodstove running by 10am I am not going to get 4 hours in. Went out to lunch with my wife yesterday. Killed the day for work but the lunch and the company was great.
So First picture My old gage. Face plate was so yellow it was hard to see and the needle was wrong side of zero. So I took it apart. Did anyone know the whole case is filled with gycerine. I think the needle was the wrong side of zero is because it was so cold. It only went to 2000 psi anyway.
Second picture Electrical switch and hour meter done. Not a great bracket but it works and I am getting tired and cold.
3rd pic cover The switch cover did not work right. I was really annoyed because just before the motor on a TSC 6" cut off saw blew up. And I mean just that It went BANG and caught fire at the vent slots on the front end. I just got it a couple of weeks ago. Don't have the receipt so maybe ,if I am lucky they will exchange it. Back to the switch cover , Not enough throw to go from on to off. So I cut the pins off , Works ok now.
4th pic Finished the mount for the log lift cylinder
5th pic cut all the pipe for the out feed table
6th pic Log lift pivot s
7th pic wheels Have to figuire out how to best mount them on the power supply. Unit is a little top heavy with no oil so I will spread the wheels to the out side. Trip hazard but cannot be helped.
 

Attachments

  • 003.jpg
    003.jpg
    760 KB · Views: 267
  • 001.jpg
    001.jpg
    781.5 KB · Views: 304
  • 002.jpg
    002.jpg
    611.2 KB · Views: 223
  • 004.jpg
    004.jpg
    731.4 KB · Views: 312
  • 005.jpg
    005.jpg
    795.5 KB · Views: 237
  • 006.jpg
    006.jpg
    871.3 KB · Views: 286
  • 007.jpg
    007.jpg
    881.6 KB · Views: 289

Tractor & Equipment Auctions

SEMI AUTOMATIC QUICK-CHANGER FOR MINI EXCAVATOR (A58214)
SEMI AUTOMATIC...
UNUSED 89" LAND PLANE (A52706)
UNUSED 89" LAND...
206320 (A57192)
206320 (A57192)
7ft Pull-Behind Rake Tractor Attachment (A59228)
7ft Pull-Behind...
CFG Industrail MX15RX (A53317)
CFG Industrail...
Gravely ZT XL-52 52in Zero Turn Commercial Mower (A59228)
Gravely ZT XL-52...
 
Top