At Home In The Woods

   / At Home In The Woods
  • Thread Starter
#1,281  
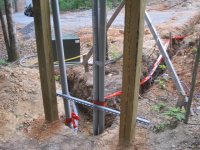
Great suggestions Pete. We did have the end of the existing half wall beefed up because it was very flimsey originally. The end 2x4 goes through a hole cut in the subfloor and is tied to the floor trusses. However, that's all for nought since the half wall will be replaced by another one that will end in a different place.

Obed
 
   / At Home In The Woods
  • Thread Starter
#1,282  
Here are the bolts that will attach a ledger board to the house. The ledger board will be used to attach the back porch floor and deck to the house.

attachment.php


What is not apparrent in the picture is there will be another row of bolts below the existing bolts. The existing bolts are attached to the framing. The lower row will be attached to the concrete foundation wall. The holes have already been drilled in the concrete.
 

Attachments

  • IMG_4103.JPG
    IMG_4103.JPG
    132.2 KB · Views: 1,459
   / At Home In The Woods
  • Thread Starter
#1,283  
Trench for Electrical Conduit

This weekend I worked on the last portion of the electrical trench between the electrical pedestal and the house.

attachment.php


I layed out with some orange paint the line that will connect the two ends of the trench that I had dug a few weeks ago. Timing for doing this portion has been a little dicey because we can't get supplies to the house while the trench is opened across the driveway. Now seemed to be a good time to finish the trench.
 

Attachments

  • IMG_4099.JPG
    IMG_4099.JPG
    188.7 KB · Views: 1,169
  • IMG_4100.JPG
    IMG_4100.JPG
    182.4 KB · Views: 338
  • IMG_4101.JPG
    IMG_4101.JPG
    178.3 KB · Views: 349
   / At Home In The Woods
  • Thread Starter
#1,284  
Solving the phone delimna made gave me a little more confidence about digging around this phone cable.

attachment.php

You can see that my electrical trench needed to be dug right beside where the cable exits the ground. I dug a little around the phone cable by hand to get it about 3 inches away from where I would be digging the electrical trench.
 

Attachments

  • IMG_4102.JPG
    IMG_4102.JPG
    199.1 KB · Views: 1,180
  • IMG_4106.JPG
    IMG_4106.JPG
    184.9 KB · Views: 379
   / At Home In The Woods
  • Thread Starter
#1,285  
I dug this section about 5 feet deep so that the gas line can cross the electric line here.

attachment.php

You can see the yellow gas line sitting above ground beside the transformer in the background. I'm digging the trench with a 9" bucket; the trench turns out to be about 12" wide or less. A 5 foot deep trench that is so narrow is tough to work in. It's too narrow to climb into. Fine tuning the trench by hand is tough. To remove small rocks that fell into the trench, I would lower the end of a hoe down and pick up the rock. Or I would use a set of post hole diggers to reach down and pull out rocks.

This rock was about 18" across. I hit it about between 3 and 4 feet down. It took a very long time to get it out of the 12" wide trench.

To finish the trench in the middle of the driveway where the two trenches joined, I had to change my tractor angle to the trench. I could no longer dig with the backhoe pointed directly behind the tractor but had to angle the backhoe to the side. When I've dug from this sideways angle before, it was always very slow because I would dig a couple feet of trench, then have to drive the tractor away from the trench and resituate the tractor to dig the next couple of feet. Remaneauvering the tractor every 2 feet would take as much time to do as the actual digging if the trench was shallow.

However, I learned a new and very useful trick. I was able to use the backhoe to lift up the rear wheels of the tractor and move the backend of the tractor about 3 to 6 inches sideways. Every so often I would pull the tractor forward a few inches when my remaneuvering resulted in the backend of the tractor being too close to the trench. That's all I had to do to shuffle the tractor sideways down the trench. This maneuver saved me a bunch of time. In this picture I was digging on the right side and then moving the tractor to the left along the trench as described above.

Here are the pictures of the finished trench.
 

Attachments

  • IMG_4110.JPG
    IMG_4110.JPG
    191.1 KB · Views: 377
  • IMG_4107.JPG
    IMG_4107.JPG
    191.6 KB · Views: 1,175
  • IMG_4113.JPG
    IMG_4113.JPG
    175.8 KB · Views: 501
  • IMG_4114.JPG
    IMG_4114.JPG
    168.6 KB · Views: 285
  • IMG_4115.JPG
    IMG_4115.JPG
    205.8 KB · Views: 284
   / At Home In The Woods
  • Thread Starter
#1,286  
My wife re-installed the drain tile underneath the electrical access holes. This is the drain tile that I attempted to install and was 15 minutes away from completion when a the rain storms that flooded Nashville reached us an messed up my work.
 

Attachments

  • IMG_4125.JPG
    IMG_4125.JPG
    152.6 KB · Views: 168
  • IMG_4123.JPG
    IMG_4123.JPG
    153.2 KB · Views: 178
  • IMG_4122.JPG
    IMG_4122.JPG
    149 KB · Views: 185
  • IMG_4121.JPG
    IMG_4121.JPG
    148.2 KB · Views: 188
  • IMG_4126.JPG
    IMG_4126.JPG
    132.7 KB · Views: 182
  • IMG_4130.JPG
    IMG_4130.JPG
    148.7 KB · Views: 180
  • IMG_4131.JPG
    IMG_4131.JPG
    145.1 KB · Views: 177
  • IMG_4132.JPG
    IMG_4132.JPG
    159.6 KB · Views: 175
   / At Home In The Woods
  • Thread Starter
#1,287  
The valley between the garage roof and house roof funnels a lot of rain onto the area where the drain tile sits.

attachment.php


We took some steps to prevent the rain from ruining the drain tile work a second time.
 

Attachments

  • IMG_4142.JPG
    IMG_4142.JPG
    100.4 KB · Views: 1,020
  • IMG_4143.JPG
    IMG_4143.JPG
    128.9 KB · Views: 352
Last edited:
   / At Home In The Woods
  • Thread Starter
#1,288  
Electrical Conduit

Electrical conduit got run this week between the transformer and the pedestal and between the pedestal and the house. The installers had a device that heated the PVC conduit so they could bend the conduit. The red plastic non-sticky tape will be placed in the trench a foot above the conduit. This tape is designed to warn future diggers that there is electrical wire in the ground below where they are digging.
 

Attachments

  • IMG_4136.JPG
    IMG_4136.JPG
    177.4 KB · Views: 2,164
  • IMG_4135.JPG
    IMG_4135.JPG
    192.8 KB · Views: 218
  • IMG_4134.JPG
    IMG_4134.JPG
    198.9 KB · Views: 213
  • IMG_4138.JPG
    IMG_4138.JPG
    181.9 KB · Views: 229
  • IMG_4139.JPG
    IMG_4139.JPG
    177.4 KB · Views: 884
  • IMG_4141.JPG
    IMG_4141.JPG
    146.7 KB · Views: 1,148
  • IMG_4146.JPG
    IMG_4146.JPG
    80.1 KB · Views: 253
   / At Home In The Woods #1,289  
while that trench is open that crosses your driveway now is your chance to add one more piece of say 2 inch PVC so if in the future you want to run any wires to the other side of your driveway you will have a pipe in place.
 
   / At Home In The Woods #1,290  
while that trench is open that crosses your driveway now is your chance to add one more piece of say 2 inch PVC so if in the future you want to run any wires to the other side of your driveway you will have a pipe in place.

That is very true. Never know when you might want lighting, driveway alarm, electric gate or such. It is cheap to do now and expensive later.

MarkV
 
   / At Home In The Woods #1,291  
That is very true. Never know when you might want lighting, driveway alarm, electric gate or such. It is cheap to do now and expensive later.

MarkV

I third that, can even just put it twelve inches down so you don't have to go looking for it, but no better time to do it.
 
   / At Home In The Woods #1,292  
I gotta say I have never seen it take 6+ months to get this far along on a house :confused:

You must be getting tired of digging holes to fill them back in.
 
   / At Home In The Woods
  • Thread Starter
#1,293  
I gotta say I have never seen it take 6+ months to get this far along on a house :confused:

You must be getting tired of digging holes to fill them back in.
Very true!
 
   / At Home In The Woods
  • Thread Starter
#1,294  
while that trench is open that crosses your driveway now is your chance to add one more piece of say 2 inch PVC so if in the future you want to run any wires to the other side of your driveway you will have a pipe in place.
We ran a 1 inch PVC for the phone line. I'm now wishing I had run a 2 inch conduit.

Obed
 
   / At Home In The Woods
  • Thread Starter
#1,295  
We spent long days Saturday and Sunday filling in the electrical trench. There were many large rocks in the backfill. If any of these rocks were directly dumped on top of the conduit, we would be at risk of having breaking the conduit during the backfilling and settling. Thus, we had to backfill much of the trench by hand so we could make sure that soft dirt without rocks covered the conduit first. So we covered the electrical conduit with a foot of soft dirt, then laid a 1 inch conduit for the phone line in the trench.

My trench had some humps and dips in it because of large rocks that I was unwilling to dig out. When the conduit was laid, there were some spots where the conduit was 2 or 3 inches above the trench bottom due to the uneven depths. The electric company inspector told us we needed to either tamp dirt under the conduit or put gravel under the conduit so the conduit would not pull apart due to the dips in the trench bottom.
 

Attachments

  • IMG_4145.JPG
    IMG_4145.JPG
    179.8 KB · Views: 213
  • IMG_4148.JPG
    IMG_4148.JPG
    174.5 KB · Views: 249
   / At Home In The Woods
  • Thread Starter
#1,296  
We worked on covering up the area where the conduit enters the basement wall. If you remember, there is a drain tile below where the conduit enters the wall. I used some hydraulic cement to fill the gap between the conduit the holes through the basement wall. The wife installed the styrofoam and put some window flashing above the conduit to help prevent water from entering the basement. We covered the gravel with landscape fabric. When I started putting dirt over the fabric, it started raining so I had to stop. We covered the area with scrap house wrap and sheathing to protect the area until I can finish filling in the area.
 

Attachments

  • IMG_4152.JPG
    IMG_4152.JPG
    126.1 KB · Views: 211
  • IMG_4151.JPG
    IMG_4151.JPG
    139.2 KB · Views: 209
  • IMG_4150.JPG
    IMG_4150.JPG
    142.8 KB · Views: 224
  • IMG_4149.JPG
    IMG_4149.JPG
    152.5 KB · Views: 278
  • IMG_4157.JPG
    IMG_4157.JPG
    142.7 KB · Views: 182
  • IMG_4156.JPG
    IMG_4156.JPG
    154 KB · Views: 194
  • IMG_4154.JPG
    IMG_4154.JPG
    95.2 KB · Views: 213
  • IMG_4153.JPG
    IMG_4153.JPG
    95.9 KB · Views: 211
  • IMG_4159.JPG
    IMG_4159.JPG
    137 KB · Views: 198
  • IMG_4160.JPG
    IMG_4160.JPG
    156.6 KB · Views: 198
   / At Home In The Woods
  • Thread Starter
#1,297  
My wife didn't like how the hall bath fan was installed.

attachment.php

See how the duct work snakes around. Each 90 degree turn is equivalent to adding 15 ft of length to the duct work in terms of inhibiting air flow and movement of moisture through the ducting. This short run has 4 90 degree turns. That reduces the efficiency of the fan equal to adding an additional 60feet of ductingf! So the wife re-installed the fan. I cut and installed the blocking and installed one of the duct hangers that my wife had a tough time reaching.

attachment.php

Here's the result of my wife's efforts.
 

Attachments

  • IMG_4161.JPG
    IMG_4161.JPG
    123.5 KB · Views: 926
  • IMG_4170.JPG
    IMG_4170.JPG
    120.3 KB · Views: 243
  • IMG_4166.JPG
    IMG_4166.JPG
    125.8 KB · Views: 835
   / At Home In The Woods #1,298  
Nice job on straightening out the duct work, but why didn't you just replace it with flex line? It's insulated and you can bend it to fit anywhere, or go as wide and gradual as you have the space for in your turns.

Eddie
 
   / At Home In The Woods #1,300  
Fan looks a lot better, amazing what 'solutions' people who don't care will come up with. Not only will the first way be inefficient but each 90 costs a few bucks too.

I like the hard line when possible, it stays cleaner over the years and will hold up to construction hazards better.
 

Tractor & Equipment Auctions

John Deere 6110M (A53317)
John Deere 6110M...
2012 INTERNATIONAL 4300 26 FT BOX TRUCK (A59904)
2012 INTERNATIONAL...
2012 DOOSAN G25 GENERATOR (A58214)
2012 DOOSAN G25...
2003 Big Tex 10PI 16ft. T/A Pipe Top Utility Trailer (A55973)
2003 Big Tex 10PI...
UNKNOWN  500BBL FRAC TANK (A58214)
UNKNOWN 500BBL...
2021 HYUNDAI HX220L EXCAVATOR (A60429)
2021 HYUNDAI...
 
Top