My little welding table DIY accessories

   / My little welding table DIY accessories #1  

dragoneggs

Super Star Member
Joined
Jun 9, 2013
Messages
14,548
Location
Seabeck, Washington
Tractor
Kubota BX-25D, Kubota Z122RKW-42
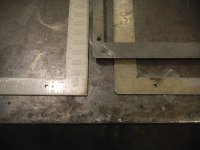
Okay guys, don't laugh... I made a couple accessories for my little (2ft by 4ft) portable welding table. The first was simply to adhesively bond three 'super magnets' purchased at Home Depot to a 2ft square. I find this helpful in squaring up parts to be welded. The magnets are small but super strong and believe it or not, it takes a pretty good yank to free them from the steel work top. I store the square on the underside.

The other was a little more creative... I adhesively bonded Click Bond studs to a steel plate and then bolted down a vise to the plate. I was going to drill holes in my 1/2in steel work top and bolt the vise down directly as typical, but I wanted to be able to have a completely flat and clear work area to so I came up with this quickly removable solution. I use a couple of vise grips to secure the vise to the work table. Works great and I can put it wherever I want it!

IMG_1711.jpg IMG_1708.jpg IMG_1709.jpg IMG_1707.jpg IMG_1706.jpg
 
   / My little welding table DIY accessories #2  
:laughing: :laughing: :laughing: :laughing:

Okay guys, don't laugh...

Oops, missed that part on the first read through ;)

It's little tricks & tips like this being shared that keeps this place interesting.
Thanks for sharing.
 
   / My little welding table DIY accessories #3  
Very nice table, will come in real handy for welding projects.:thumbsup:

Don't know if you realize it or not. Those magnets will play havocked with the arc, if you tack or weld near them. Little PITA thing called arc blow!:D
 
   / My little welding table DIY accessories #4  
Those magnets will play havocked with the arc, if you tack or weld near them. Little PITA thing called arc blow!

See, there's another one right there!
 
   / My little welding table DIY accessories #5  
That square is a framing square used for laying out things like stair stringers and rafters. 9 out of 10 ARE NOT SQUARE! You need to use a speed square to set things to square. Never use a framing square to set things to 90 deg -- I've seen them be as much as 1/2" off in 2 ft. Check it by setting the thinner side against a known straight edge - like the factory cut edge of a piece of plywood, ( be real picky about the edge alignment here) draw a line along the outside edge of the fat side, now flip it so the thin side is on the opposite side of your drawn line but aligned along that factory cut again and see if your drawn line still lines up with the fat edge. When I needed to have a square square - and I was buying a piece of plywood at the same time, I took all the squares off the shelf and did that - I didn't find one square.
 
   / My little welding table DIY accessories #6  

Attachments

  • Framing square 1.JPG
    Framing square 1.JPG
    232.7 KB · Views: 410
  • Framing square 2.JPG
    Framing square 2.JPG
    232.8 KB · Views: 399
   / My little welding table DIY accessories #7  
I also use the Pythagorean Theorem (3-4-5 rule) to check my squares. I also flip me levels over to check to see if the bubble is in the same spot. I also have a rafter square with the corner cut for bead clearance. Speed squares are used for small projects but if I can get the bigger one in there I use that.
 
   / My little welding table DIY accessories #8  
Very nice table, will come in real handy for welding projects.:thumbsup:

Don't know if you realize it or not. Those magnets will play havoc with the arc, if you tack or weld near them. Little PITA thing called arc blow!:D

Yeah, and if you watched that old Miller video, that "Arc Blow" is an ornery rascal. :laughing:
Their solution was to buy one of their AC welders. :D
 
   / My little welding table DIY accessories #10  
You can sometimes bring a framing square into "square" with a center punch, if it's not TOO far off - if the angle is too acute, make a punch mark near the inside corner and recheck - repeat as necessary, but recheck with each successive punch til you get the hang of it.

If the square is WIDER than 90 degrees, punch just in from the OUTSIDE corner... Steve

Oh, and AFTER you get it true, try not using it as a PRY BAR (DAMHIKT :rolleyes: )
 
   / My little welding table DIY accessories
  • Thread Starter
#11  
You can sometimes bring a framing square into "square" with a center punch, if it's not TOO far off - if the angle is too acute, make a punch mark near the inside corner and recheck - repeat as necessary, but recheck with each successive punch til you get the hang of it.

If the square is WIDER than 90 degrees, punch just in from the OUTSIDE corner... Steve
Yep... That's how I do it.
 
   / My little welding table DIY accessories #12  
You can do the same thing with C-Channel. Take a sledge hammer and place it under one of the flanges of the C-Channel, (used as a dolly). Hit the top of the flange with a ball peen hammer.
 

Attachments

  • Channel strong.jpg
    Channel strong.jpg
    56.6 KB · Views: 171
   / My little welding table DIY accessories
  • Thread Starter
#13  
Very nice table, will come in real handy for welding projects.:thumbsup:

Don't know if you realize it or not. Those magnets will play havocked with the arc, if you tack or weld near them. Little PITA thing called arc blow!:D
Uh oh! Didn't know about the magnet issue. Now you got me paranoid and I removed the magnets from my welding table.... dang it! So why are there magnet squares sold for welding???
 
   / My little welding table DIY accessories #14  
So why are there magnet squares sold for welding???
They are handy for holding things!:cool: Just be aware if you have issues while welding with arc blow remove them from the area. I've had issues with them just tacking close to a magnet before.
 
   / My little welding table DIY accessories
  • Thread Starter
#15  
They are handy for holding things!:cool: Just be aware if you have issues while welding with arc blow remove them from the area. I've had issues with them just tacking close to a magnet before.
Gotcha! Could you please explain a little more about arc blow and how to recognize it?
 
   / My little welding table DIY accessories #17  
That square is a framing square used for laying out things like stair stringers and rafters. 9 out of 10 ARE NOT SQUARE! You need to use a speed square to set things to square. Never use a framing square to set things to 90 deg -- I've seen them be as much as 1/2" off in 2 ft. Check it by setting the thinner side against a known straight edge - like the factory cut edge of a piece of plywood, ( be real picky about the edge alignment here) draw a line along the outside edge of the fat side, now flip it so the thin side is on the opposite side of your drawn line but aligned along that factory cut again and see if your drawn line still lines up with the fat edge. When I needed to have a square square - and I was buying a piece of plywood at the same time, I took all the squares off the shelf and did that - I didn't find one square.
There are tricks to squaring up a framing square, google it

Dang, Bukit beat me to the punch
 
Last edited:
   / My little welding table DIY accessories #18  
Us old pipe fitters are lost w/o 2 framing squares handy and a pipefitter folding rule. We also use two levels w/magnet bases, one for the horizontal piece and the other for the vertical. Yes, you have to check them once in awhile. Buy quality tools and they will be accurate when new and take a lot of abuse to get out of whack. We always kept a new one at the shop to calibrate the ones we carried banging around in the truck and on the job. Pipe fitter rules fold so you can see the numbers with the folded part on to instead of hanging done. Lets you set it on a horizontal surface and read it. Carpenter rule (what you get off the shelf). I have only found them at a plumbing supply or industrial supplier. Come out here some day Dragon eggs and I will show you one and how to use the two methods.

Ron
 
   / My little welding table DIY accessories
  • Thread Starter
#19  
Us old pipe fitters are lost w/o 2 framing squares handy and a pipefitter folding rule. We also use two levels w/magnet bases, one for the horizontal piece and the other for the vertical. Yes, you have to check them once in awhile. Buy quality tools and they will be accurate when new and take a lot of abuse to get out of whack. We always kept a new one at the shop to calibrate the ones we carried banging around in the truck and on the job. Pipe fitter rules fold so you can see the numbers with the folded part on to instead of hanging done. Lets you set it on a horizontal surface and read it. Carpenter rule (what you get off the shelf). I have only found them at a plumbing supply or industrial supplier. Come out here some day Dragon eggs and I will show you one and how to use the two methods.

Ron
You are on!
 

Marketplace Items

2001 Ford F-150 4x4 Pickup Truck (A59230)
2001 Ford F-150...
(32) 8" FLOOR TRUSSES (A60432)
(32) 8" FLOOR...
2004 AGCO Gleaner 3000 Corn Header (A61307)
2004 AGCO Gleaner...
2012 TAKEUCHI TL12 SKID STEER (A60429)
2012 TAKEUCHI TL12...
2005 Peterbilt 387 with Wet Kit (A61306)
2005 Peterbilt 387...
2455 (A60432)
2455 (A60432)
 
Top