Bridge#2

   / Bridge#2
  • Thread Starter
#41  
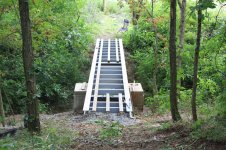
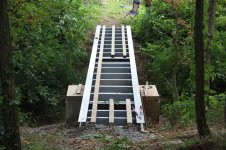
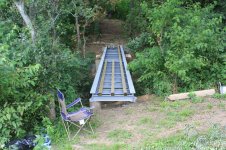
I had to put 2 more cross-braces in...I had everything set-up for 18' 4x4's, nobody sells 18' 4x4's around here, had to use 16', so I put two more 6" i-beams in. I drilled 64 holes in the cross-braces to bolt the 4x4's to. What a job!!!
 
   / Bridge#2
  • Thread Starter
#42  
I'll post pics of the progress tomorrow, worked till dark today. "wore-out"...
 
   / Bridge#2 #43  
Piers poured on the ten foot sections. I dug the holes 3 feet with the kubota, then finished them by hand (they are 4'). The 10' sections are in with the cross-braces. Almost ready for wood.

You have really done a great job!

It sure will be a sturdy bridge when finished.

Keep posting.
 
   / Bridge#2
  • Thread Starter
#44  
I got the some of the wood-runners in, the heat here is nasty...90+..not my favorite working conditions. I put the Kubota through her paces pulling out small tree-stumps. I used the steal wheel method...worked great (wish i'd taken pics). This was a way bigger project than i thought. Its finally looking like a bridge though. Kinda got rained-out today, and i needed a small siesta. Here's a few pics of the progress.
 

Attachments

  • 2b-049.jpg
    2b-049.jpg
    356.4 KB · Views: 512
  • 2b-048.jpg
    2b-048.jpg
    280.3 KB · Views: 617
  • 2b-047.jpg
    2b-047.jpg
    341.3 KB · Views: 487
   / Bridge#2 #46  
man that bridge is looking awesome i built one a couple years ago out of two trees i cut down i will half to take some pics of it and send it to you
 
   / Bridge#2 #47  
Awesome job!

I think you'll be able to tow the Queen Mary across that bridge...

Nice work!
 
   / Bridge#2
  • Thread Starter
#48  
man that bridge is looking awesome i built one a couple years ago out of two trees i cut down i will half to take some pics of it and send it to you

I would love to see it.
 
   / Bridge#2 #49  
Why did you decide to use circular piers on oneside, and the square on the other? I also love that you have a lawn chair on each side with a beer can... Just so you have a good resting place close by? ;-)
 
   / Bridge#2 #50  
How wide will the finished bridge be when finished? Looks too narrow for a tractor from the photos?
 
   / Bridge#2 #51  
:eek::eek::eek: WOW!!! I'm speachless!!!!!!!!


Nice work!


Looks like you are anticipating heavy rain and serious flow through the gully.
So to avoid the water flow from undercutting your foundation, put in some good size 1-2' and smaler rip rap on the upside, sides and down side of the foundations.

Great looking bridge, should hold an 18 wheeler!:D
 
   / Bridge#2
  • Thread Starter
#52  
Why did you decide to use circular piers on oneside, and the square on the other? I also love that you have a lawn chair on each side with a beer can... Just so you have a good resting place close by? ;-)

I used 12" circular piers on both sides (4' deep) with a support wall off center to help support the middle. Ya don't think I do all this work sober do you.
 
   / Bridge#2
  • Thread Starter
#53  
How wide will the finished bridge be when finished? Looks too narrow for a tractor from the photos?

It will be 6 feet 5 & 1/2 inches. It has about 12 inches of over-hang off each side of the I-beams. I agree, the pics make it look narrow, but keep in mind its 35 feet long. I made it a little wider than the first bridge (its 6 feet wide) just to give me a little more room pulling my trailer across it. My tractor (Kubota B2150hst) with the backhoe attached will fit fine.
 
   / Bridge#2 #54  
WOW that is simply amazing, great work and wonderful engineering. Keep up the great work and the pics. And thanks for letting us follow your work :D

James
 
   / Bridge#2
  • Thread Starter
#55  
:eek::eek::eek: WOW!!! I'm speachless!!!!!!!!


Nice work!


Looks like you are anticipating heavy rain and serious flow through the gully.
So to avoid the water flow from undercutting your foundation, put in some good size 1-2' and smaler rip rap on the upside, sides and down side of the foundations.

Great looking bridge, should hold an 18 wheeler!:D

Thanks. I was planning on putting some rock around the foundation to protect it (not sure what rip rap is...rock I think). We got 4 inches of rain the other day in less than 2 hours, it gave me a real good idea of where to protect the wash-out areas. Thanks for the ideas.
 
   / Bridge#2
  • Thread Starter
#56  
WOW that is simply amazing, great work and wonderful engineering. Keep up the great work and the pics. And thanks for letting us follow your work :D

James

Thanks. I must be doing something right with my lawn chair engineering, not many negative posts about my second bridge.
 
   / Bridge#2
  • Thread Starter
#57  
Today I got the rest of the runners in and started laying the planks (2x6s treated). I ran into a problem...the 4x4 runners are 1/8 of an inch taller than the top of the I-beams (my mistake) creating a small bowed look. Im probably the only one that would notice...but I do. The fix im thinking of is to put a shim in between the I-beams and the planks ( one that is as wide as the beam). Thats 70 feet of shims!!! I could take the runners back out and mill them down but thats a lot of work (105 feet of milling, plus unbolting etc.) Help...any ideas?
 
   / Bridge#2 #58  
Leave the 1/8" alone - that will be your crown so the water rolls off!
 
   / Bridge#2 #59  
That treated lumber will shrink as it dries out over the next few months. I'll bet the 1/8" will be gone by then. You could get rolls of the rubber/tar window flashing they use for building houses and roll that on top of the beams to save time if you think the wood won't shrink. It would be good protection for the beams anyway. The builders used that on my pole barn for every area steel was going to contact the treated boards (along the skirt, up posts, etc). The bridge looks great. Can't wait to see it when it's done.
 
   / Bridge#2 #60  
Thanks. I was planning on putting some rock around the foundation to protect it (not sure what rip rap is...rock I think). We got 4 inches of rain the other day in less than 2 hours, it gave me a real good idea of where to protect the wash-out areas. Thanks for the ideas.

"Rip rap".... engineering term for protective rock on underwater bridge structures to prevent the hydrolic effects of water on the foundations.

It's "Large" crushed rock 1 to 2 feet in size with smaller rock used to fill in the gaps. The large rock is bigger than the water flow can move and slows the velocity of the water arround the foundation. with a narowing of the channel you have the water will naturally accelerate and thus the wate will tend to dig a deeper channel. So to prevent that you need the rip rap to slow the flow down and prevent the water action.

Love the pic's and awsome progress! Nice work.
 

Tractor & Equipment Auctions

Kubota M4700 4WD 51HP Utility Loader Tractor (A56857)
Kubota M4700 4WD...
2018 KOMATSU WA320-8 WHEEL LOADER (A60429)
2018 KOMATSU...
19008 (A56859)
19008 (A56859)
2019 FREIGHTLINER CASCADIA TANDEM AXLE SLEEPER (A59904)
2019 FREIGHTLINER...
1974 Ford F600 Grain Truck (A61307)
1974 Ford F600...
2013 FORD F250 (A60460)
2013 FORD F250...
 
Top