Horse barn project

/ Horse barn project
  • Thread Starter
#41  
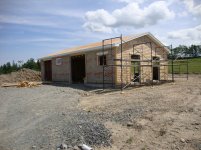
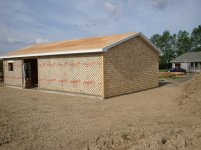
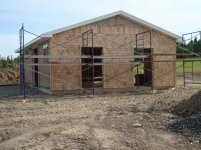
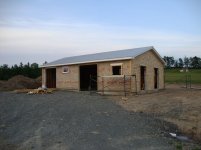
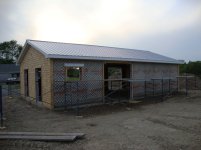
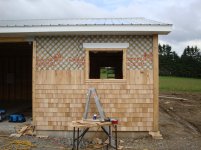
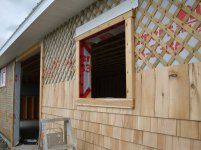
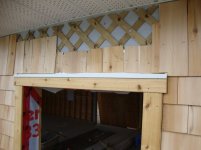
The shingling is coming along, we have both gable ends finished now, and on to the sides. The staple count is at ~ 6000-7000 so far, and 19 bundles of shingles.

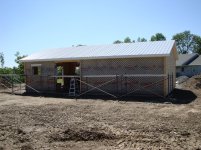
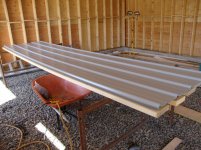
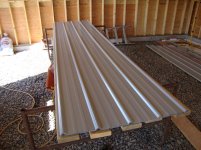
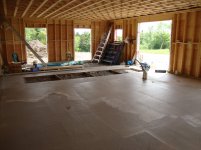
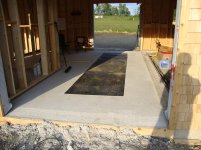
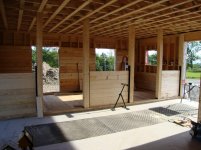
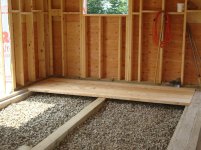
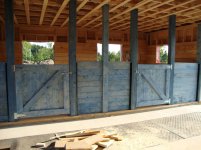
Steel for the roof is going on tomorrow if it doesn't rain, and concrete floor scheduled for next Tuesday.

Sean
 

Attachments

  • DSC01113.jpg
    DSC01113.jpg
    389 KB · Views: 148
  • DSC01112.jpg
    DSC01112.jpg
    362.2 KB · Views: 172
  • DSC01111.jpg
    DSC01111.jpg
    376.8 KB · Views: 159
/ Horse barn project
  • Thread Starter
#42  
Let's just say it rained on Saturday and leave it at that. I looked out once and there were two tabbies and a shnauzer going past the window in the deluge...

Anyway, today was a better day. We got the back half of the roof clad in steel, and part of the front this evening. Tomorrow should see it done if all goes well. We had three people this morning, just my wife and I tonight. Not an easy job for 2 people, but ok if there's no wind.

2 inch screws with a cup washer and a rubber grommet to hold the stuff down with, 50 screws per sheet. There were 15 sheets of steel in the pile (enough to do half the roof, waiting to be drilled all at the same time. 14 feet long and about 3 feet wide.

Sean
 

Attachments

  • DSC01115.jpg
    DSC01115.jpg
    281.9 KB · Views: 151
  • DSC01114.jpg
    DSC01114.jpg
    450.4 KB · Views: 186
  • DSC01116.jpg
    DSC01116.jpg
    339.9 KB · Views: 160
  • DSC01117.jpg
    DSC01117.jpg
    303.7 KB · Views: 152
/ Horse barn project #43  
Curious how you get your roofing so square. No matter what I do I usually end up with the drip edge running up or downhill a little because I can't get that first right angle laid out to start the first edge. The other thing I do is pull each sheet up or down a smidge to make up for it. I've been tempted to put two screws in first sheet then add a few more sheets to see where the edge actually ends up, then go back and adjust first sheet before screwing it down. So far I've only used metal roofing on buildings that were already falling down, or were just for horses, so I didn't put too much effort into it. If I ever built something that nice I'd want to figure out how to get things straight.
 
/ Horse barn project #44  
A chalk line is cheap. On new "square" building this will help, on an older building you might have to do some cyphering to get things figured so they'll look square.

Wedge
 
/ Horse barn project #45  
Let's just say it rained on Saturday and leave it at that. I looked out once and there were two tabbies and a shnauzer going past the window in the deluge...

Anyway, today was a better day. We got the back half of the roof clad in steel, and part of the front this evening. Tomorrow should see it done if all goes well. We had three people this morning, just my wife and I tonight. Not an easy job for 2 people, but ok if there's no wind.

2 inch screws with a cup washer and a rubber grommet to hold the stuff down with, 50 screws per sheet. There were 15 sheets of steel in the pile (enough to do half the roof, waiting to be drilled all at the same time. 14 feet long and about 3 feet wide.

Sean

Hmmm...you pre-drilled your sheets? I have never done that. Have I been doing it wrong?
 
/ Horse barn project
  • Thread Starter
#46  
Curious how you get your roofing so square. No matter what I do I usually end up with the drip edge running up or downhill a little because I can't get that first right angle laid out to start the first edge. The other thing I do is pull each sheet up or down a smidge to make up for it. I've been tempted to put two screws in first sheet then add a few more sheets to see where the edge actually ends up, then go back and adjust first sheet before screwing it down. So far I've only used metal roofing on buildings that were already falling down, or were just for horses, so I didn't put too much effort into it. If I ever built something that nice I'd want to figure out how to get things straight.

The sheets came the exact length we needed (special order), we cut off one edge to get enough to screw down without having a rib at the very edge. We used Duchesne steel roof, TR-80 profile.

Once the first piece was cut, you just align either the vertical edge with the roof rake, or the lower edge with the drip edge on the roof. You could measure from the side of the roof and snap a line up and down the roof to go by, we didn't do that though.

Luckily our roof was almost perfectly square to begin with. According to our builder friend, if it's an older roof and not square, leave about an inch hanging over to cover up sins.

If you find it's starting to "run out" as you go along, screw the bottom edge down, then muscle the top into place. The dam* stuff is like an accordion really, and flexes a LOT.

Sean
 
Last edited:
/ Horse barn project
  • Thread Starter
#47  
Hmmm...you pre-drilled your sheets? I have never done that. Have I been doing it wrong?

Yes, we pre-drilled them. Two main reasons, one being that there was no measuring once we had the sheet on the roof, just put the screws in the holes and drive 'em home.

Second reason, although the screws will go through the steel without drilling, I find they leave a sharp curl where they go through that can cut the rubber grommet as it's tightened down.

I doubt there's any right or wrong to it, just whatever works best for you.

Sean
 
/ Horse barn project
  • Thread Starter
#48  
Ok, we finished the roof and the cap last night. The cap system leaves a lot to be desired in my opinion, but it is what it is.

Apparently it's not too bad, because it rained to beat the devil here today and we had no leaks.

Concrete floor slab was poured today during the deluge, I should have pics of that either tomorrow or the next day.

Sean
 

Attachments

  • DSC01118.jpg
    DSC01118.jpg
    303.2 KB · Views: 202
  • DSC01119.jpg
    DSC01119.jpg
    276.5 KB · Views: 144
  • DSC01120.jpg
    DSC01120.jpg
    252.5 KB · Views: 179
/ Horse barn project #49  
If you find it's starting to "run out" as you go along, screw the bottom edge down, then muscle to top into place. The dam* stuff is like an accordion really, and flexes a LOT.

Sean

That's a good tip. One thing I've done is cheat a little on the overlap to get back into square.
 
/ Horse barn project #50  
Second reason, although the screws will go through the steel without drilling, I find they leave a sharp curl where they go through that can cut the rubber grommet as it's tightened down.
Sean

Big ditto on that. The only other thing I've found that helps is using a scratch awl or something similar that you can hit with a hammer and start a small hole. That also stops the creation of that little curl. But predrilling also gives a much nicer look because it's straight, especially if the pitch is steep enough that you can see the screws.
 
/ Horse barn project #51  
Ok, we finished the roof and the cap last night. The cap system leaves a lot to be desired in my opinion, but it is what it is.

Apparently it's not too bad, because it rained to beat the devil here today and we had no leaks.

Did you buy the closure strips, or make up something of your own? I tried not using them and found the wind blew snow up under there. Doesn't matter much in a barn, but if it's a heated building it would melt and be a problem.
 
/ Horse barn project
  • Thread Starter
#52  
We didn't use them at all... we had heard that they make it difficult to keep a smooth roof line and ours is sheeted in with plywood and Typar house-wrap anyway. We may have snow ingress, but unless it's a lot it won't be a problem. I'd sooner have the air circulation.

I had thought if it becomes a problem we may use some low-expansion foam and give a squirt up into each rib. Once it dries trim the excess. Another way to do it would be to lay a bead of foam on the roof deck a few inches up from the edge before you lay the sheet down.

We discussed strapping the roof with purlins vs. using 1/2" plywood, decided to go with the solid option. The guy that helped us build it mentioned that his had sweated during the winter months and recommended going with a solid deck. It also makes it pretty solid to walk around up there.

One thing I will say about the cap design, if it ever does leak, the water should follow the cap profile and run down the outside of the roof not the inside.

We ended up using 54 screws per sheet of steel, each sheet had 4 ribs and we put in screws 3 inches from the bottom, then every 16 inches up until we got to the cap. My drill thought I was trying to kill it.

Sean
 
/ Horse barn project #53  
I had thought if it becomes a problem we may use some low-expansion foam and give a squirt up into each rib. Once it dries trim the excess. Another way to do it would be to lay a bead of foam on the roof deck a few inches up from the edge before you lay the sheet down.
I made my own out of pipe insulation last time. It's that stuff that goes on 3/4" pipe to keep it from sweating. I cut it into quarters then trimmed to length in between each rib. Worked pretty good and saved a lot of money. Those closure strips cost almost as much as the panels.

We discussed strapping the roof with purlins vs. using 1/2" plywood, decided to go with the solid option. The guy that helped us build it mentioned that his had sweated during the winter months and recommended going with a solid deck. It also makes it pretty solid to walk around up there.
I also had condensation problems in the horse barn that I did with purlins. The last runin I built I put down tar paper on top of the purlins, I'm hoping that will stop the condensation. Hasn't been through a winter yet so don't know.

One thing I will say about the cap design, if it ever does leak, the water should follow the cap profile and run down the outside of the roof not the inside.
Not sure I understand. If I peek under the cap, wouldn't I be looking at the top edge of the panels? So if water blows in there, why doesn't it go under the panel?

We ended up using 54 screws per sheet of steel, each sheet had 4 ribs and we put in screws 3 inches from the bottom, then every 16 inches up until we got to the cap. My drill thought I was trying to kill it.
The instructions mine came with showed the screws right next to one side of each rib in the field, and on both sides of rib at top and bottom edge, twice as many along rake edge. I found it was hard to set the screws with the right compression on the o-ring. Took a lot of fiddling to get that right. I think the pros must have a drill with some kind of adjustable clutch.
 
/ Horse barn project
  • Thread Starter
#54  
Not sure I understand. If I peek under the cap, wouldn't I be looking at the top edge of the panels? So if water blows in there, why doesn't it go under the panel?


The instructions mine came with showed the screws right next to one side of each rib in the field, and on both sides of rib at top and bottom edge, twice as many along rake edge. I found it was hard to set the screws with the right compression on the o-ring. Took a lot of fiddling to get that right. I think the pros must have a drill with some kind of adjustable clutch.

If the water follows the cap down, it ends up on top of the panel, and would have to go uphill to get to the underside.

Generally we set ours so that the washer won't turn by hand, and the rubber is well compressed. I learned that if the hole is off-center on the rib, about the only way to get the rubber to compress evenly is to angle the screw slightly, otherwise it'll squirt out from under the washer.

Sean
 
/ Horse barn project
  • Thread Starter
#55  
The first pour of concrete is in, and the second pour to put a bottom layer under the rubber aisle mats is due this morning. I have a couple drains to put in first.

The mats are about an inch thick, and will be set into a recess in the floor.

I started shingling the front yesterday, and worked on some window trims. It's 2x4 cedar, ripped on a 5 degree bevel to fit over the shingles on the bottom and blend with the same line of the side frames, which are set into the shingles. A good table saw makes a huge difference here. I have the old portable saw I used for the house, but that one is relegated to shingle duty only now, I picked up an older Beaver table saw a few years ago for more precise work.

We did the same thing with the house window trims, turned out well enough to do a matching job on the barn.

Sean
 

Attachments

  • DSC01132.jpg
    DSC01132.jpg
    286.4 KB · Views: 244
  • DSC01130.jpg
    DSC01130.jpg
    295.9 KB · Views: 235
  • DSC01129.jpg
    DSC01129.jpg
    289.8 KB · Views: 167
  • DSC01128.jpg
    DSC01128.jpg
    252.1 KB · Views: 206
/ Horse barn project #56  
That's a really nice looking building. Its a shame to put horses into it!
Our run-in pole barn looked pretty good, too, until the horses started kicking, chewing and otherwise bashing at it; it looks pretty ratty around the edges now, though.
BOB
 
/ Horse barn project
  • Thread Starter
#57  
Their stalls are going to be pretty rugged, the exterior is more for us than them. Neither of the two we have are chewers, or kickers for that matter, not to say they won't develop the habit or we get others in time. Azz scratching is about the worse they do, so if the walls can stand 1100 lbs worth of itch we should be ok :laughing:

Where are you in PEI, Bob? We get over there infrequently, might drop in if we get the chance. Our last visit there was to the vet college with a colicky horse, I don't care to repeat that trip anytime soon.

Sean
 
/ Horse barn project
  • Thread Starter
#58  
Concrete work is finished, I did a little more work on the shingles around some of the windows, and we started framing the interior partitions this weekend.

The rubber floor matting is in place in the center aisle way, tomorrow looks like more exterior trim and shingles if the weather holds.

Sean
 

Attachments

  • DSC01133.jpg
    DSC01133.jpg
    300.8 KB · Views: 186
  • DSC01134.jpg
    DSC01134.jpg
    176.3 KB · Views: 172
  • DSC01144.jpg
    DSC01144.jpg
    308.7 KB · Views: 187
  • DSC01145.jpg
    DSC01145.jpg
    305.2 KB · Views: 179
  • DSC01146.jpg
    DSC01146.jpg
    309.6 KB · Views: 199
/ Horse barn project
  • Thread Starter
#59  
We finally finished the shingling last week, it took 37 bundles of shingles and about 12,000 staples. The interior framing is complete except for a few finishing touches on the stall walls and one more wall to board in with 1x6 tongue and groove.

We used rough 6x6 posts for the stall wall uprights, collared at the top with 2x6 and braced at the bottom with angle iron and lag bolts.

The tack room has been insulated and covered with vapour barrier, sealed with acoustic sealant and has the door installed.

The roll-up garage door is ordered, should be here in about a week or so. I have the barn door tracks, trolleys and hangers, it's soon time to start building the sliding doors.

We finished the suspended floor yesterday, tonight my wife let her horse try it out, with her in the saddle too! Hardly any deflection at all, so it's definitely strong enough. We wanted the ceiling to be high enough to ride in and out if we want to, no problems with headroom. Morgans aren't that tall (our's are about 15h 2 tall).

Things slow down a bit with only my wife and I working on it, we're expecting the electrician next week to wire it and hook up power from the house.

Sean
 

Attachments

  • DSC01162.jpg
    DSC01162.jpg
    282 KB · Views: 264
  • DSC01164.jpg
    DSC01164.jpg
    237.3 KB · Views: 144
  • DSC01165.jpg
    DSC01165.jpg
    218.5 KB · Views: 183
  • DSC01150.jpg
    DSC01150.jpg
    326.4 KB · Views: 176
  • DSC01163.jpg
    DSC01163.jpg
    267.9 KB · Views: 172
/ Horse barn project
  • Thread Starter
#60  
The stall fronts are finished, we're working on boarding in the interior walls in a few places now, dry-walling the tack room. Second coat of mud went on today, by Tuesday night we should be ready for paint.

Sean
 

Attachments

  • DSC01170.jpg
    DSC01170.jpg
    262.5 KB · Views: 602
  • DSC01171.jpg
    DSC01171.jpg
    283.6 KB · Views: 1,975

Marketplace Items

2009 CAROLINA  16FT EQUIPMENT TRAILER (A58018)
2009 CAROLINA...
2023 Unverferth 3PT 10 FT Perfecta Field Cultivator (A61307)
2023 Unverferth...
2012 VOLVO VNL (A55745)
2012 VOLVO VNL...
2020 Chevrolet Silverado 1500 4x4 Crew Cab Pickup Truck (A59230)
2020 Chevrolet...
2017 Wacker Neuson LTV6 Towable Light Tower (A56857)
2017 Wacker Neuson...
1990 International F-4900 Tri Axle Dump Truck (A59230)
1990 International...
 
Top