Welding table build

   / Welding table build #1  

CDN Farm Boy

Veteran Member
Joined
Sep 30, 2012
Messages
1,382
Location
Ottawa Ontario
Tractor
Kubota B3300SU
I got a handful of cash for Christmas and sold a 6.0L motor that I hadn't gotten around to using to buy a plasma cutter from Duncan at Everlast Canada. Still had cash leftover burning a hole in my pocket. With my birthday this past week, added cash from my wife, my folks and my mother-in-law and ordered up enough steel to build a welding table and have a couple chunks left over. Steel was ordered Thurs, delivered Friday and I started cutting today. Shipping slip says 1140 lbs. I'll measure up what is not used to calculate an accurate completed weight but it should be easily north of 900 lbs, closer to the 1000 I figure.

Overall the table will be 4 x 8 with 5' of it 1/2" plate and the other 3' will be cutting slats.
2.5" x .237 wall tubing used for top rails to accept 2" slide in accessories
2.5" x .188 wall legs
2" x .188 used for lower shelf supports

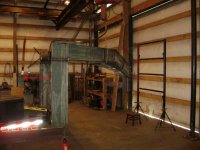
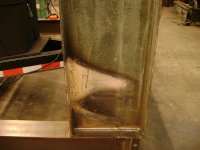
Parts cut and ready for prep and welding:

20140201_173958.jpg

(Sorry for the dark pic)

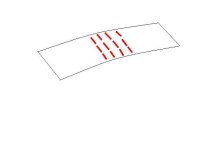
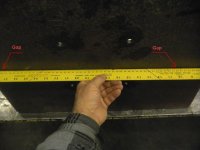
A question for you experienced welders out there, particularly those that deal with heavy plate like this on a regular basis: How flat should I expect the 4'x5' sheet of 1/2" plate to be?

I figured it would be flat. Not flat like a milled surface but flat to eye with a 4' level. I've got roughly 1/8" gap under the middle of my 4' level when checking the 5' direction. I can pull it flat with a couple big ratchet straps and blocks of 8x8 but don't think that I should have to. I'm concerned that even if I pull it straight before I weld it to the frame, when I take the straps off, it will just return to the bow and pull the frame with it, defeating the purpose of building a flat table.
 
   / Welding table build #2  
Possibly turn it over and try level again ? If it is the same , then just the shear weight is bowing it , if only supported on the edges . Possibly would need a support brace through middle in that direction .

Fred H.
 
   / Welding table build #3  
I don't have a lot of experience with this, but what I'd do is build the table with the bow up. Once the table is complete, I'd take my torch and use one of these two methods to correct the bow. ;)
 

Attachments

  • plate.JPG
    plate.JPG
    12 KB · Views: 407
  • Plate thin.JPG
    Plate thin.JPG
    17 KB · Views: 413
   / Welding table build #4  
I don't have any advice on getting the table leveled out. But that's gonna be a nice present once finished. I need to build myself a welding table soon as one would really come in handy.

Chad
 
   / Welding table build #5  
Agree with S.A. , You never stated if it bowed in opposite direction if you turned it over ? If it does , it would be much easier to bow it down than to bow it up with heat . If anything , lay it with bow up on a hard surface and drive over it ??

Fred H.
 
   / Welding table build #6  
Most of the new 1/2 plate I have encountered is dead flat from the warehouse. But then I always try to go pick one out myself. 1/2" plate with a bow in it is tough to straighten as it is probably stretched. I would get a piece of H beam, probably 6-8" and put as a strong back under the center at right angle to the bow. Get the plate pushed down tight to the beam, get innovative and figure a means to do that as there are many ways I can think of, put a series of tacks 2" long about 8" apart . That should hold it pretty flat. You will probably never get it dead flat like my smaller one is.

Ron
 
   / Welding table build #7  
I don't see why the 2.5"X .237wall tube frame wouldn't hold it mostly flat if you get it pulled tight and weld it in place. If it doesn't keep it straight do like Shield Arc said, he knows his stuff about heat straightening. Or you could get a few lengths of .25" X 2" and run them vertical to the plate down the length. That combined with the tube should hold it.
 
   / Welding table build #8  
The weight could possibly make it bow but are you building a frame the plate welds to? I made a 4' x 8' x 1/2" table but made a base out of 3" channel iron with a cross member in the middle. The frame is back 8" or so from the edge. I had it figured out so I only needed to buy one length of channel. I just made sure the base was flat and then pulled the 1/2" plate tight to the base. Then I stitch welded it. I think I put 2" welds on 6" or 8" centers so it wouldn't get too hot and warp the plate. It's not perfectly flat but close enough for anything I'd ever need. I used 1 1/2" sq. tubing for the legs and welded 1 1/8"(?) nuts on the bottom. Then I welded a piece of ready rod to 3/8" plates to attach 1000 LB. capacity locking swivel casters. I mounted a tubing bender on the table and needed to make sure the table was level. With the casters on the ready rod, I can easily roll the table around and level it. I put jam nuts on the ready rod so I can lock it in place when it's level. I cut a wrench out of 1/2" plate to adjust the casters. I welded nuts onto the ready rod before welding them onto the plates. This gives me an easy way to use my wrench for adjusting the table for level. The table weighs about 1000 lbs.
 
   / Welding table build
  • Thread Starter
#9  
Its definitely the plate that is bowed. It's currently supported on the ends and the bow is up. The frame material stacked on top as on the pic did nothing to change it.

The main frame will be set back 2" from the edge for clamping. Using 2" x 3/16 for the cutting slats, I'll have 1 1/2" square crossers to set the 1/2" plate at the same height
 
   / Welding table build
  • Thread Starter
#10  
I also have two 6" 700lbs fixed wheels that will be mounted on the bottom of the legs on the cutting end with solid legs on the table end. Should give the best combination of stable and portable. Going to put a hitch on the table end so I can move it with either the fel or 3pt hitch

I hadn't planned on any adjustment to the legs at this point as I only have gravel floor in the shop and won't likely have concrete for a while yet. I figured I could add adjustment when the time comes. Perhaps that is being short sighted and I should do it now?
 
   / Welding table build #11  
The theory of heat shrinking is easy, the trick is how much heat to apply. Sometimes you end up chasing your tail when doing it! :laughing:
 

Attachments

  • Heat shrink 2 gap.jpg
    Heat shrink 2 gap.jpg
    80 KB · Views: 290
  • Heat shrink 3.JPG
    Heat shrink 3.JPG
    237.4 KB · Views: 303
  • Heat shrink spray.JPG
    Heat shrink spray.JPG
    225.8 KB · Views: 311
  • Beam 1.JPG
    Beam 1.JPG
    220.8 KB · Views: 341
  • Beam 2.jpg
    Beam 2.jpg
    161.3 KB · Views: 325
   / Welding table build #12  
Shield Arc,
Please explain what you're doing and why in the drawings in post 3 and the photos in post 11. I want to make sure I understand.
 
   / Welding table build #13  
Well some people think it's voodoo,:laughing: but it's really simple! When you heat steel it expands, when it cools it contracts further than it was originally, the water just speeds up the cooling / contracting.;)
 
   / Welding table build #14  
If your plate was sheared from the steel supplier the application of small amounts of heat will not work. The shearing action sets up stresses along the edges and into the plate making the heating method not work. If it was torched it will work fine. You can even flatten 6" thick pcs. You can cool the heat with water or air. Air is slower but makes less mess.
 
   / Welding table build #15  
Shield Arc,
Please explain what you're doing and why in the drawings in post 3 and the photos in post 11. I want to make sure I understand.[/QUOT
In post 3, the lines and dots represent places you've applied heat with the torch and when those spots cool, they'll contract more than they've swelled and draw the ends of the steel upward and the places where heat was applied downward, is that correct?
 
   / Welding table build #16  
Stuckmotor, yes that's how it works. I have never done that myself, but ShieldArc has posted about it enough I think I could do it :D Hey SA, how long did it take to learn you could bend steel like that after you invented fire? :laughing: ... Oh wait, forgot no picking on the old guys..
 
   / Welding table build #17  
The theory of heat shrinking is easy, the trick is how much heat to apply. Sometimes you end up chasing your tail when doing it! :laughing:
In the third photo, that must be a pump type spray bottle in your hand. At first I thought you were applying heat with a plasma cutter and couldn't figure out why you weren't wearing a glove.
The final two photos have me stumped. Is the red arrow pointing at something or showing the direction you are drew the metal? Is the final photo the result of your work?
I ask all these questions because I keep a list of links with pointers on metal working. If the link to this one is labeled with your name, I'll know it's expert information.
Thanks,
Stuck
 
   / Welding table build #18  
SquirmyPug,
I've drawn a fair amount of metal with heat, the problem is, it wasn't all intentional. :confused:
 
   / Welding table build #19  
SquirmyPug,
I've drawn a fair amount of metal with heat, the problem is, it wasn't all intentional. :confused:

I've done the same, it seems to be easy though, just got to take your time. Usually when I'm using a torch to heat something its to bend it with force, not the heat.
 
   / Welding table build #20  
A type of heat shrinking is used all the time for straightening things like oilfield skids. The skids get bowed from welding the checker plate on. All you have to do is flip the skid upside down and place blocks at the 4 corners. Then you heat across the main I beam cross members (usually about 4) and let it cool. The weight of the skid will let it settle till it's pretty flat. If it needs more you can some weight or a wet rag or water mist to get it to move a little more. I'm real rusty on the subject but I think as long as the steel is under the lower critical temperature, the water won't affect it.

Shield Arc, you should post the pictures of the I beams that were curved with heat in the Procedure Handbook. I'm sure that takes some expertise to do but very impressive they could get them the same.
 

Tractor & Equipment Auctions

2020 John Deere 1025R MFWD Compact Tractor (A56438)
2020 John Deere...
2006 Heil Tanker Trailer Heavy Duty 65K GVWR Tank Trailer (A56438)
2006 Heil Tanker...
SHOP BUILT TOOL TRAILER (A58214)
SHOP BUILT TOOL...
2025 Ford Transit Cargo Van (A56858)
2025 Ford Transit...
Bush Hog 72in Rotary Brush Cutter Tractor Attachment (A55852)
Bush Hog 72in...
2016 FREIGHTLINER CASCADIA TANDEM AXLE SLEEPER (A59905)
2016 FREIGHTLINER...
 
Top